

Create HyperStandby Task
On this page
Hyper-V Host
-
Launch the [Create vStandby Task] wizard and the information of the backup image file is displayed.
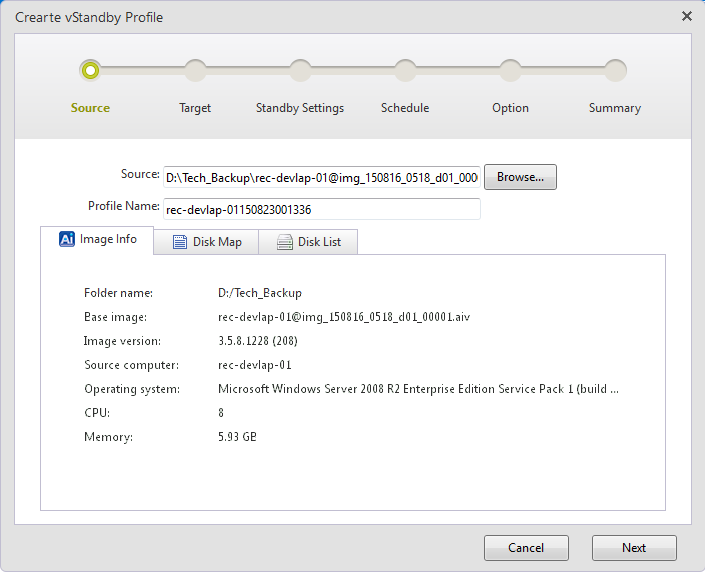
Click the [Disk Map] tab to display the disk map of the source backup image files.
The backup image files created by using HyperBack are not displayed.
Click the [Disk List] tab to display the information of disk size, used space, format type, etc.
Some of the information is not displayed for the backup images created by using HyperBack.
Click [Next].
-
Select [Hyper-V] for the target host in [Select Target] and click [Connect]. When using Hyper-V on remote computer, please ensure that Administrative Share is enabled on the managed remote computer.
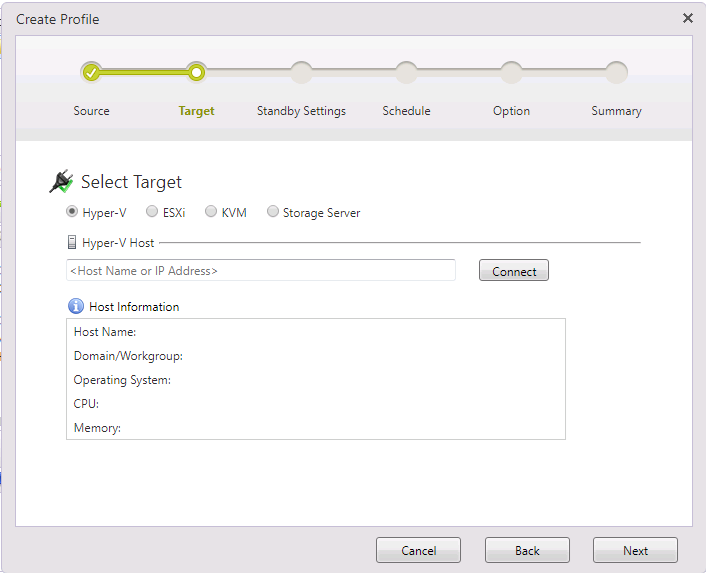
Please enter login credentials for the Hyper-V host. If creating more standby VMs on the Hyper-V host, check on the box to [Save Credentials] so that login credentials are no longer required. To establish connection to the Hyper-V host, log in as administrator or domain administrator of the connected host. If a local Hyper-V host is selected as the target, click <host name or IP address> and select [This machine (localhost)]. When connection to the Hyper-V host is successfully established, the host information is displayed as follows.
Click [Next].
-
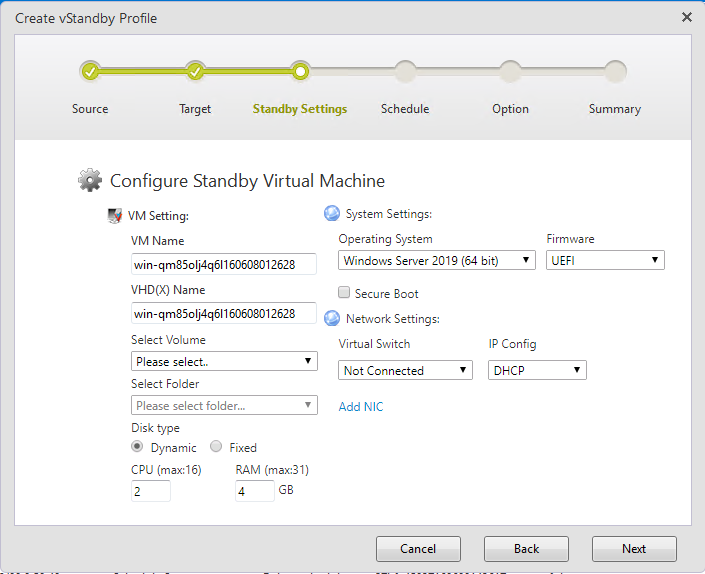
Configure the settings the standby VM in [Configure Standby Virtual Machine] window.
-
Virtual Machine Setting
-
VM Name
The name of standby virtual machine to create. -
VHD(X) Name
Virtual hard disk name of the standby VM. -
Select Volume Specify a target volume on Hyper-V host to create the virtual hard disk or a mount point for CSVFS volume.
-
Select Folder Select a folder to restore in the selected volume. A new folder may be created.
-
Disk Type
-
Dynamic Depending on the size of the data virtual machine guest OS writes on the file, the file size expands dynamically.
-
Fixed The same capacity as the virtual disk size is reserved on the physical disk at the beginning.
-
-
CPU
A specified number of virtual CPUs is assigned for the standby VM. -
RAM
A specified amount of memory is allocated to the standby VM. -
SecureBoot
When enabled, SecureBoot is enabled on the created standby virtual machine.
-
-
System Setting
OS and firmware of the backup source machine is automatically selected from the image information.If the selected value is not correct, please enter the corresponding OS and the firmware.
-
Network Setting
-
Virtual Switch Use the drop-down menu to assign the preferred network for the standby virtual machine.
-
IP Config
Assign the IP configuration for the virtual machine as static or DHCP.Only DHCP is selectable for creating a standby VM of a Linux OS.
-
-
-
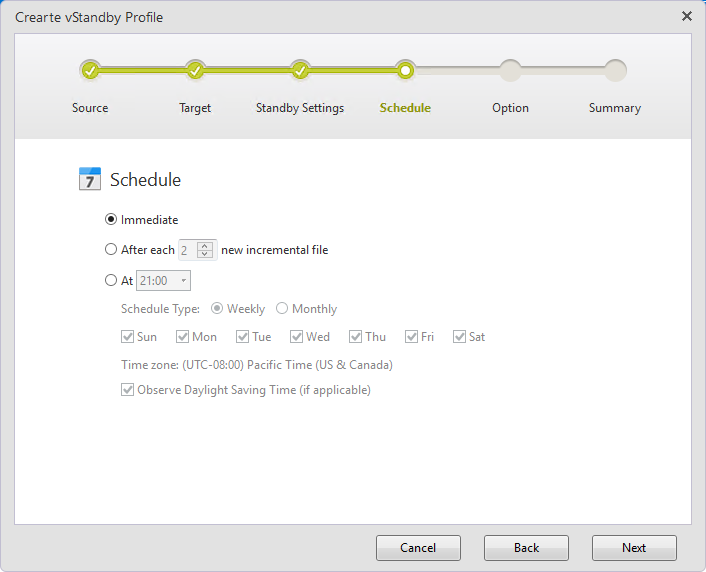
Please configure the settings for the intervals to create standby VMs and boot points.
-
Schedule
-
Immediate Upon creation of ActiveImage Protector backup image file, the task is executed.
-
After each xx new incremental file When the predefined number of image files are created, the task is executed.
-
At xx The task is executed at the specified day and time.
-
Click [Next].
-
-
Please configure the option settings.
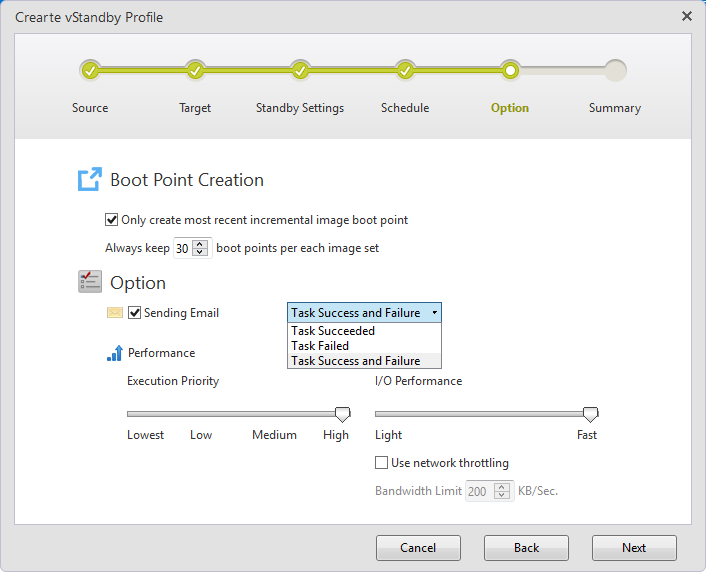
-
Boot Point Creation
-
Always keep xx boot points per each image set Specify the number (up to 30) of boot points to keep (up to 30). When the specified number of boot points are created, the oldest and the second oldest boot points are merged.
-
Only create most recent incremental image boot point Upon execution of a task, a boot point is created for the latest image file.
-
-
Options
-
Sending Email Check the box to be notified via email of a completed task execution or the result of task execution.
-
Execution Priority Please select a level of a task execution priority.
-
I/O Performance Please select a level of I/O performance.
-
Use network throttling Network bandwidth limit can be specified for [Bandwidth Limit xx KB/Sec].
-
Click [Next].
-
-
Go to [Summary] page and review the configured settings. Click on the expansion button to review the settings. To complete the settings click [Finish] button.
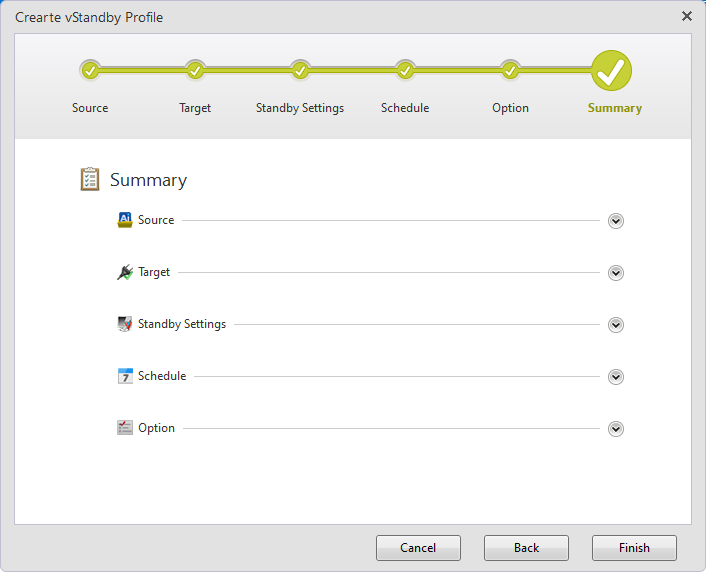
Clicking [Cancel] goes back to the wizard. Click [Finish] and the profile and the standby VM will be created.
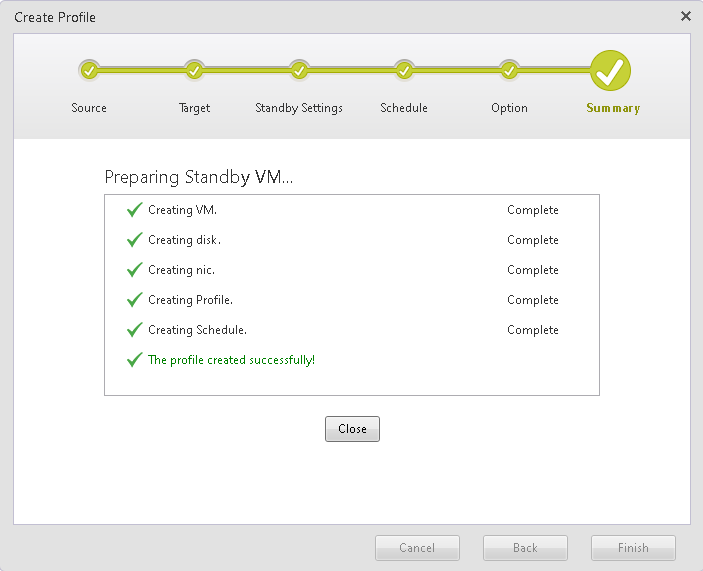
Clicking [Cancel] goes back to the wizard. Click [OK] and the profile and the standby VM will be created.

Click [Close].
After virtual conversion to CSVFS, for the required operating procedures on the conversion target cluster node, please refer here “Restore to CSVFS volume / post-conversion processing”.
ESXi
-
When [Create vStandby Task] is launched, the source backup image files are listed.
Click [Disk Map] tab and the disk map of source backup image files is displayed.
The backup image files created by using HyperBack are not displayed.
Click [Disk List] and the information including disk size, the used space, format type is displayed.
The some of the backup image files created by using HyperBack are not displayed.
Click [Next].
-
[Select [ESXi] for the target host in [Select Target], specify the host name or IP address for the host and click the [Connect] button.
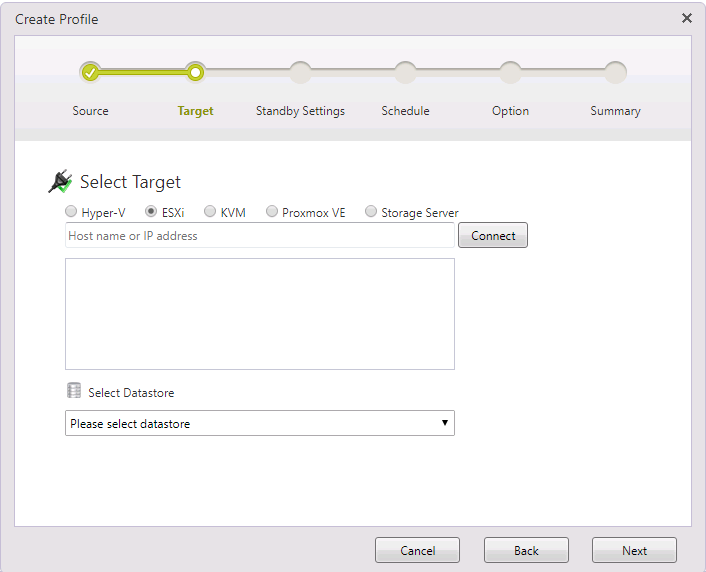
Enter the login credentials for the ESXi host. To create more standby VMs on the ESXi host, check on the box for [Save Credentials], so that login credentials are no longer required. Upon a successful connection to the ESXi host, please select a datastore from the drop-down list as the destination to save the created VMDK files.
Click [Next].
-
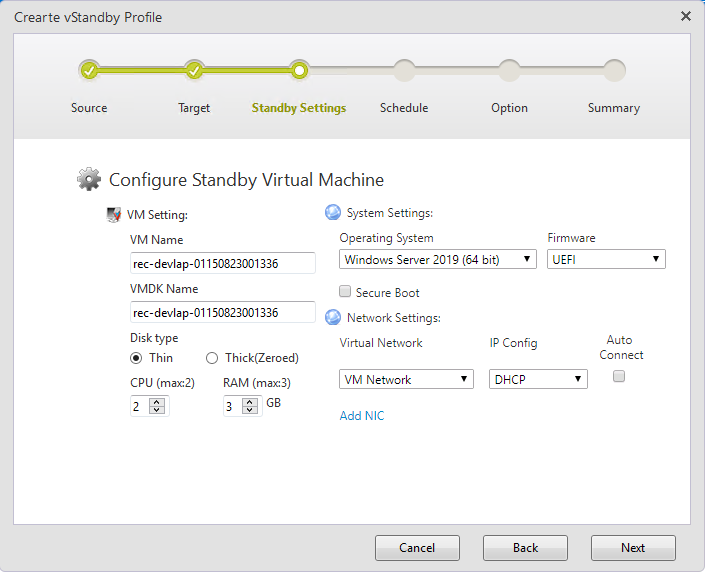
Configure the VM settings in [Configure Standby Virtual Machine].
-
Configure Standby Virtual Machine
-
VM Name Specify a name for the newly created standby virtual machine.
-
VMDK Name Virtual hard disk name of the standby VM.
-
Disk Type
-
Thin - Depending on the size of the data virtual machine guest OS writes on the file, the file size dynamically expands.
When [ESXi] is selected, you cannot select Thin.
-
Thick (Zeroed) - The same capacity as the virtual disk size is reserved on the physical disk at the beginning.
-
-
CPU
A specified number of virtual CPUs is assigned for the standby VM. -
RAM A specified amount of memory is allocated to the standby VM.
-
SecureBoot
When enabled, SecureBoot is enabled on the created standby virtual machine.
-
-
System Setting
OS and firmware of the backup source machine is automatically selected from the image information.If the selected value is not correct, enter the appropriate OS and the firmware.
-
Network Setting
-
Virtual Network Use the drop-down menu to assign the preferred network for the standby virtual machine.
-
IP Config Assign the IP configuration for the virtual machine as static or DHCP.
Only DHCP is selectable for creating standby VM of Linux OS.
-
Auto Connect Booting the OS establishes network connection.
-
Add NIC A multiple number of additional network adapters can be assigned to the SVM.
-
Click [Next].
-
-
Configure the frequency intervals at which boot point snapshots are to be taken.
-
Schedule
-
Immediate Upon creation of ActiveImage Protector backup image file, the task is executed.
-
After each xx new incremental file When the predefined number of image files are created, the task is executed.
-
At xx The task is executed at the specified day of week/month and time.
-
Click [Next].
-
-
Configure option settings.
-
Boot Point Creation
- Only create most recent incremental image boot point Upon execution of a task, a boot point is created for the latest image file.
- Always keep xx boot points per each image set Specify the number (up to 30) of boot points to keep. When the specified number of boot points are created, the oldest and the second oldest boot points are merged.
-
Options
-
Sending Email Check the box to be notified via email of a completed task execution or the result of task execution.
-
Execution Priority Please select a level of a task execution priority.
-
I/O Performance Please select a level of I/O performance.
-
Use network throttling Network bandwidth limit can be specified for [Bandwidth Limit xx KB/Sec].
Click [Next].
-
-
-
Review the configured settings. Click on the expansion button to review the settings.
Please click [Finish] button. The following [Confirm] dialog is displayed.
Clicking [Cancel] goes back to the wizard. Click [OK]. Standby virtual machine and the profile will be created.

Click [Close].
KVM
-
Launch Create vStandy Profile wizard. The information of the source backup image file is displayed.
Click [Disk Map] tab to display the disk map of the source backup image file.
[Disk Map] is not available for the backup image file created by using HyperBack.
Click [List of Disks] to display the information including the disk size, used size, format type, etc.
Some of the information is not available with the backup image created by using HyperBack.
Click [Next].
-
Select KVM for [Select Target], select [KVM Host] and click [Connect] button.
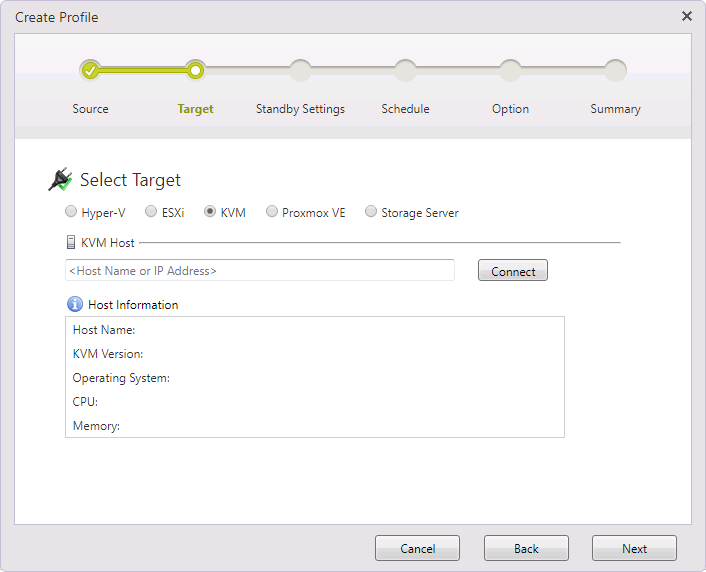
Enter credentials to log in KVM host. When you will create other standby VM on this host, check the box for [Save Credentials] so that login credentials are no longer required.
When the connection to the host is successfully established, the datastore is listed in the dropdown list. Select the datastore as the destination saving the converted data.When establishing the connection to KVM host, you need to enter root account information. You also need to allow SSH access as root on the Linux host.
Please make sure the following are installed on Linux host. Also, please configure your firewall to allow port 3260 for iSCSI-target service.
RHEL series targetcli
Debian, Ubuntu targetcli-fbClick [Next].
-
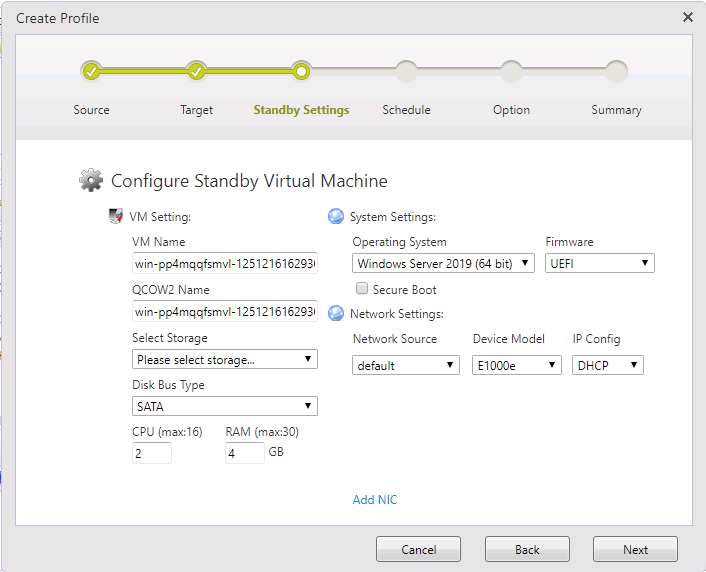
Configure the following settings for [Configure Standby Virtual Machine].
-
Configure Virtual Standby Machine
-
VM Name
Specify the name of standby virtual machine to create. -
QCOW2 Name
Specify the hard disk name of standby virtual machine to create. -
Disk Bus Type Specify the virtual disk bus type.
-
CPU
Assign the number of CPUs for the standby VM. -
RAM Specify the amount of memory allocated to the standby VM.
-
SecureBoot
When enabled, SecureBoot is enabled on the created standby virtual machine.
-
-
System Settings
The OS of the backup source system and firmware are automatically selected from Image Information.When incorrect value is selected, please specify the corresponding OS and firmware.
-
Network Settings
-
Network Source Select the network source to use.
-
Device Model Select the device model to use.
-
IP Config
Select DHCP or Fixed for IP address. -
Add NIC
Select this to add multiple NICs.
-
Click [Next].
-
-
Configure the settings to create boot points.
-
Schedule
-
Immediate
After creating a backup image file by using ActiveImage Protector, the task is executed. -
After each xx new incremental file Backup task is executed when the specified number of incremental files are created.
-
At xx
The task is executed at the specified time on the specified day of a week or monthly.
-
Click [Next].
-
-
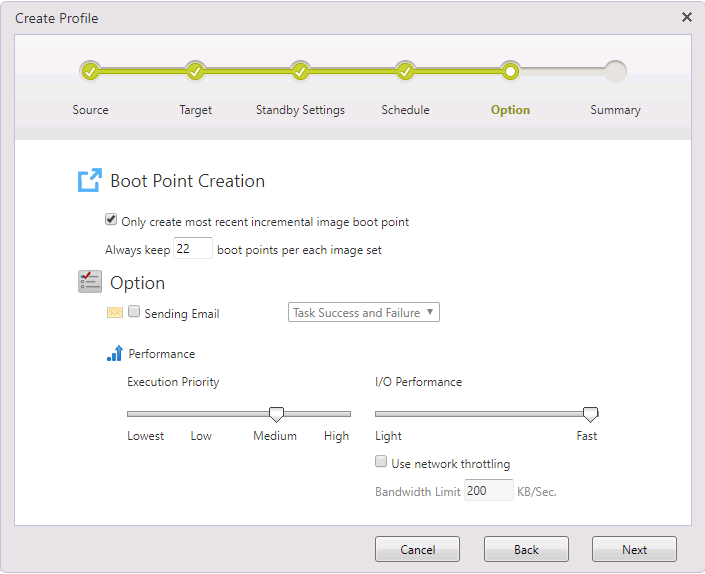
Configure the Option settings.
-
Boot Point Creation Specify the maximum limit for the number of boot points to create virtual standby replicas (up to 22). When the number of the boot points reaches the predefined limit, the most and the second most obsolete boot points are merged. When enabling [Only create most recent incremental image boot point] option, one task creates only one boot point based on the latest incremental image file.
-
Option
-
Sending Email
Configure to send email notification of a task completed with the specified task status or upon task completion. -
Execution Priority Set the CPU priority level for the task execution priority.
-
I/O Performance
Throttle the network I/O performance. -
Use Network Throttling
Check the box to enable [Use Network Throttling] option. Define the the maximum throughput in KB/second allowed to access the target host.
-
Click [Next].
-
-
Use the Summary window to review the configuration and options. By clicking the expand button for each section, you can view the detailed configuration settings.
Review the configured settings. To complete the settings click [Finish] button. The following dialog will be displayed.
Click [Back] to go back to the wizard.
Click [Finish] to create standby VM and profile.
Click [Close].
Proxmox
-
Launch Create vStandy Profile wizard. The information of the source backup image file is displayed.
Click [Disk Map] tab to display the disk map of the source backup image file.
[Disk Map] is not available for the backup image file created by using HyperBack.
Click [List of Disks] to display the information including the disk size, used size, format type, etc.
Some of the information is not available with the backup image created by using HyperBack.
Click [Next].
-
Select Proxmox for [Select Target], select [Proxmox Host]and click [Connect] button.
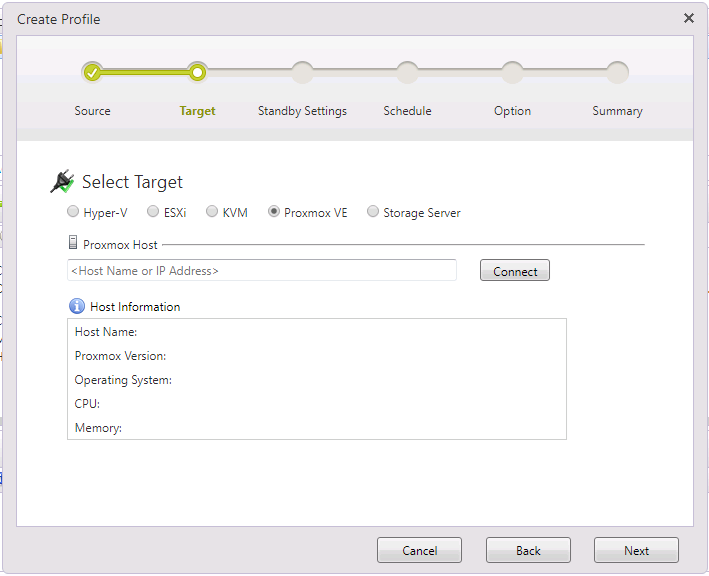
Enter credentials to log in Proxmox host. When you will create other standby VM on this host, check the box for [Save Credentials] so that login credentials are no longer required.
When the connection to the host is successfully established, the datastore is listed in the dropdown list. Select the datastore as the destination saving the converted data.Click [Next].
-
Configure the following settings for [Configure Standby Virtual Machine].
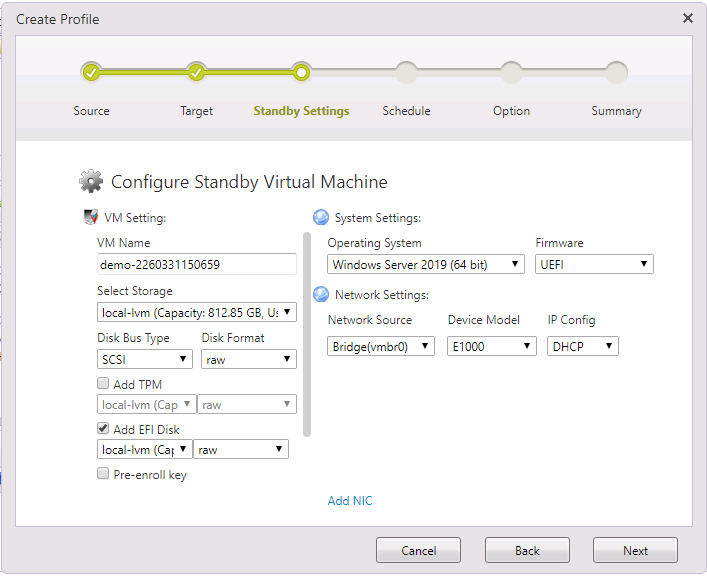
-
Configure Virtual Standby Machine
-
VM Name
Specify the name of standby virtual machine to create. -
Select Storage
Specify the destination storage on Proxmox host for the created virtual hard disk.Depending on the storage type or Proxmox version, rollback to the specified snapshot may be limited. You are recommended to verify that creating a snapshot and rolling-back to a specific snapshot is allowed on a virtual machine configured on the specified storage.
-
Disk Bus Type/Disk Format Specify the virtual disk bus type and format.
-
CPU
Assign the number of virtual CPUs for the standby VM. -
RAM
Specify the amount of memory allocated to the standby VM.You can add TPM or EFI disks as needed.
When creating a virtual standby replica with SecureBoot enabled, you are recommended to add an EFI disk with [Standard Distribution Key] enabled. If not enabling, SecureBoot is disabled on the created virtual standby replica.
-
-
System Settings
OS and firmware of the backup source machine is automatically selected from the image information.If the selected value is not correct, enter the appropriate OS and the firmware.
-
Network Settings
-
Network Source Select the network source to use.
-
Device Model Select the device model to use.
-
IP Config
Select DHCP or Fixed for IP address. -
Add NIC
Select this to add multiple NICs.
-
Click [Next].
-
-
Configure the settings to create boot points.
-
Schedule
-
Immediate
After creating a backup image file by using ActiveImage Protector, the task is executed. -
After each xx new incremental file Backup task is executed when the specified number of incremental files are created.
-
At xx
The task is executed at the specified time on the specified day of a week or monthly.
-
Click [Next].
-
-
Configure the Option settings.
-
Boot Point Creation Specify the maximum limit for the number of boot points to create virtual standby replicas (up to 22). When the number of the boot points reaches the predefined limit, the most and the second most obsolete boot points are merged. When enabling [Only create most recent incremental image boot point] option, one task creates only one boot point based on the latest incremental image file.
-
Option
-
Notification
Configure to send email notification of a task completed with the specified task status or upon task completion. -
Execution Priority Set the CPU priority level for the task execution priority.
-
I/O Performance
Throttle the network I/O performance. -
Use Network Throttling
Check the box to enable [Use Network Throttling] option. Define the the maximum throughput in KB/second allowed to access the target host.
-
[Click [Next].
-
-
Use the Summary window to review the configuration and options. By clicking the expand button for each section, you can view the detailed configuration settings.
Review the configured settings. To complete the settings click [Finish] button. The following dialog will be displayed.
Click [Cancel] to go back to the wizard. Click [OK] to create standby VM and profile.
Click [OK] to create standby VM and profile.
Storage Server
-
Launch the [Create vStandby Task] wizard and the information of the source backup image file is displayed.
Click [Disk Map] tab to display the disk map for the source backup image.
The backup image files created by using HyperBack are not displayed.
Click the [Disk List] tab to display the information of disk size, used space, format type, etc.
Some of the information in Disk List is not displayed for the backup images created by using HyperBack.
Click [Next].
-
Select [Storage Server] in [Select Target] and select a target.
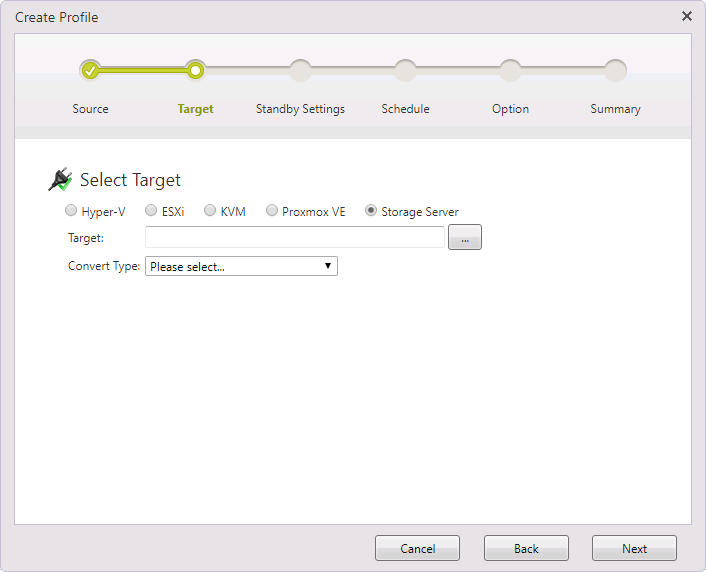
-
Target Specify the location to save the created virtual disks.
-
Convert Type Select the virtual disk type to create, i.e., VMDK for VMware products or VHD/VHDX for Microsoft Hyper-V products.
Click [Next].
-
-
Configure the settings in the following dialog, depending on the Convert Type selected.
VMware products (VMDK)
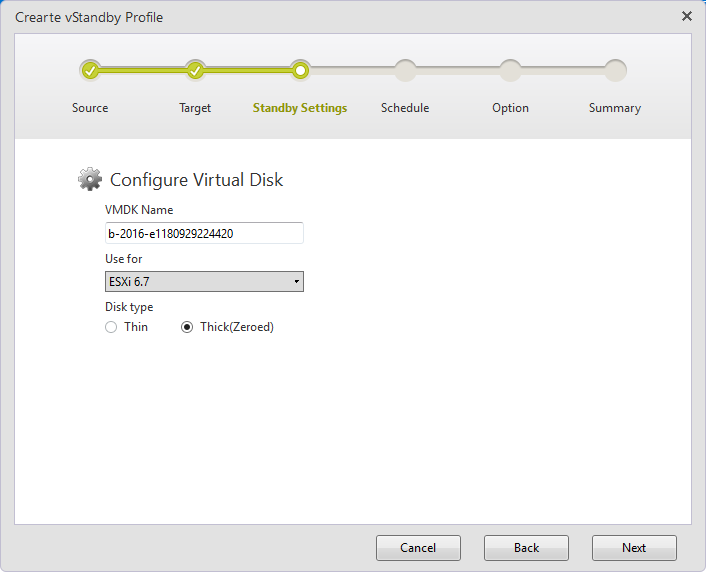
-
VMDK Name Specify a unique name.
Double-byte characters are not allowed to use.
-
Use for Select the product to use the converted virtual disk.
-
Disk Type
-
Thin Depending on the size of the data virtual machine guest OS writes on the file, the file size dynamically expands.
-
Thick (Zeroed) The same capacity as the virtual disk size is reserved on the physical disk at the beginning.
-
System Setting - OS and firmware of the backup source machine is automatically selected from the image information.
If the selected value is not correct, enter the appropriate OS and the firmware.
-
Microsoft Hyper-V (VHDX/VHD)
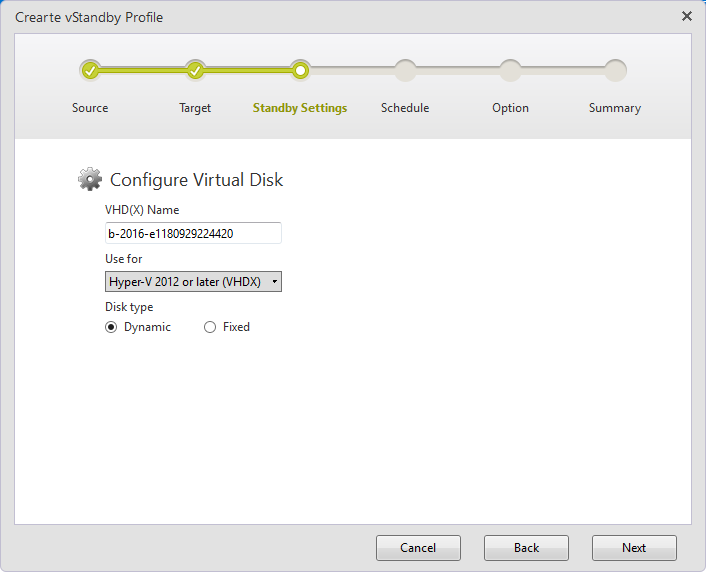
- VHD(X) Name Specify a name.
Double-byte characters are not allowed to use.
-
Use for Select the product to use the converted virtual disk.
-
Disk Type Select [Dynamic] or [Fixed].
-
System Setting OS and firmware of the backup source machine is automatically selected from the image information.
If the selected value is not correct, enter the appropriate OS and the firmware
Click [Next].
-
-
Please configure the schedule settings to create boot points
-
Schedule
-
Immediate Upon creation of ActiveImage Protector backup image file, the task is executed.
-
After each xx new incremental file When the predefined number of image files are created, the task is executed.
-
At xx The task is executed at the specified day / time.
-
Click [Next].
-
-
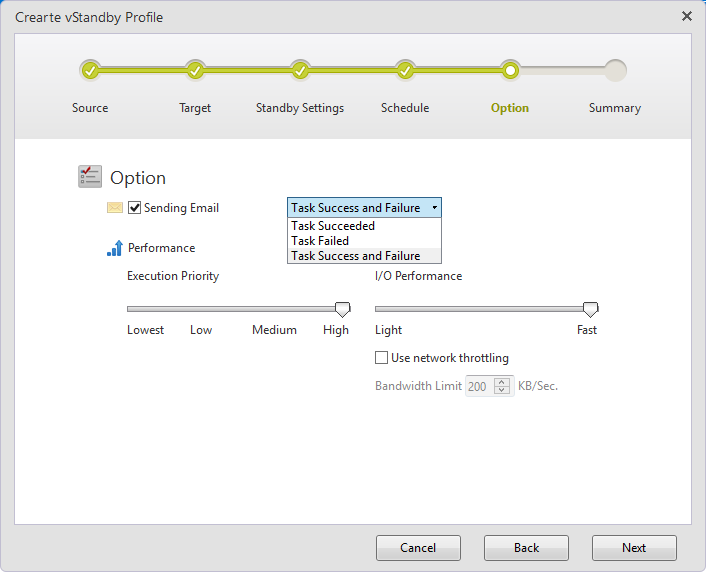
Configure the option setting.
-
Boot Point Creation
-
Always keep xx boot points per each image set Specify the number (up to 30) of boot points to keep (up to 30). When the specified number of boot points are created, the oldest and the second oldest boot points are merged.
-
Only create most recent incremental image boot point Upon execution of a task, a boot point is created for the latest image file.
-
-
Options
-
Sending Email Check the box to be notified via email of a completed task execution or the result of task execution.
-
Execution Priority Please select a level of a task execution priority.
-
I/O Performance Please select a level of I/O performance.
-
Use network throttling Network bandwidth limit can be specified for [Bandwidth Limit xx KB/Sec].
-
Click [Next].
-
-
Click on the expansion button to review the settings. To complete the settings, please click on [Finish] button.
Virtualization Procedures
To use the created VMDK/VHD(X) file, follow these virtualization procedures.
-
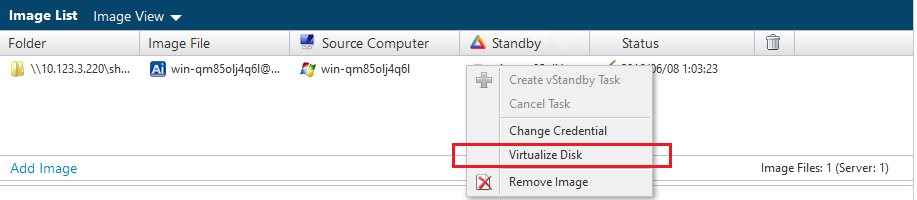
Select, right-click on a file from the list and click on [Virtualize Disk] in the menu.
-
Click the [Yes] button in the following dialog box.
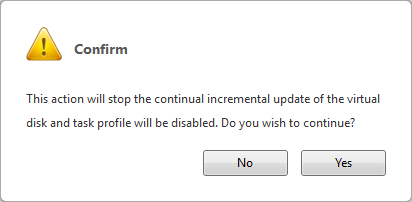
Once the process completes, be aware that the scheduled incremental backup tasks will be disabled.
When the process successfully completes, the items on the [Profile] tab are grayed out and only [Delete Profile] is active to select. -
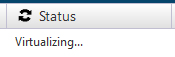
Virtualization process is in progress.
-
Upon completion of the virtualization process, VMDK/VHD(X) file is now usable.