Recovery
An entire disk, a specific volume, or a selected file may be restored from a backup.
Before using a tape device, please refer here for more detailed information.
Volume Recovery
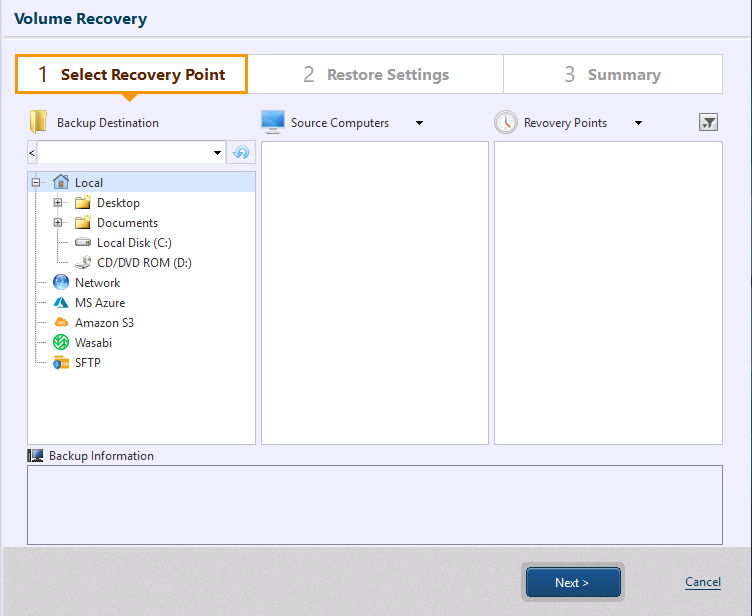
Step 1: Select Recovery Point
Specify the folder in which the backup files are located, host and recovery point.
When the information of the tape drive is not correct, click [Refresh] button.
The information of the selected recovery point is displayed in [Backup Information].
Click [Next].
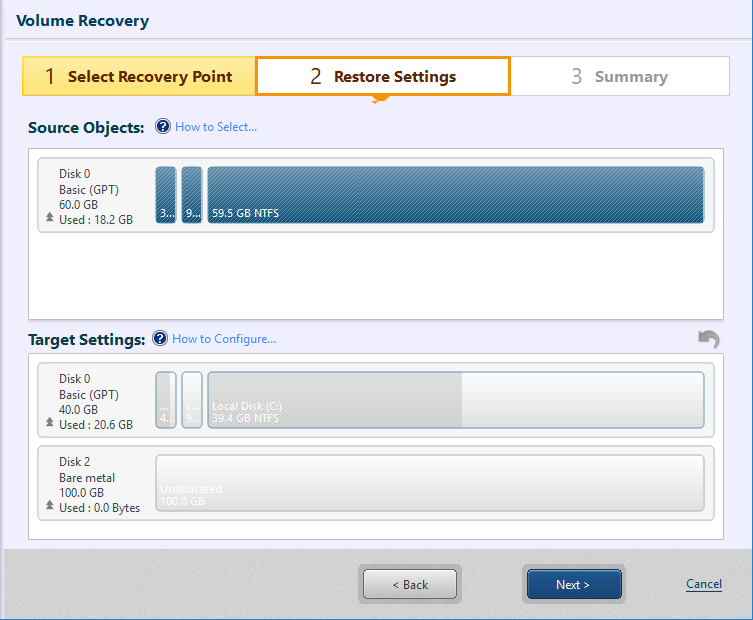
Step 2: Select Restore Target
The disk selected with Step 1 is displayed under [Recovery Item:]. Drag and drop the item (a disk or a volume) to the restore target disk. You can also right-click on the restore source and select the target.
-
The following are the limitations when using Agentless backup images created by HyperBack.
- The information of volumes are not displayed in Disk Map.
- Only an entire disk may be restored from a backup.
- When restoring to a disk larger than the backup source disk, restoring in proportional expansion of each volume is not supported. Each volume will be restored in the original size.
- When restoring data disk in boot environment, the restored system will be offline in the environment where SAN policy such as server OS is enabled.
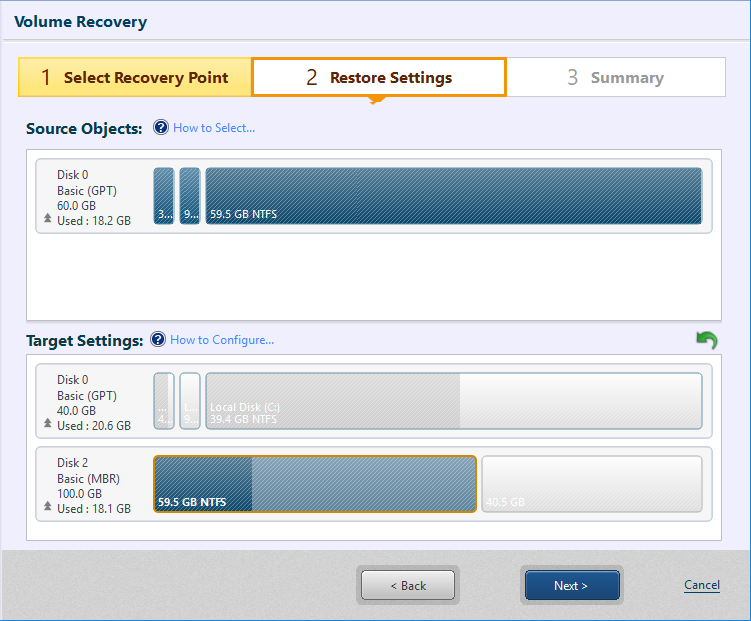
For example, 59.5GB volume displayed in [Recovery Item:] is selected to restore to the unallocated space in disk 1 displayed at the bottom of the window.
When overwriting to restore to an existing basic volume in a Linux boot environment, please make sure the target volume is unmounted. To unmount the target volume please go to [Utilities] - [Mount (Local)] and select the target volume to unmount. Since restoring a logical volume or restoring in extended size is not supported, please run Restore Disk task.
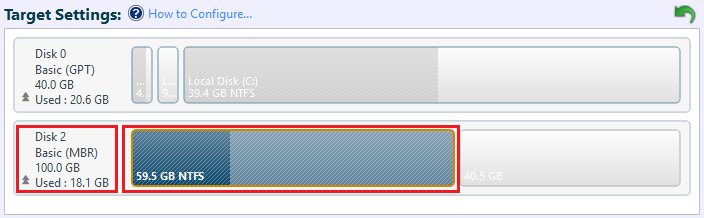
Target Settings
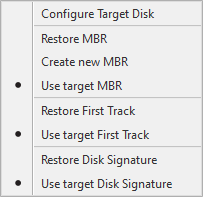
Right-click on the disk information of the restore target disk and disk restore options are displayed in the menu to restore MBR, First Track, Disk Signature.
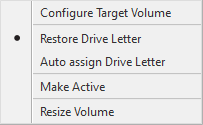
Right-click on a volume of the restore target disk and the volume restore options are displayed in the menu to restore drive letter, activate the boot partition, change volume size (to the specified size).
The volume size of the restore target can be adjusted by dragging the right edge of the volume.
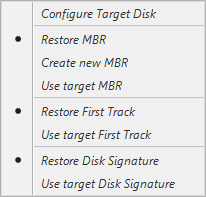
Configure Target Disk
-
MBR
The MBR (master boot record) is contained in the first sector of the hard disk drive. Master boot record consists of master boot code and partition table.-
Restore MBR Select this option to restore the master boot record in the backup.
-
Create new MBR Select this option to create Windows standard MBR.
-
Use target MBR The MBR of the destination is used.
-
-
First Track
First track represents the 63 sectors at the beginning of disk drive. ActiveImage Protector excludes the first sector (MBR) and restores the subsequent 62 sectors. (As for a GPT disk, partition table is also excluded.) Some boot loader may need the data for booting up the system.-
Restore first track First track of the backup is restored.
-
Use target First Track First track of the destination is used.
-
-
Disk signature
Disk signature is used for Windows OS to identify physical disk.-
Restore Disk Signature Disk signature of the backup is restored.
-
Use target disk signature Disk signature of the destination is used.
When restoring a connected backup disk to enlarged size, please enable [Use target disk signature] option. When restoring by enabling [Restore Disk Signature] option, the task fails in Error -999.
-
Volume Restore
-
Drive Letter
You can specify how to handle the drive letter assigned to the volume to restore.-
Restore Drive Letter The drive letter assigned to the backup is restored.
-
Auto assign Drive Letter Drive letter is automatically assigned to the restored volume.
-
-
Make Active To restore the boot partition, the partition is activated.
-
Resize Volume If a larger or smaller volume is selected as restore destination, you can select one of the following options to restore the volume in the reduced size or an extended size.
For operating procedures on how to restore a volume in reduced size, please refer here.
Others
Enable [Ignore checksum error] to ignore a checksum error that occurred with a backup and continue the process.
Enable [Post-restore process] to execute the post-restore process upon completion of a restore task.
Additional Options
-
Initialize Disk
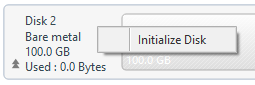
If restore target disk is bare metal disk, the disk may be initialized. If a restore by volume is performed to a bare metal disk, please make sure that the disk is initialized. Right-click on the disk information on the disk, context menu is displayed.This feature is not provided in Linux boot environment.
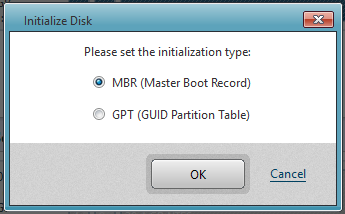
Please select the disk initialization type.
-
Create Partition
The available space may be partitioned if necessary. Right-click on the space to display the context menu.
Enter the volume size in [Create Partition] dialog.
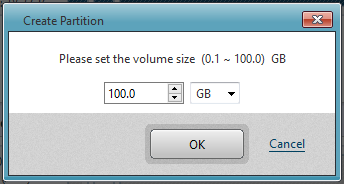
ActiveImage Protector does not support formatting the created partition.
Creating partitions by [Create Partition] and overwriting restore to the created partitions cannot be performed by a single task execution.
-
Delete Partition This operation is not supported in Linux boot environment.
Click on [Next].
Summary
Review the summary.
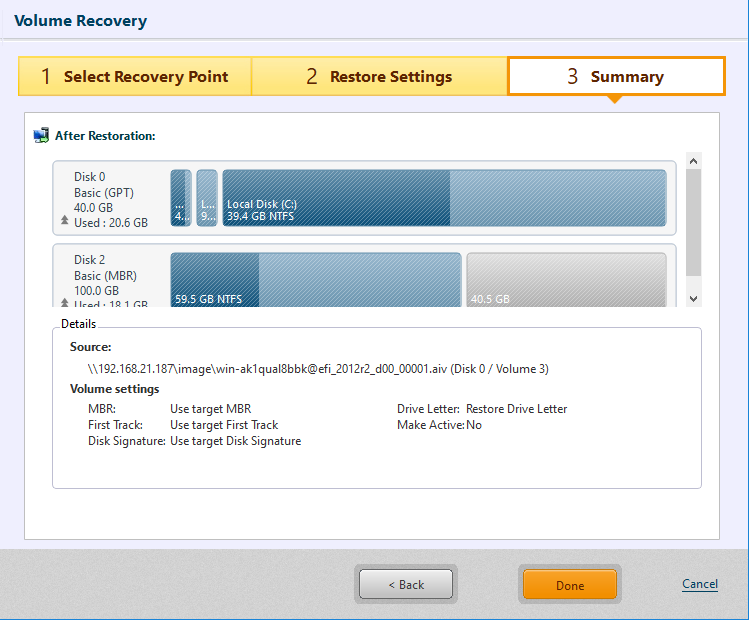
Click [Done] to start the restore task.
Restore a volume or a disk to local system.
<– Agentless backup created by using HyperBack is not supported.
–>
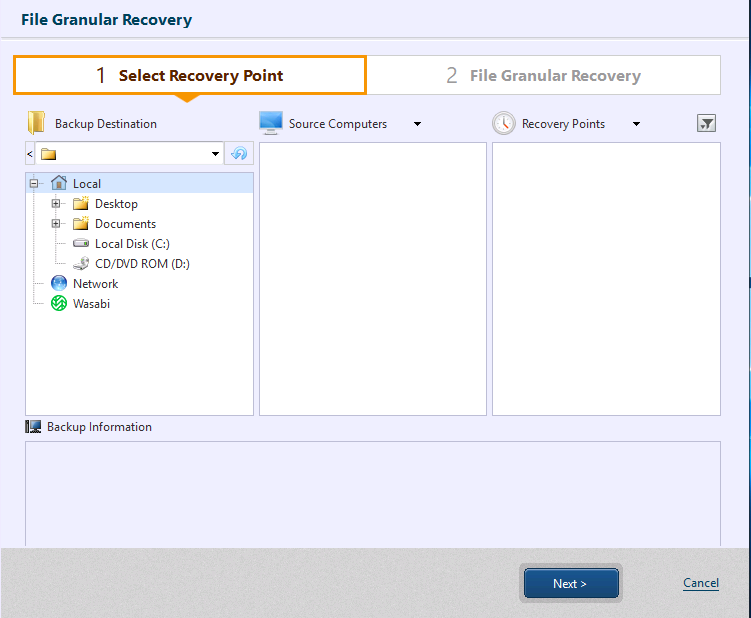
File Recovery
A specific file or folder can be restored from a backup to a specified location.
File Recovery in IT Pro does not support a backup file (* .afb file) created by using File Backup feature.{: .alert .alert-info }
-
Specify the folder in which the backup files are located, host and recovery point. The information of the selected recovery point is displayed in [Backup Information].
File Recovery does not support backups saved in cloud storage or SFTP server. Please download the backups to local storage or network shared folder to restore.
Select backup source host and recovery point, then click [Next].
-
Click the checkbox in [Backed up files] for the items to restore. The selected items are listed in [Recovery Items].
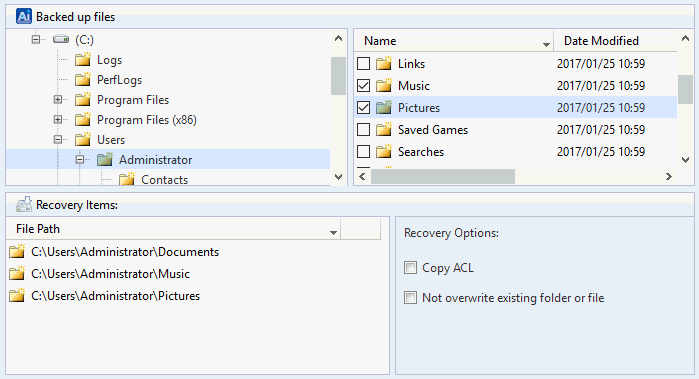
Right-click on the volume to display the hidden folders.
To exclude the listed items from restore source, click [X] button or uncheck the box in [Backed up files].
To display [X] button, mouse over the blank column.
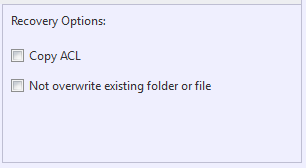
The following Recovery Options may be configured.
-
Copy ACL The selected file is restored keeping Access Control List (ACL) configured for the restore source file.
-
Not overwrite existing folder or file If there exists a file or folder of which name already exists in the destination folder, the file or folder is not overwritten but renamed.
When using image file (.afb) created by running File Backup task, the above options are not displayed.
-
-
Click [..] and specify the destination to save the items to restore.

Click [Run] to start restore processing.
When restored, the path specified with the backup source drive remains unchanged.
If the restore items include a file located in the root folder of the backup or a file in the hidden attributes folder, the attribute of the restore target folder is ‘hidden’ until the restore task completes.
A specific file or folder can be restored.
HyperRecovery
Step 1: Select Recovery Point
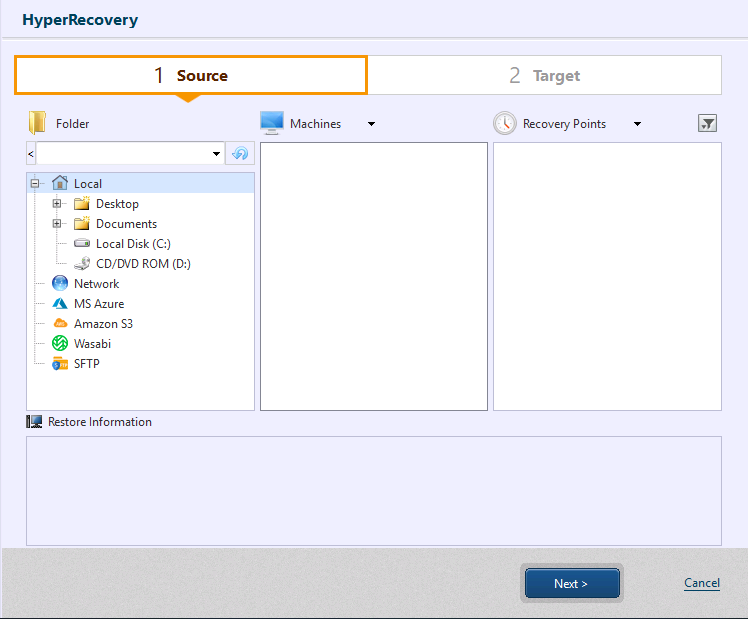
Specify the folder in which the backup files are located, host and recovery point. The information of the selected recovery point is displayed in [Backup Information].
When the displayed information of the tape drive is not correct, click [Refresh] button.
The OS version information may not be obtained from a backup image created by using HyperBack. To restore the backup image to an ESXi host, please enter an appropriate value for [OS] in Step 2 Restore Target setting.
Supported AIP Images:
| Agent-based | Agentless | |
| Backup image of Windows system | 〇 | 〇 |
| Backup image of Linux system | △ Only Basic is supported. |
〇 |
Click [Next].
Step 2: Restore Settings
When using a backup image created by using HyperBack Version 7.5.1 or later, the connection to backup source hypervisor is automatically attempted to establish. The backup source virtual machine is pre-selected.
When selecting a recovery point created by using HyperBack Version 7.5.1 or later, if authentication information for the hypervisor is changed from when the recovery point was created, the connection to backup source hypervisor is not automatically established. Please click [Connect to hypervisor].
When using the following backup images or if the connection to the backup source hypervisor cannot be established, the connection to backup source hypervisor is not automatically established. Please click [Connect to hypervisor] and establish the connection to the restore target hypervisor.
- Backup image created by running Volume Backup task.
- Backup image created by HyperBack Version 7.5.0 or earlier
After establishing the connection to restore target hypervisor, please select Recovery type.
- Select an existing virtual machine to restore
- Restore as a new virtual machine
- Restore disk only
When establishing the connection to vCenter of VMware vSphere, [Only restore disk] is not supported to use.
Restore to an existing virtual machine
Select an existing virtual machine on hypervisor and specify the restore target disk.
The process will be as follows:
-
When using a backup image created by using HyperBack Version 7.5.1 or later and when the following conditions are met, the data are restored in the target disk.
-
When connected to Microsoft Hyper-V or VMware ESXi, and if a disk of the same UUID as the disk selected for restore target is attached to the backup source virtual machine.
-
When connected to KVM, Proxmox and if the disk in the same file path as when backing up is connected to the backup source virtual machine.
When the process starts, please be aware that the data on the target disk will be overwritten.
-
-
In the following cases the data are restored to the new disk. The disk on which the data are restored will be connected to an available slot on the virtual machine. Please configure the required settings when necessary.
-
Even when using a backup image created by using HyperBack Version 7.5.1 or later, if a disk of the same UUID or in same file path as the disk selected for restore target is not attached to the backup source virtual machine.
-
When using a backup image created by using HyperBack Version 7.5.0 or earlier.
-
When using a backup image created by Volume Backup.
-
The recovery target virtual machine, when running and the process starts, will be turned off.
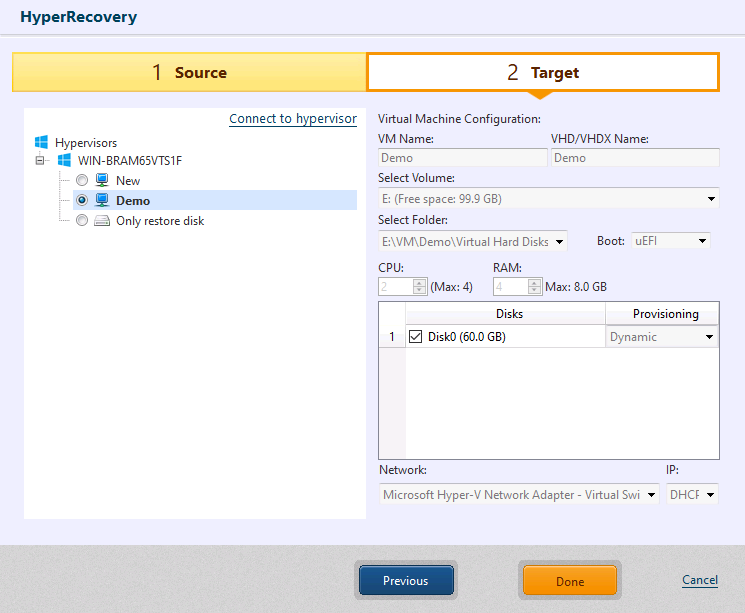
Connect to Microsoft Hyper-V and restore to [the new] virtual machine
Select a specific folder to restore data.
Ensure that Administrative share is enabled on Hyper-V of the managed remote computer. Windows Server 2012 R2 or later is supported for the restore target system.
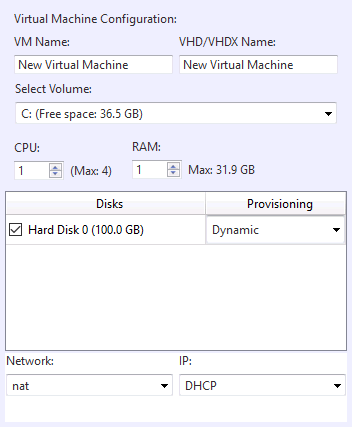
Please configure the settings for the following items.
-
VM Name Specify a virtual machine name to restore.
-
VHD/VHDX Name Specify the VHD/VHDX name to restore.
-
Select Volume
Specify a target volume to restore the virtual machine or a mount point for CSVFS volume. -
Select Folder Select a folder to restore in the selected volume. A new folder may be created. If a mount point for CSVFS volume is selected, a folder cannot be selected.
-
CPU
Assign the number of CPUs for the standby VM. The number of CPU(s) on the target host is the maximum that can be assigned. -
RAM
Specify the amount of memory allocated to the standby VM. Amount of memory size on the target host is the maximum that can be assigned. -
Disks
Please select the disk to restore. Then select the virtual disk provisioning type (Dynamic or Fixed) for the disk type. -
Network
Assign a preferred network available on the target host. -
IP
Only DHCP is supported.
When restoring Linux guest machine, the NIC device name may differ from that of the backup source. As a result the connection may not be established automatically. In such cases, please configure the connection settings manually after the restoration.
When connecting to Microsoft Hyper-V and [Restore disk only] is selected
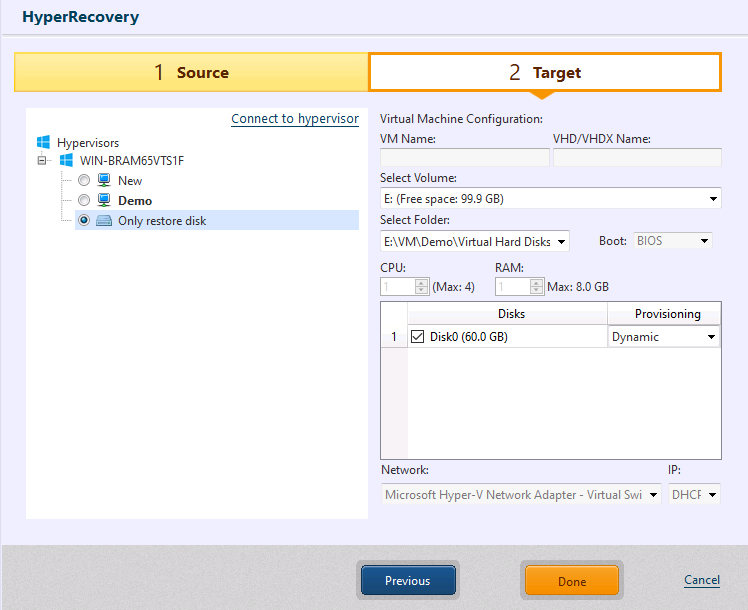
Please configure the settings for [Volume] and [Folder], [Disk Setting].
Click [Done] when the configured settings are complete.
After restoring to CSVFS volumes, please take the required operating procedures detailed in [After restoring/converting virtual machines to CSVFS volumes].
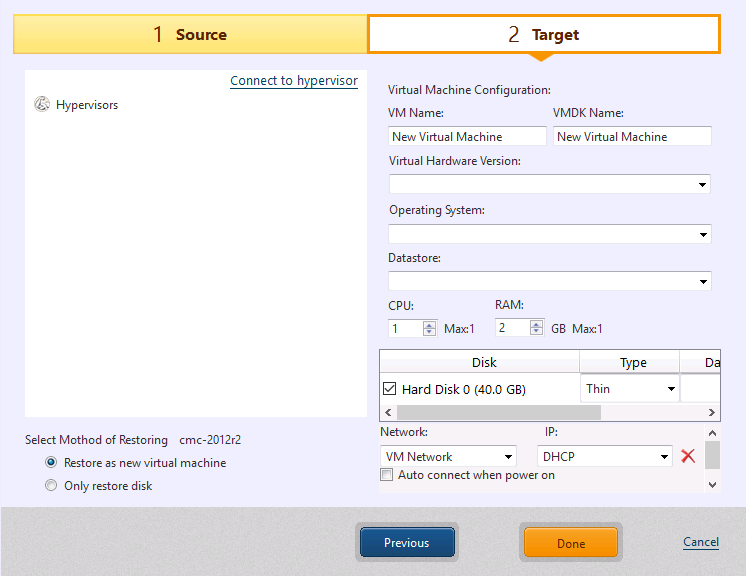
Connnect to VMware ESXi and [restore to a new virtual machine]
The data are restored to the datastore.
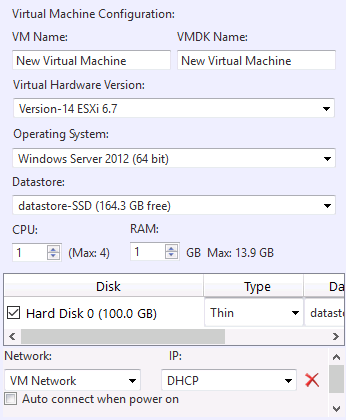
Please configure the setting for the following items.
-
VM Name
Specify a virtual machine name to restore. -
VMDK Name
Specify the VMDK name to restore. -
Virtual Hardware Version
Specify VM version supported on the target host. -
OS
The OS in the backup to use is specified.To use a backup image from which OS information is not specified in Backup Information in Step 1, please enter an appropriate value for [OS].
-
Datastore Specify the target datastore to restore the virtual machine.
-
CPU
Assign the number of CPUs for the standby VM. The number of CPU(s) on the target host is the maximum that can be assigned. -
RAM
Specify the amount of memory allocated to the standby VM. Amount of memory size on the target host is the maximum that can be assigned. -
Disk
Please select the disk to restore. Specify the virtual disk type and the restore target datastore for the respective disks.When connected to VMware vCenter Version 7 or later as restore target, the virtual disk can be restored as FCD.
-
Network You can select a network on conversion target host. When adding a network, please click [Add NIC].
The network using a double-byte character is not displayed.
-
IP
Only DHCP is supported. -
Auto connect when power on By enabling this option, the network connection is automatically established when the system boots up.
The disk controller of the restored virtual machine is configured with the default settings of a new virtual machine created for the specified operating system. After restoring the virtual machine, please change the default setting if necessary.
When restoring Linux guest machine, the NIC device name may differ from that of the backup source. As a result the connection may not be established automatically. In such cases, please configure the connection settings manually after the restoration.
Connect to VMware ESXi and [Restore disk only]
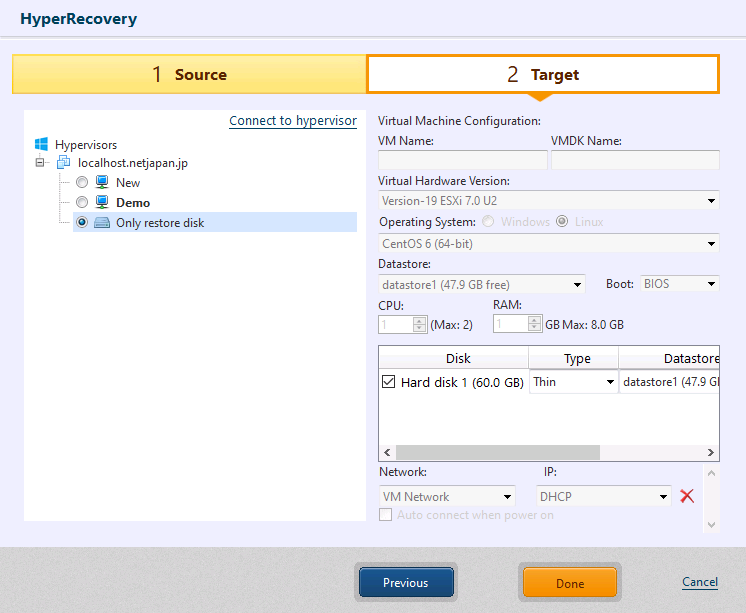
Please configure the setting for [Only restore disk].
Click [Done] when the configured settings are complete.
Connect to KVM and [Restore as a new VM]
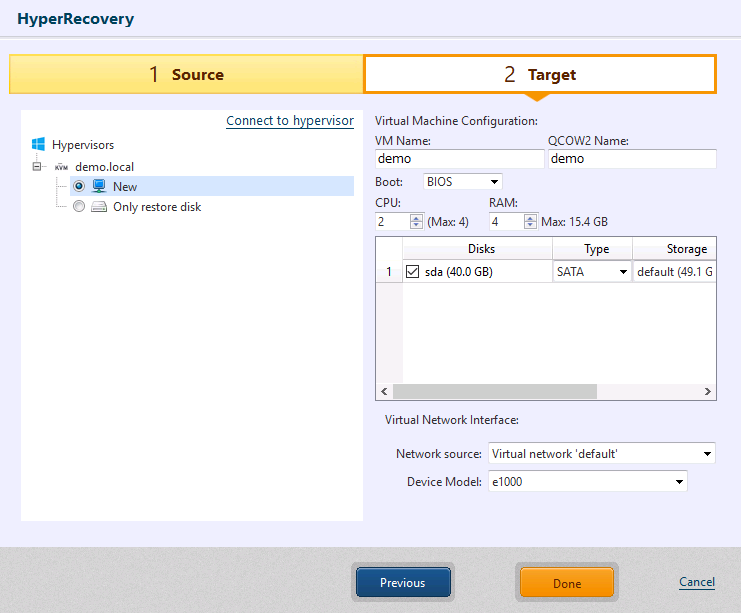
Restore data in storage.
Please specify the following items.
-
VM Name
You can specify any VM name.You cannot specify a single-byte space.
-
QCOW2 Name
You can specify any name.You cannot specify a single-byte space.
-
Boot
Please select the boot mode. -
CPU
The number of CPU(s) on the target host is the maximum that can be assigned. -
RAM
Amount of memory size on the target host is the maximum that can be assigned. -
Disks
Please select the disk to restore. Specify the restore target datastore for the respective disks.When restoring multiple disks after changing the disk bus type, all disks will be configured with the same bus type.
-
Network
Assign a preferred network available on the target host.
When restoring Linux guest machine, the NIC device name may differ from that of the backup source. As a result the connection may not be established automatically. In such cases, please configure the connection settings after the restoration.
Connect to KVM and [Restore disk only]]
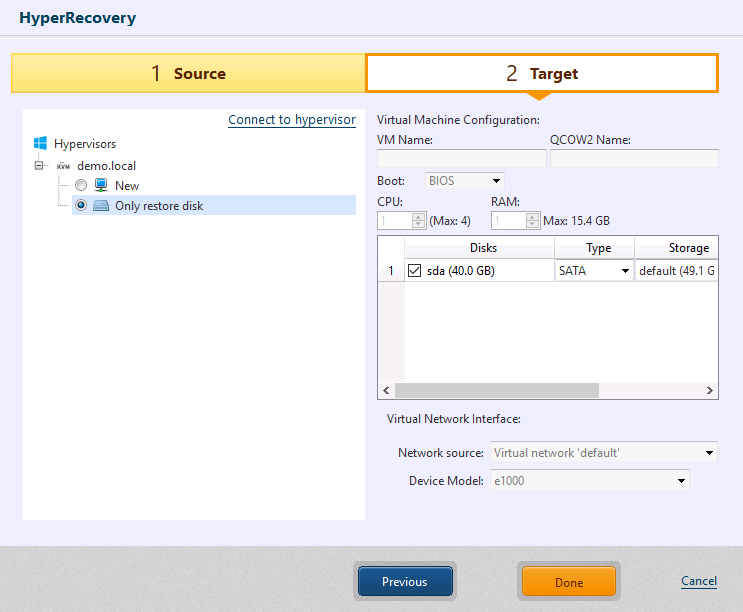
You can configure the settings for the items in [Disk Setting].
After configuring the recovery settings, click [Done].
The restored disk image is created and named in [VM name_recovery date / time.qcow2] format.
When importing a restored disk image of a system disk, create a virtual machine by modifying the settings for firmware or disk bus as necessary.
Connect to Proxmox and [Restore as a new virtual machine]
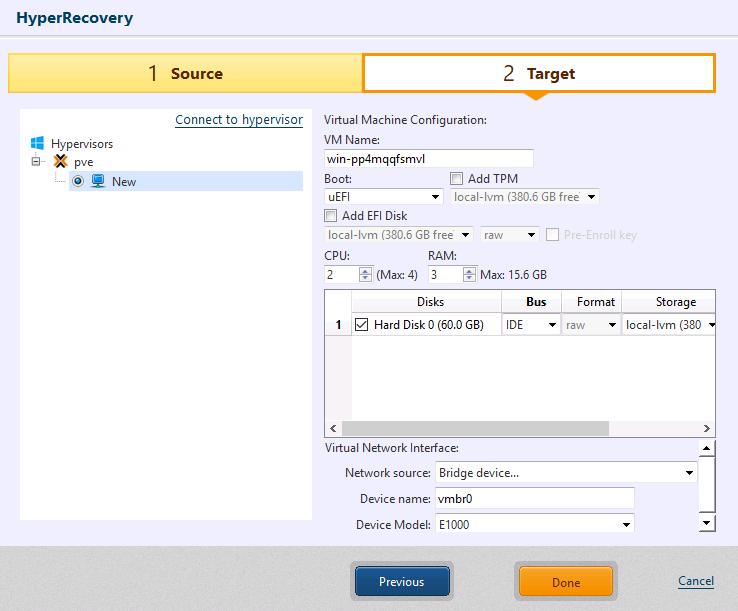
Restore data in storage.
Please specify the following items.
-
VM Name
You can specify any VM name.You can specify only single-byte alphanumeric characters and “-“.
-
Boot
Please select the boot mode.If necessary, TPM or EFI disks may be added.
When restoring to Version 9.1.0 or later Proxmox host, specify a storage supporting QCOW2, so that you can select TPM format.
When restoring a backup image of the system on which Secure Boot is enabled, you are recommended to add EFI disk with the [Standard Distribution Key] enabled. If you do not restore the backup image as stated above, Secure Boot is disabled on the restored system. After restoring the backup image, add EFI disk on Proxmox Web console to enable Secure Boot.
-
CPU
The number of CPU(s) on the target host is the maximum that can be assigned. -
RAM
Amount of memory size on the target host is the maximum that can be assigned. -
Disks
Please select the disk to restore. You can select restore target storage by disk.When restoring multiple disks by changing the disk bus type, the bus type setting is configured the same for every disks.
You can select the format when selecting the storage supporting QCOW2.
-
Network
Assign a preferred network available on the target host.
Only restoring to an existing virtual machine and [Restore as a new virtual machine] on Proxmox are supported to run.
Virtual standby replica is implemented into the specified hypervisor by restoring from a backup to a new virtual machine or a virtual disk.
This feature is not available on the Desktop and Cloud Editions.
HyperRecovery Live!
Step 1 : Select Recovery Point

Specify the folder in which the backup files are located, host and recovery point. The information of the selected recovery point is displayed in [Backup Information].
When the displayed information of the tape drive is not correct, click [Refresh] button.
The OS version information may not be obtained from a backup image created by using HyperBack. To restore the backup image to an ESXi host, please enter an appropriate value for [OS] in Step 2 Restore Target setting.
When using backup save in cloud storage, the process time for booting up virtual machine may increase.
Supported AIP Images:
| Agent-based | Agentless | |
| Backup image of Windows system | 〇 | 〇 |
| Backup image of Linux system | △ Only Basic is supported. |
〇 |
Click [Next].
Step 2: Restore Settings
Click [Connect to Hypervisor] to establish a connection to the hypervisor on which the virtual machine will be restored. Supported hypervisors include Microsoft Hyper-V configured on the local computer and VMware vSphere vCenter for Windows.
Restore Target(Microsoft Hyper-V)
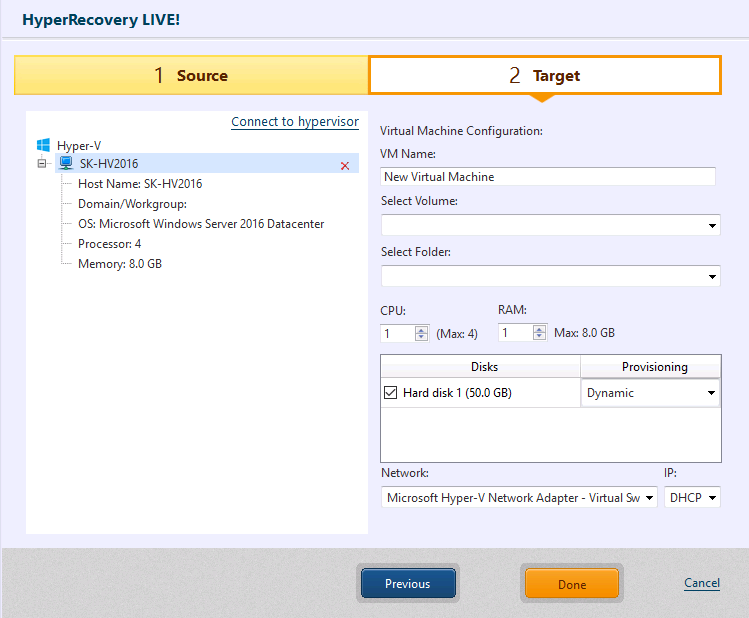
Select a specific folder to restore data.
Please configure the settings for the following items.
-
VM Name Specify a virtual machine name to restore.
Cannot use double-byte characters.
-
Volume
Select a target volume to restore a virtual machine or a mount point for CSVFS volume. -
Folder Select a folder to restore in the selected volume. A new folder may be created. If a mount point for CSVFS volume is selected, a folder cannot be selected.
-
CPU
Assign the number of CPUs for the standby VM. The number of CPU(s) on the target host is the maximum that can be assigned. -
RAM
Specify the amount of memory allocated to the standby VM. Amount of memory size on the target host is the maximum that can be assigned. -
Disks
Please select the disk to restore. Then select the virtual disk provisioning type (Dynamic or Fixed) for the virtual disk type. -
Network
Assign a preferred network available on the target host. -
IP
Only DHCP is supported.
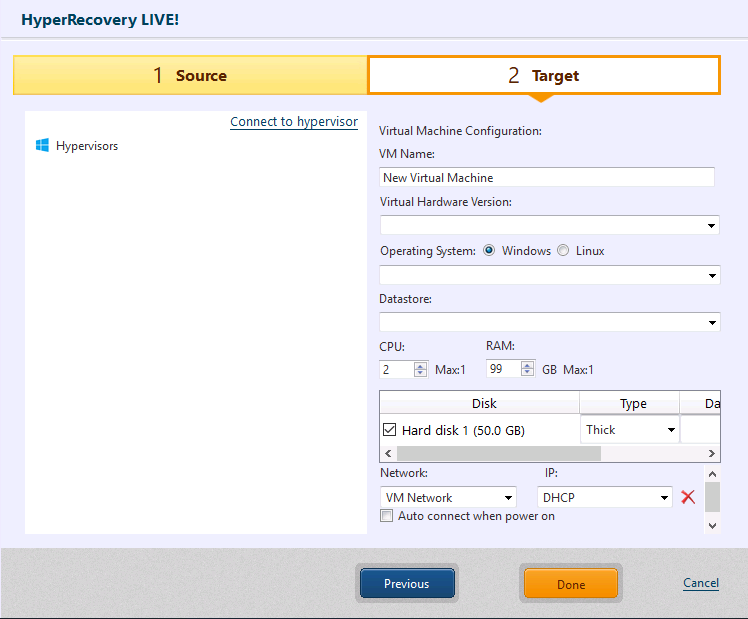
Restore Target(VMware vSphere vCenter)
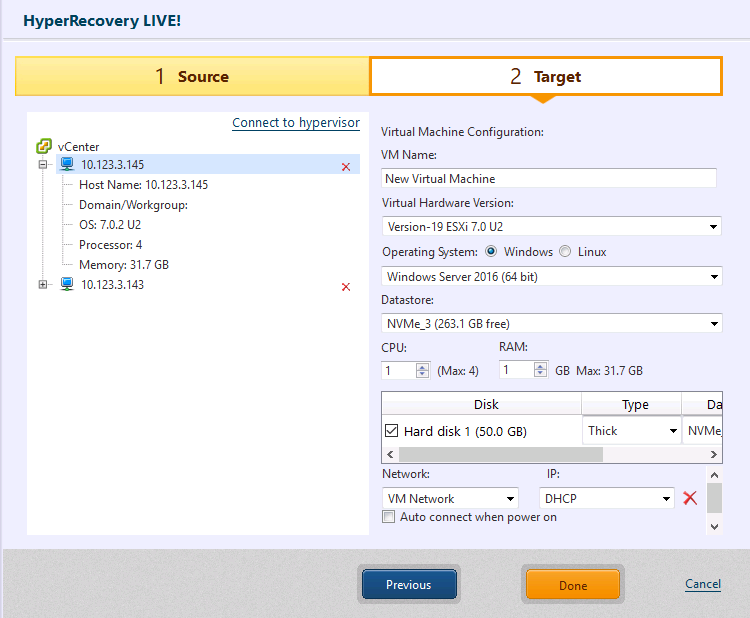
The data are restored to the datastore.
Please be aware that the disk type of the restored virtual disk is [Thick provisioning].
Please configure the setting for the following items.
-
VM Name
Specify a virtual machine name to restore.Cannot use double-byte characters.
-
VM Version Specify VM version supported on the target host.
-
OS
The OS in the backup to use is specified.When using backup image which OS information is not specified in Backup Information in Step 1, please specify an appropriate value.
-
Datastore
Specify the target datastore to restore the virtual machine. -
CPU
Assign the number of CPUs for the standby VM. The number of CPU(s) on the target host is the maximum that can be assigned. -
RAM
Specify the amount of memory allocated to the standby VM. Amount of memory size on the target host is the maximum that can be assigned. -
Disk
Please select the disk to restore. Specify the restore target datastore for the respective disks. -
Network Assign a preferred network available on the target host. Click [Add NIC] to assign additional network adapters.
The network using a double-byte character is not displayed.
-
IP
Only DHCP is supported. -
Auto connect when power on By enabling this option, the network connection is automatically established when the system boots up.
The disk controller of the restored virtual machine is configured with the default settings of a new virtual machine created for the specified operating system. After restoring the virtual machine, please change the default setting if necessary.
Virtual standby replica is implemented into the specified hypervisor by restoring from a backup to a new virtual machine. When starting restore process, the virtual machine boots up for immediate operation.
This feature is not available on the Desktop and Cloud Editions.
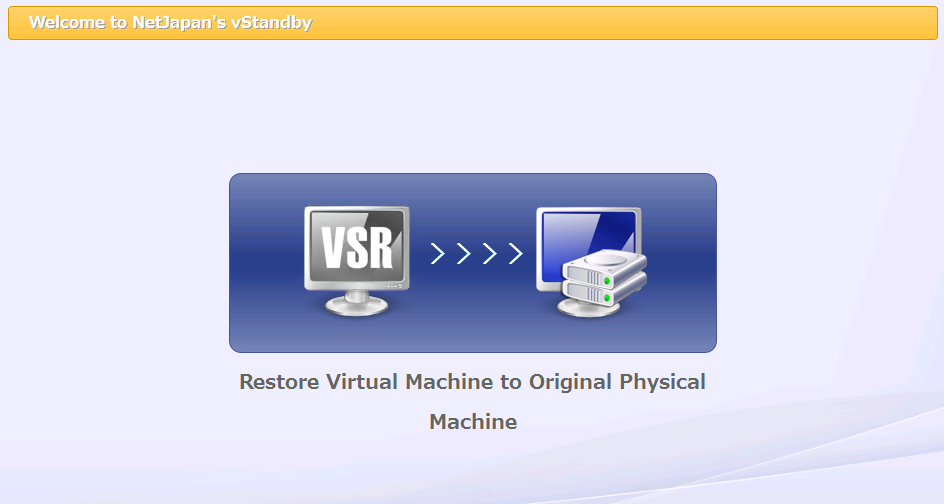
Restore from VSR to original computer
Before starting to use this feature, please build boot environment using Windows ADK. This feature does not support the use of Boot environment built using Windows RE.
Restore from virtual standby replica created on VMware vSphere 6.5 or later host is not supported. Please create a backup in the virtual standby replica and restore the backup to the source computer.
When restoring from a virtual standby replica on Microsoft Hyper-V host, please ensure that Administrative share is enabled on the Hyper-V host. When restoring from the host on which Administrative share is disabled, please create a backup in the virtual standby replica and restore the backup to the source computer.
-
Shut down the restore source virtual standby replica.
-
Insert the Windows RE/PE-based boot environment media on the source computer to boot up the boot environment from the media.
-
Select [Recovery] - [Restore VSR] and Click the button in the center of the window.
-
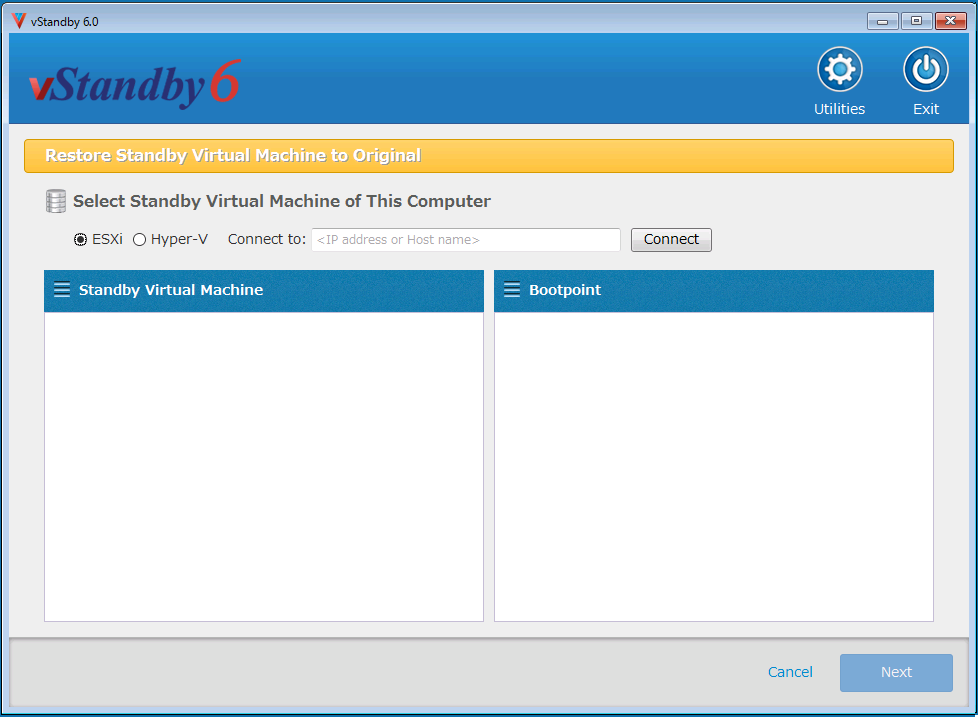
Specify the host on which the virtual standby replica is located and click [Connect].
-
The virtual standby replicas located on the specified host are listed in [Virtual Standby Machine] pane. Selecting the virtual standby replica to restore, the boot points of the standby virtual machine are listed in the [Boot Point] pane.
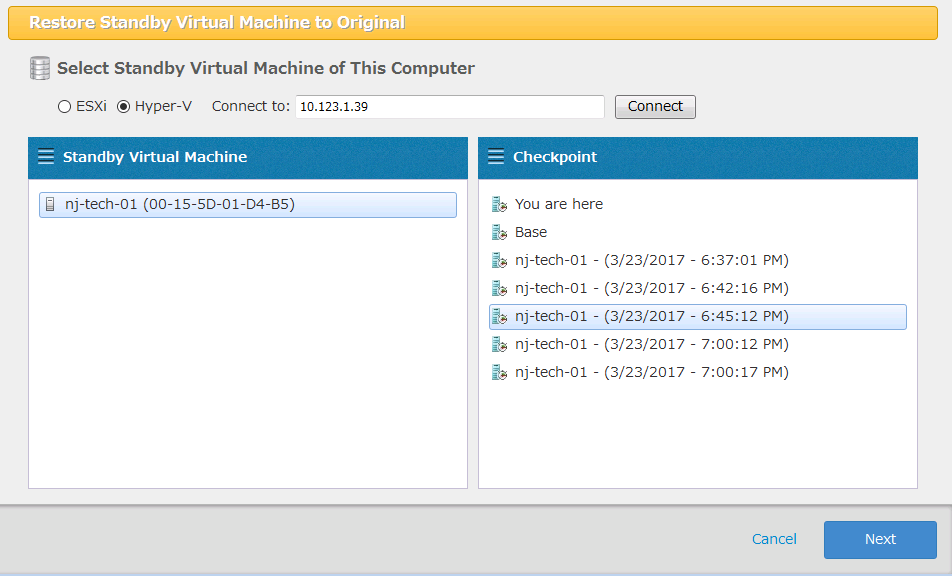
Only if the NIC identified on the machine, on which Boot Environment is started, matches up with the MAC address indicated to the right of the virtual standby replica, the virtual standby machine can be selected.
Select the boot point to restore and click [Next].
Before starting the restore task, it is recommended to boot up the virtual standby machine from a boot point and monitor the status of the system.
-
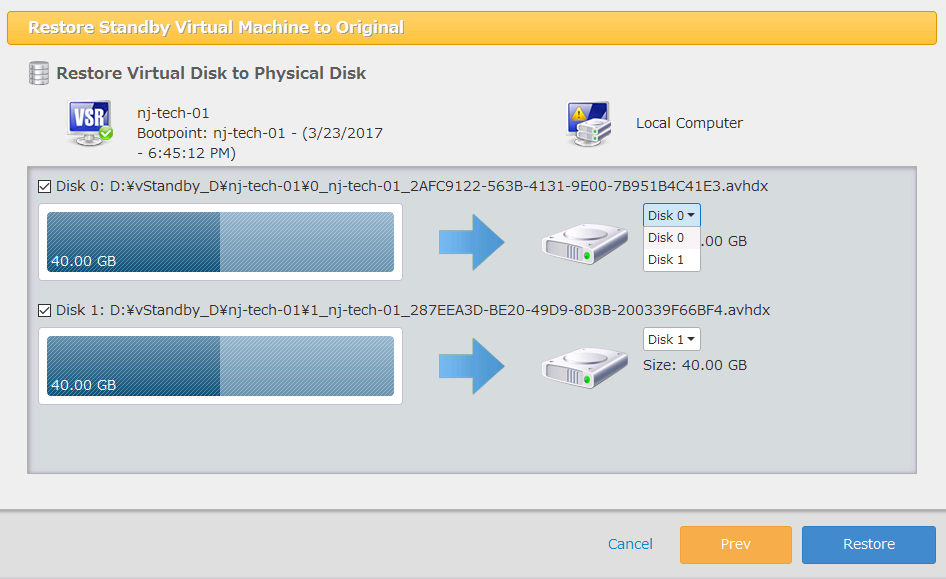
Select the target disk for restore and Click [Restore].
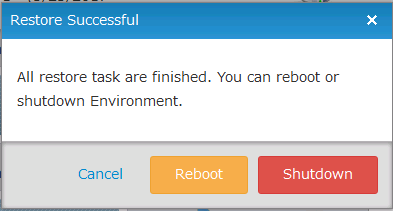
When restore process completes, select the operation.
-
Cancel Close this dialog.
-
Reboot End the Boot Environment and restart the system. Before restarting the system, it is recommended to eject the Boot Environment media.
-
Shutdown End the Boot Environment and shut down the system.
-
By using boot environment (using Windows RE/PE-based boot media), restore a VSR created by vStandby to source machine.
Desktop and Cloud editions do not provide this feature.
Tips
Restore the Volume in Reduced Size
Provided that the restore source is an NTFS volume, the restore source volume may be restored to a volume or an available space smaller than the source. If so, please make sure the following conditions are met.
-
Used space in restore source volume is 5GB or less. Used space + 500 MB or more
-
Used space in restore source volume is 5GB or more. Used space + 10% or more of used space
Even if the above conditions are satisfied, depending on fragmentation status in the restore source volume, execution of the task may fail.
The used space is inclusive of system area.
This feature does not support a Linux-based boot environment.
-
Launch the Restore wizard.
-
Select the recovery point and the disk. Click [Next >].
-
Select the system volume to restore then drag and drop the volume to the target. Alternatively, right-click on the selected volume and the restore target can be specified.
Before specifying a bare metal disk as the restore target, please make sure that the disk is initialized. To initialize the disk, right-click on the disk information to display the context menu.
Please select the disk initialization type.
-
If the restore target volume or available space is smaller than the source, but the above conditions are satisfied, the volume is added to [Select Target:]. If you want to further reduce the volume, right-click on the volume to select [Change Volume Size] in the context menu or place the mouse cursor on the right-end of the volume and drag it to the left.
Restore system volume alone (BIOS boot system)
Follow these procedures to restore only the system volume for BIOS boot systems (Windows 7 or later).
-
Launch the Restore Wizard.
-
Select the recovery pint and the disk. Click [Next >].
-
Select the system volume to restore, drag and drop the volume to the restore target. You can also right-click on the system volume and specify the restore target.
Before specifying a bare metal disk as the restore target, please make sure that the disk is initialized. To initialize the disk, right-click on the disk information to display the context menu.
Please select [MBR] for the disk initialization type.
-
The volume to restore is displayed in [Select Target:].
#### Example of Disk Restore Setting
Following the above example, MBR, first track and disk signature are restored from the backup. If the restore source resides on the system, it is recommended not to restore the disk signature from the backup. If there are multiple disks with the same signature, the restored disk will go offline.
#### Example of Volume Restore Setting
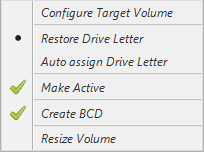
When [Make Active] is selected in order to boot from the restored volume, also select [Create BCD] to create the boot configuration data (BCD) required to boot up the system.
Upon completion of the above settings, click on [Next >].
-
Review the settings and click on [Done] to start the restore task.
-
Upon completion of the task, boot up the system by selecting [Operation].
If not configured as above and the restore task was executed, please perform the following operating procedures.
-
Go to the left pane or the menu to select [Utilities] - [Restore Boot Setting].
-
Select the disk and click on the radio button for the restored system volume.
-
Perform the following operating procedures, one by one, whatever is necessary.
-
Restore MBR from image If restoring to a bare metal disk, or if there is a third-party boot loader which is not configured to boot from the restored system volume exists on the restore target disk, it is recommended to restore MBR from the backup.
-
Create BCD If you failed to create BCD when you executed the restore task, please use this feature.
-
Make Active If you failed to set the volume active when you executed the restore task, please use this feature.
As you cannot undo the above operations, it is recommended to proceed with these operations carefully.
-
-
Upon completion of the operating procedures, go to the [Operation] menu and reboot the system.
Restore system volume alone (uEFI boot system)
Please follow these procedures to restore the system volume alone for uEFI boot system.
-
Launch Restore Image wizard.
-
Select the recovery point and the disk as the target. Click on [Next >].
-
Select the system volume (C drive) to restore, drag and drop the volume to the target volume. You can also right click on the system volume and specify the restore target.
Before specifying a bare metal disk as the restore target, please make sure that the disk is initialized. To initialize the disk, right-click on the disk information to display the context menu.
Please select [GPT] for the disk initialization type.
-
When the restore target volume is specified, the following message is displayed. Click on [Yes].
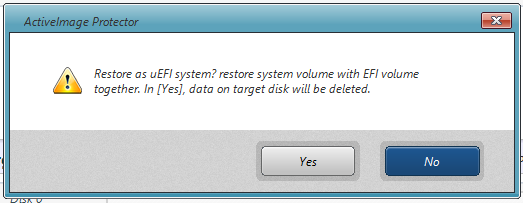
-
In the following confirmation dialog, the restored backup is displayed. After reviewing, click [Done] to start restore task.

-
Upon completion of the restore task, reboot the system by selecting [Operation] menu.
Restore Cluster Shared Volume (CSV)
To restore a cluster shared volume (CSV), follow these operating procedures.
-
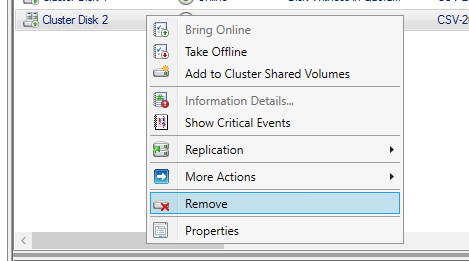
The Restore Wizard does not support overwriting restore to a disk including CSVFS volume or CSVFS volume. It is required to delete the restore target disk from the cluster shared volume (CSV) by using Failover Cluster Manager.

-
After deleting the restore target disk from the cluster shared volume (CSV), please delete it also from the available storage area specified as the target.
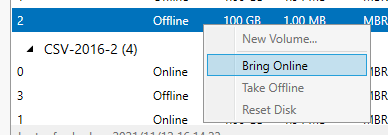
-
Place the restore target disk online by using Server Manager (or Computer Management).
-
Launch this product, specify the above restore target in Restore Wizard and run the restore task.
Booting up or operating a virtual machine from the check point created only after creating the restore source backup is not supported. It is recommended to delete the check point, if any, before restore.
-
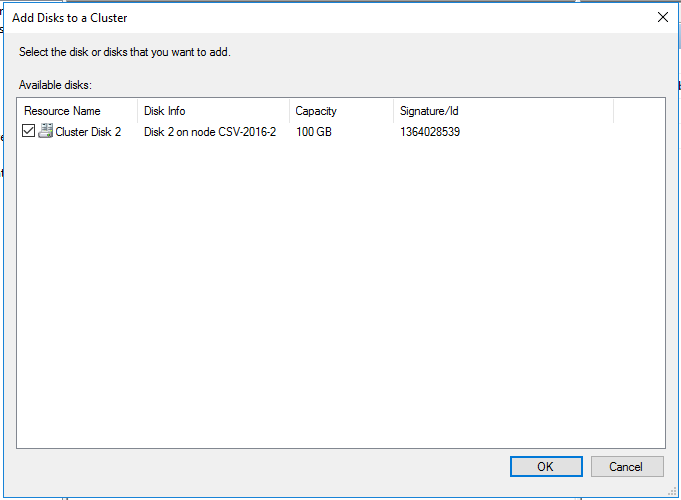
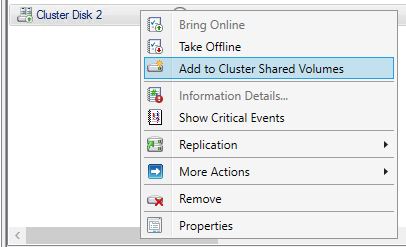
Upon completion of the above, please boot up the cluster and add the restored disk to the cluster and CSV.
If the virtual machine roll is configured, please take the operating procedures described here.
If you continue to take backup of CSVFS volume restored from a backup, please edit the backup schedule and select the CSVFS volume as the backup source.
Since a different ID is assigned to the CSVFS volume deleted from the cluster and added again, if the backup task is executed without editing the schedule setting, the backup task fails in error.
Post-restore of Hyper-V VM resources storage
Please follow these operating procedures after restoring the volume / disk where the resources of the virtual machines are saved.
Using the existing virtual machine list
-
Select [Stop Service] in Hyper-V Manager and stop Hyper-V Virtual Machine Management service.
-
When the service is stopped, select [Start Service] and start Hyper-V Virtual Machine Management service.
-
The check point of Windows Server 2012 R2 or later Hyper-V virtual machine may be indicated as [
- backup - (Date)]. In this case, run PowerShell with Administrator authority and the following command. Get-VMsnapshot -ComputerName \'<Host Name>\' -VMName \'<VM Name>\' -SnapshotType Recovery | Remove-VMSnapshotExecution of the command starts consolidation process, and the check point will not be displayed.
-
If ‘-AutoRecovery.AVHDX’ exists in the folder where virtual hard disk is located, please delete ‘-AutoRecovery.AVHDX’.
After above operations, boot up virtual machine by using Hyper-V Manager.
Clustered Hyper-V
When there exists the same virtual machine as backup in Roll List in Failover Cluster Manager, the virtual machine may be booted as it is.
Before booting up, please check the configured setting. If network adapter is in ‘configuration error’, the virtual machine fails to boot up.
When there does not exist the same virtual machine in the Roll List in Failover Cluster Manager, please configure the virtual machine to provide high availability.
Importing virtual machines from the restored volume / disk
[
Get-VMsnapshot -ComputerName \'<Host Name>\' -VMName \'<VM Name>>\' -SnapshotType Recovery | Remove-VMSnapshot
Execution of the command starts consolidation process, the check point will not be displayed.
If ‘-AutoRecovery.AVHDX’ exists in the folder where virtual hard disk is located, please delete ‘*-AutoRecovery.AVHDX’.
Restore to CSVFS volume / post-conversion processing
Please follow these operating procedures after performing a restore or conversion of a virtual machine to CSVFS volume.
Restore as / conversion to a new virtual machine
The restored / created virtual machine configured for high availability by using Failover Cluster Manager can be used to provide failover capability.
It is recommended to configure the standby virtual machine or virtual standby replica created by using HyperStandby, vStandby for high availability when booting or operating the standby virtual machine.
When configured for high availability and fail-over from the ownership node to the other cluster node takes place, the backup task fails.
Restore disk only
A folder named with the virtual machine is created in the specified CSVFS, and a virtual hard disk is restored / created. When creating a new virtual machine in CSVFS by using Hyper-V Manager and virtual hard disk is connected, the virtual machine configured for high availability by using Failover Cluster Manager can be used to provide failover capability.