Backup
ActiveImage Protector offers backup features as follows.
Server Edition provides agent-based backup and agentless backup features.
Agent-based backup feature includes [Volume Backup], [File Backup] and [vStandby], while agentless backup feature is provided as [HyperBack].
For example, when you have product keys for two licenses, you are allowed to configure and execute [HyperBack] task for one source virtual machine as well as a [Volume Backup] task.
Before using a tape device, please refer here for more detailed information.
Desktop and Cloud Editions do not support tape devices as the destination storage.
Cloud Edition does not support SFTP server for destination storage.
When configuring the settings for In-Cloud Standby task, please go to [Advanced Setting] - [General] and enable [Make backup image file P2V ready for In-Cloud Standby] option in Step 2. If not enabled, remote connection to the instance attaching the volume created by using a snapshot on cloud is disabled.
Volume Backup
Step 1 : Select Backup Source
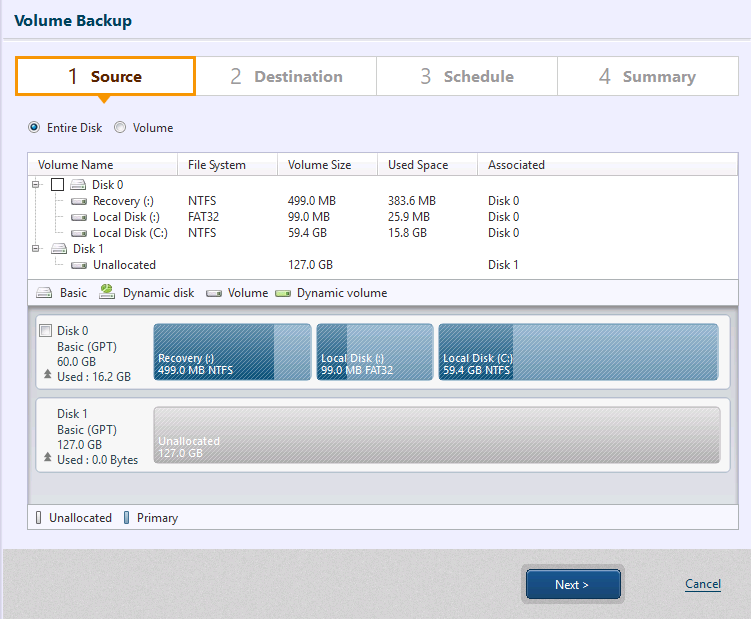
Use one the following operating procedures to select a backup source.
Click a radio button to specify the backup type and the backup source.
-
Disk : Select if backing up the entire physical disk (to include all volumes).
For dynamic disks which are configured as mirror volumes, please select disks containing both the primary and secondary volumes.
When backing up virtual machine in Azure, you do no have to include the disk where Temporary Storage exists in backup source.
-
Volume : Select by checking the box for any specific volume(s) for backup source.
ActiveImage Protector supports only one CSVFS volume to be selected per backup task.
After configuring the above settings, click [Next].
Step 2 : Select Destination

Select a destination storage and configure the settings.
-
Task Name Specify the name for the backup task.
-
Destination Folder Specify the destination folder for the backups. The created backups are saved under a sub-folder created under the specified destination folder. The sub-folder is created under a unique name.
You are not allowed to edit the unique backup image file name.
When specifying cloud storage as the destination, please refer here
When selecting USB device as the destination, please refer here for the operation.
When Actiphy ImageCenter (StorageServer) is selected to use for saving backup image files, even when backup process has completed with this product, if the processing of backup image files with Actiphy ImageCenter(StorageServer) has not completed yet and the subsequent schedule comes, then, the process does not gain from 0.1% until the processing of backup image files completes with ImageCenter (StorageServer).
-
Comment
Add a brief description in the [Comments] textbox to define for the created backup. -
Destination Isolation Option
Disconnects access to backup image storage drives after backups complete rendering the specified destination storage inaccessible. This feature is available on OS on which AIP is installed.The combined use of the Destination Isolation feature with a post-backup process is not supported.
-
Un-assign the drive letter from the local hard disk after completing the backup: When this option is enabled, ActiveImage Protector will utomatically unassign the local hard disk’s drive letter once the backup process is complete. Before starting a subsequently scheduled task, ActiveImage Protector will automatically assign the local hard disk’s drive letter. This option can be used as a security measure for preventing data tampering in the storage connected by assigning drive letter in Explorer, etc.
-
Take the destination local hard disk offline after completing the backup: When you enable this option, ActiveImage Protector will set the destination hard disk to offline once the backup is complete. When the subsequently scheduled task runs, the destination local hard disk is set online. This option can be used as a security measure for preventing data tampering in the storage connected by assigning drive letter in Explorer, etc.
-
Eject the destination USB hard disk after completing the backup: Enabling this option causes ActiveImage Protector to eject the destination drive once the backup is complete if you save your backups to removable media, such as a USB drive. Please make sure the destination USB hard disk is plugged in before starting the subsequent task. Otherwise, the task fails in -403 error.
In order to successfully run a backup task, please manually use the following procedures so that the device is recognized on OS.
-
Plug in / out USB HDD cable or USB flash memory.
-
Restart OS.
-
-
Disable the destination network connection after completing the backup: This option will disconnect the network connection to your backup destination once the backup is complete if you save backups to a network drive. Before starting a subsequently scheduled task, the destination network connection is automatically enabled.
-
-
RDX data cartridge eject setting
When enabling [RDX data cartridge eject setting] in [Preference] - [General], the following are displayed instead of Destination Isolation option.The combined use of the Destination Isolation feature with a post-backup process is not supported.
-
Weekly : The cartridge is ejected for the last incremental backup task scheduled on the specified day(s) of a week.
-
Daily : The cartridge is ejected at a specified time after full or incremental backup. When the time comes to eject the cartridge during backup process, ejection of the cartridge is suspended.
-
When backup task completes : The cartridge is ejected after a full or incremental backup completes.
-
Not Eject: Do no eject the cartridge.
-
-
Compression Enabling compression reduces storage requirements by further compacting the backups. Begin by checking the [Compression] box, then selecting the desired type of compression.
-
Deduplication Compression: Select one of the three levels of deduplication available.
-
Level 1 - Deduplication is performed at the highest level. This level of compression may increase the overall backup processing time but achieves the most tightly compressed backups.
-
Level 2 - This preset level provides the best balance between process time and compression performance. (This is the default setting).
-
Level 3 - The backups will be generated at a lower compression rate and deduplication requires less backup processing time.
Temporary File Folder: Set the location for deduplication to process temporary files.
The maximum size of the temporary file folder will be 1% of the used space of backup source.
You are recommended to specify a folder on SSD that delivers fast read and write speeds.
When specifying a tape device for backup destination, Deduplication Compression feature is not supported to use.
-
-
Standard Compression: The dropdown menu provides three levels of standard compression.
-
Standard - Backup processing time and storage requirements are at an optimum.
-
Fast - Backup processing time is the shortest.
-
High - The compression process will place a higher demand on system resource usage and an increase in processing time but the result is a smaller backup image.
-
-
-
Password Protection Password protect the backup image file by assigning a unique password. This ensures that password input is required for mounting, exploring, or restoring any of the contents of the image file (this doesn’t encrypt the contents).
There are three levels of encryption to choose from.
-
RC5 - An early encryption standard with a variable block size, key size and number of rounds. Selecting RC5 encryption provides a faster encryption processing speed.
-
[AES 128 bit] and [AES 256 bit] - A stronger encryption method than RC5 with a fixed block size and a key size of 128 or 256 bits.
-
Advanced Backup Options
Click [Advanced Options] to access the advanced backup options settings page.
-
General

-
Backup by disk If including multiple disks in backup source, backups are created per disk.
-
Split image into xx MB files The backup is split into multiple files of the specified size (MB).
-
Ignore bad sectors
By enabling this option, encountering unreadable sectors will not interrupt the backup task. -
Create an MD5 file for image
MD5 file is created for the created backup. -
Ignore inaccessible volumes By enabling this option, encountering inaccessible volumes will not interrupt the backup task.
-
Use network throttle (Max KB/Second) Define the maximum throughput in KB/second by using network throttle if destination drive is located on a network shared folder or cloud storage.
-
Use network write caching When storing backups in network shared folder, cached data are used.
-
Backup time-out: xx hours Specify the time-out and the maximum time to wait for a backup task to complete the backup process. If the backup process has not completed when time-out occurs, the task will be canceled.
-
In the process of base (full) backup, the pool is overwritten. When specifying a tape device for backup destination, the pool is blanked out and overwritten in the midst of base (full) backup process.
-
Move the tape media back to the slot after completing the backup When a tape library is selected as the backup destination and backup images are saved in tape media, tape media is moved from the drive to the original slot or an available slot.
When there is no available slot other than mail slot, the tape media is not moved from the drive and "Not found free slot for moving tape." is recorded in log. {: .alert .alert-info }-
Eject tape after backup completes When a tape library is selected as the backup destination, the tape is ejected after backup process completes.
When a tape library is selected as the backup destination and there is no available space in mail slot, the backup task completes with error.
Either [Move the tape media back to the slot after completing the backup] or [Eject tape after backup completes] option is selectable.
-
-
-
Preparatory process

-
Make backup image file P2V ready Performs the same process as required for [Virtualization] during backup but includes the installation of the driver required for virtualization (VMware ESXi/Microsoft Hyper-V/KVM), and changing the registry settings, etc. Instead of using [Virtualization], restore the backup directly to a virtual machine.
-
Make backup image Cloud ready
Performs the same process as required for booting the system in cloud environment (installation of the driver, changing the registry settings).
・AWS EC2 driver (AWS PV driver, ENA driver, Intel 82599 VF interface)When restoring the backup file created by enabling this option, the required process is performed when booting the system for the first time after completing the recovery process and the system automatically reboots. After rebooting the system, remote desktop is supported to access. {: .alert .alert-info }
-
-
VSS and Changed Block Tracking Settings
Edit the VSS settings and changed block tracking setting for a backup task. Changing this setting in most cases is not necessary (for IT Technicians).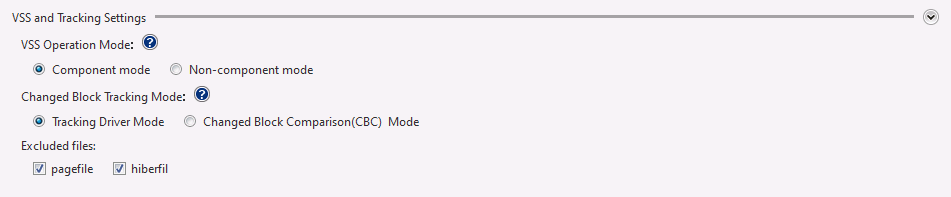
-
VSS Operation Mode
Check in the check box for [Component Mode] to run VSS in component mode in backup process. Enabling VSS component mode runs the additional Verify data task (if supported) before execution of a backup task.-
Component Mode : VSS component mode is enabled for every VSS writer.
-
Non-component mode : VSS component mode is disabled for every VSS writer.
-
-
Changed Block Tracking Mode When a tracking driver is installed, you can select to use the tracking driver or CBC (Changed Block Comparison) mode for the change tracking method.
When using the tracking driver, you are not allowed to enable multiple tasks for the same backup source at the same time. Only one backup task runs to continue incremental backup chains.<br>When using CBC (Changed Block Comparison), you can enable multiple number of backup tasks for the same backup source at a same time. {: .alert .alert-info } When CBC (Changed Block Comparison) is selected and a large-size file is included in the backup source, incremental backup process time may increase. {: .alert .alert-info } -
Excluding Files
You can specify the items to exclude from backup process.
-
-
Deduplication Compression
Select the option to ensure that the backup task completes without interruption if insufficient disk space is detected in the temporary file folder before operation.
-
Auto-switch from default to an alternate folder The temporary file folder used by deduplication will automatically switch over if insufficient disk space is detected. In boot environment, backup source volume is not used.
-
Continue operation with [Standard] Compression Deduplication Compression process will stop but the backup task will continue to complete using the default Standard Compression. The created backup image is recognized as “Deduplication Compression” processed.
-
Temporary File Folder Specify the location for deduplication to process temporary files. The maximum size of the temporary file folder will be 1% of the used space of backup source or less. The higher the deduplication level, the larger the temporary file size will be.
-
-
Scripting
Scripts can be implemented to run before and or after snapshots are taken or after the backup been created. Use the dialog box to execute scripts.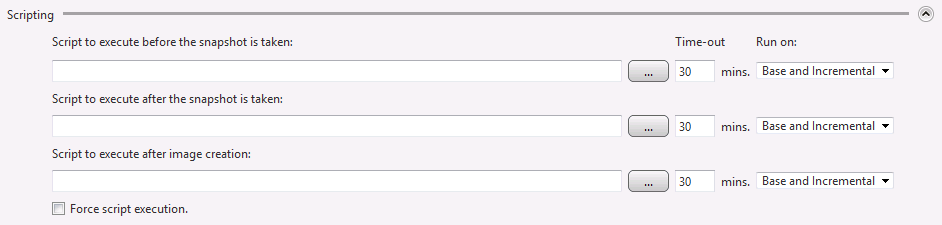
-
Script to execute before the snapshot is taken Specify a script or batch file to run before the snapshot is taken.
-
Script to execute after the snapshot is taken Specify a script or batch file to run after the snapshot is taken.
-
Script to execute after image creation Specify a script or batch file to run after the backup has been created.
-
Force script execution Checking this box ensures that all specified script or batch files will be executed even if an error occurs during the backup operation.
-
Run on
Select the backup type to run the specified script.
Scripts must be non-interactive.
-
When completing the settings, click [Next] to create a backup schedule.
When the system is not restarted yet after installation of the product, if the system volume and ReFS volume are included in the backup source, system restart is required. After restarting the system, please configure the settings according to the instructions of the wizard.
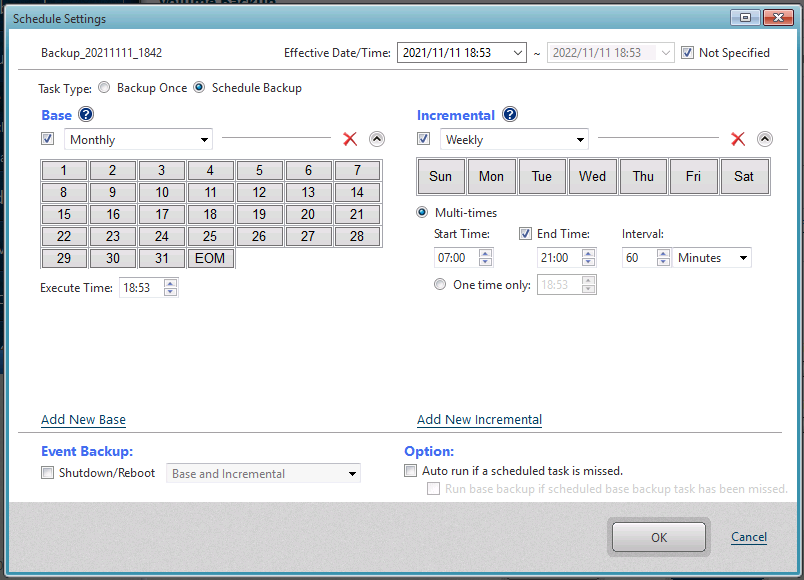
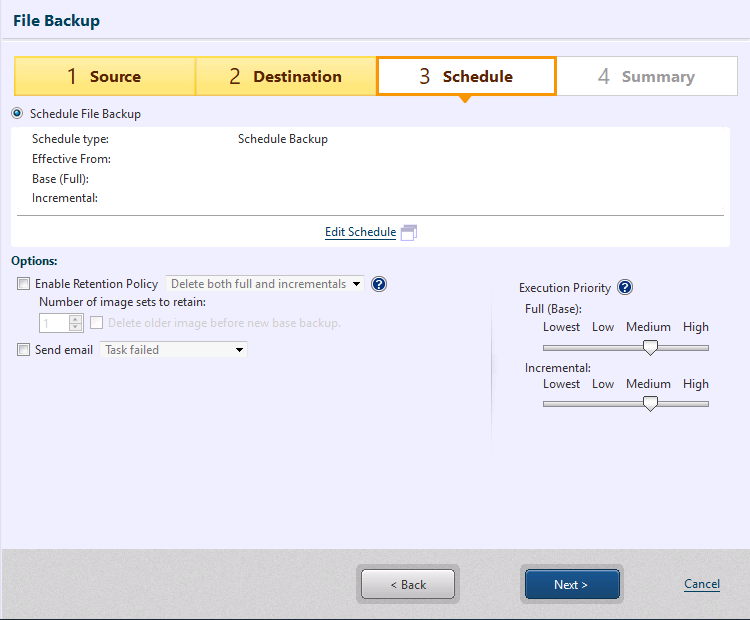
Step 3: Create Backup Schedule
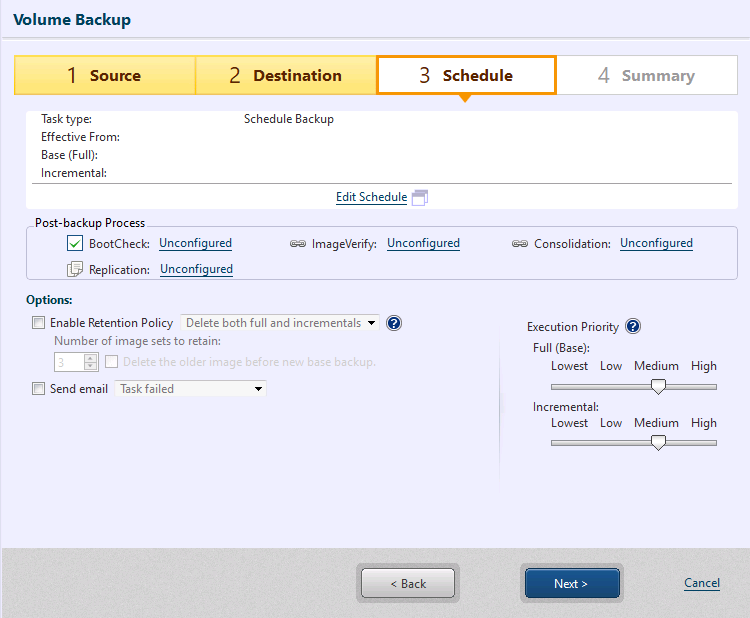
Configure the backup schedule settings from the step [3 Schedule] window and by clicking [Edit Schedule].
-
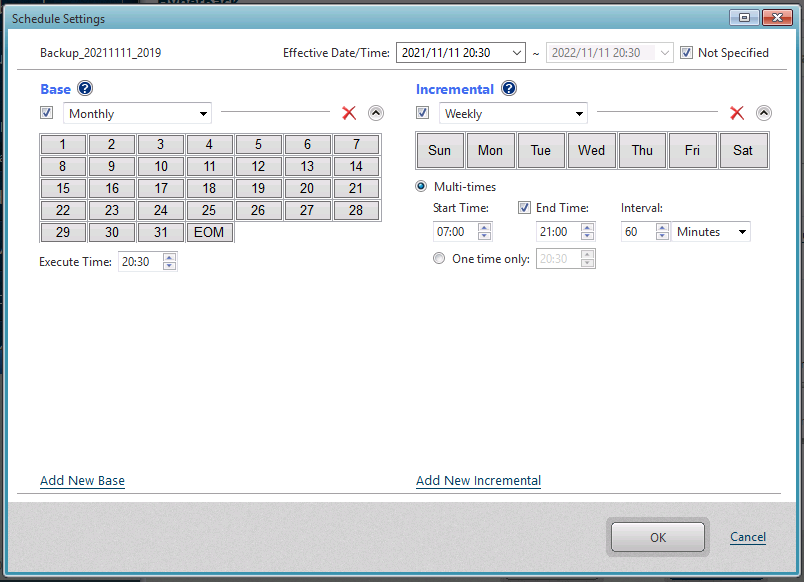
Effective Date/Time
Begin by specifying [Effective Date/Time] that the scheduled task becomes live. The [Effective Date/Time] defaults to begin 10 minutes from the start of the configuration wizard. The [Not Specified] option may be checked so that the schedule task is live for an unlimited period. -
Backup Task Type
Please select [One-time Backup] or [Scheduled Backup]. When selecting [Scheduled Backup], please select the schedule type. -
Base
Check the box and use the drop down menu to select the schedule type. Options include [Weekly], [Monthly], [Specified Date/Time], [Designate Specific Days]. Uncheck the box to disable the schedule instead of deleting.
Click [Add New Base] to add a new base backup schedule. Any unnecessary schedule can be deleted by clicking on ‘x’ icon. -
Incremental
Check the box and use the drop down menu to select the schedule type. Options include [Weekly], [Monthly], [Specified Date/Time]. The following options are provided to run incremental backup tasks.-
Multi-times - Please specify the time slot and interval to run recurring backup tasks. If not specifying [End Time], the incremental backup tasks regularly run until the specified time on the following day.
-
One Time Only - Specify the execution time.
Click [Add New Incremental] to add a new Incremental backup schedule. Any unnecessary schedule can be deleted by clicking on ‘x’ icon.
-
-
Event Backup Check the box for the [Shutdown / Reboot] option to enable event-triggered backups so the backup task is started upon system shutdown or restart.
Home edition or its equivalent does not provide for monitoring the progress or cancelling running backup tasks.
If Quick Start-up is enabled in the system environment, running a backup task at System Shutdown is not an option.
-
Option
-
Auto run if a scheduled task is missed By enabling this option, a skipped task at system shutdown if any, is automatically executed when the system is rebooted.
-
Prioritize a skipped base backup task When this option is enabled and if both base and incremental backup images are skipped, execution of the skipped base backup task is prioritized.
The tasks skipped due to system maintenance or installation of a Windows Update will be automatically executed when the system is rebooted. It is recommended to disable this option if you not want to automatically run the skipped tasks.
-
In the event that an enabled but undefined schedule already exists, the schedule setting cannot be configured. Disable or delete the schedule.
When completing the settings, click [OK] to create a backup schedule. Summary of the configured schedule settings are displayed.
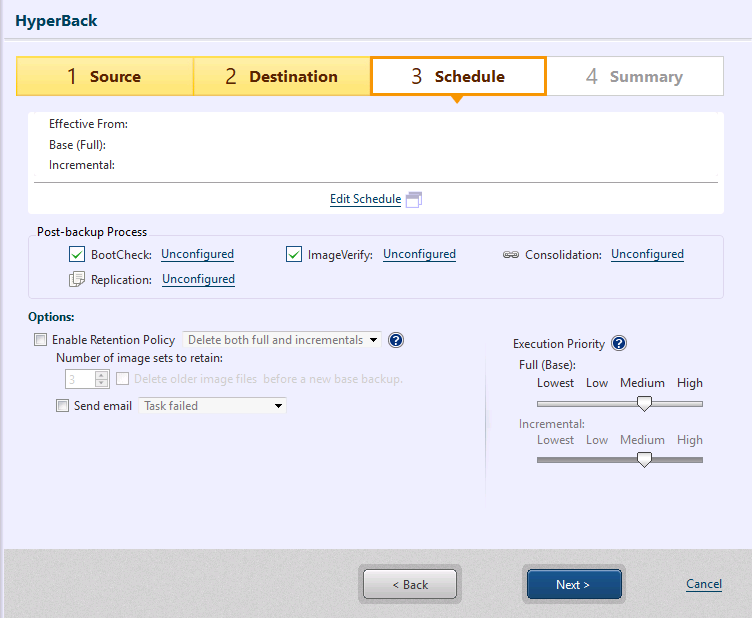
Post-backup Process

When [Scheduled Backup] is selected, you can configure the settings for post-backup processing to execute when a backup file is created. For more details, please refer here.
When you specified Amazon S3, Microsoft Azure for the destination storage, Post-backup Process is not supported.
Options

-
Enable Retention Policy
Check this box to enable a retention policy as to how many sets of incremental backup files to retain before deletion. Image set includes a base backup and the associated incremental or differential backup. Select [Delete the older image before new base backup] option to delete the most obsolete image set before a new image set is created, when the number of image sets reaches the pre-defined limit. Select option to delete the most obsolete image set before a new one is created.-
Delete both the full and incremental: Select this radio button to delete both full and incremental backups based on the retention policy settings.
-
Delete only the incremental: Selecting this option deletes only the incremental backups based on the retention policy. Full backups are not deleted.
-
-
Enable Reconcile when issues occur in the image chain or tracking data The use of an existing incremental backup image file keeps continuity in an incremental image set should an incremental file is deleted or failed to create. If not enabling this option, the subsequent incremental backup task creates a base backup image file.
-
Create an incremetnal image sequentially after restoring the system. Check this box to continue the incremenatal chain even after restoring the system.
-
Create an incremetnal image sequentially after resuming the schedule. Check this box to continue the incremenatal chain even after disabling/enabling the schedule.
The above three options are valid only when Tracking Driver Mode is selected.
-
Send email Check this box to send email notification of a task completed with a specified status. Predefine the email notification settings by selecting [Preferences] - [Notification] from the menu bar.
-
Execution Priority
Select a level of task Execution Priority.
When completing the settings, click [Next].
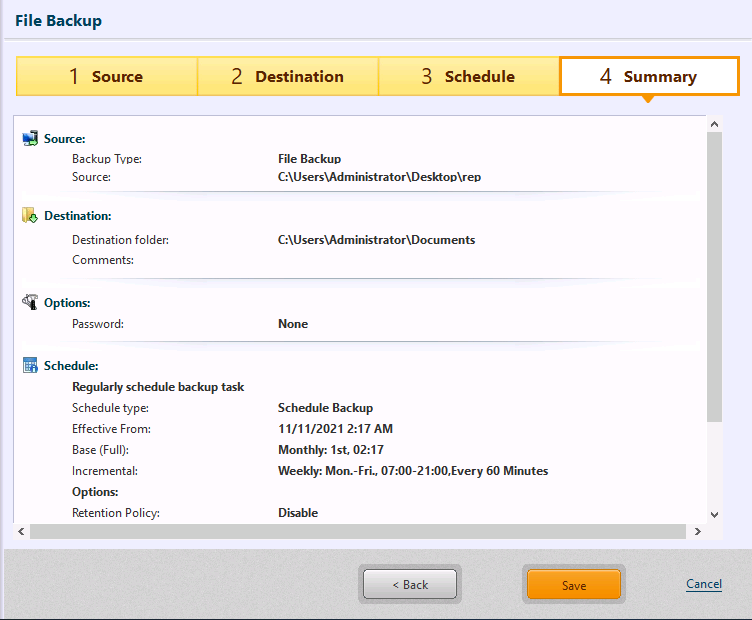
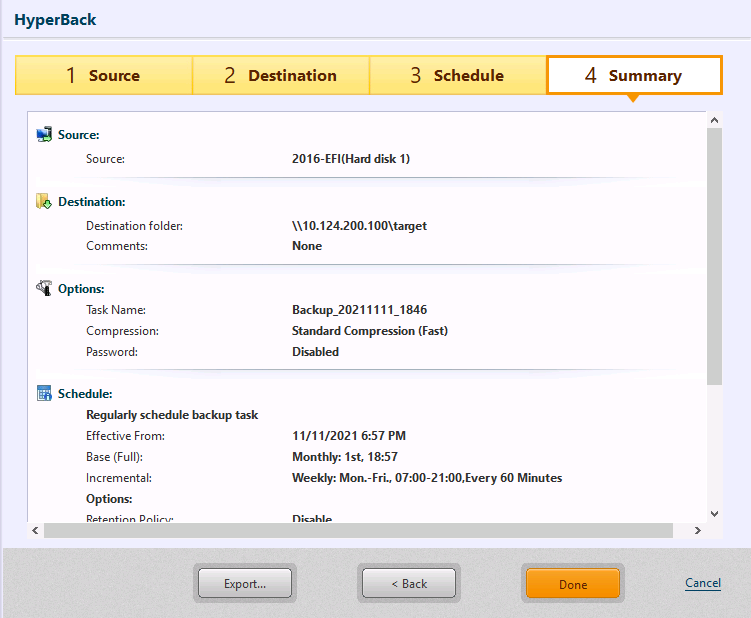
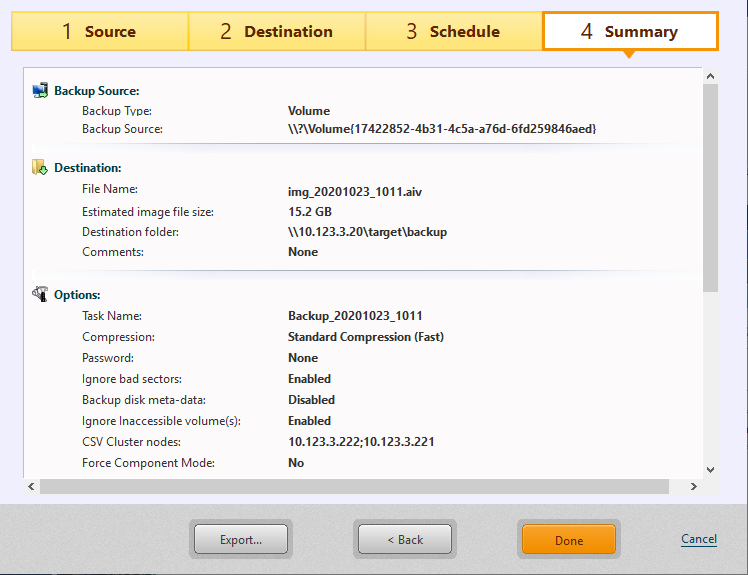
Step 4: Summary
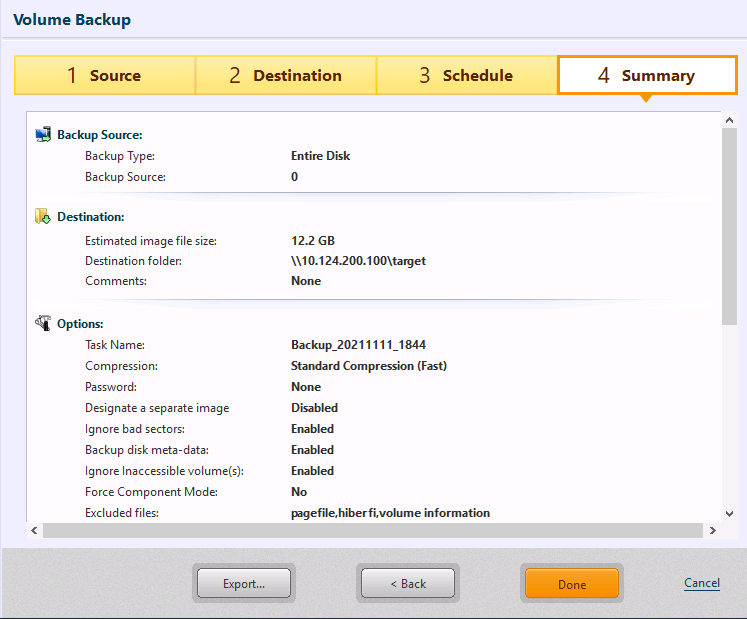
Use the Summary window to review the backup configuration and options.
Click [Save].
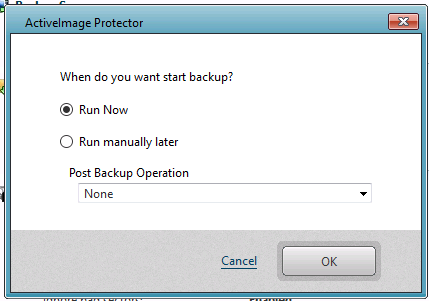
When One-time Backup is selected
Click [Done] to display the dialog for configuring the settings for the execution timing.
When Scheduled Backup is selected
Click [Done] to display the confirmation message for starting the first scheduled backup task.
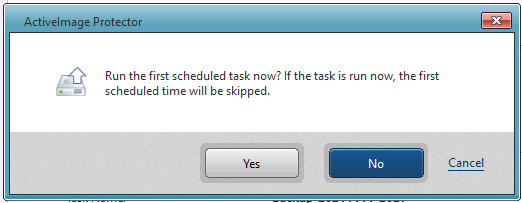
Click [Yes] to start the task immediately. Click [No] to go back to Dashboard window. Click [Cancel] to go back to the wizard instead of completing the configured setting.
If selecting to perform a post-backup process, the process starts immediately after backup image is created according to the settings configured.
Allows you to select a specific disk on local system or a volume for backup source.
File Backup
Step 1: Select Backup Source
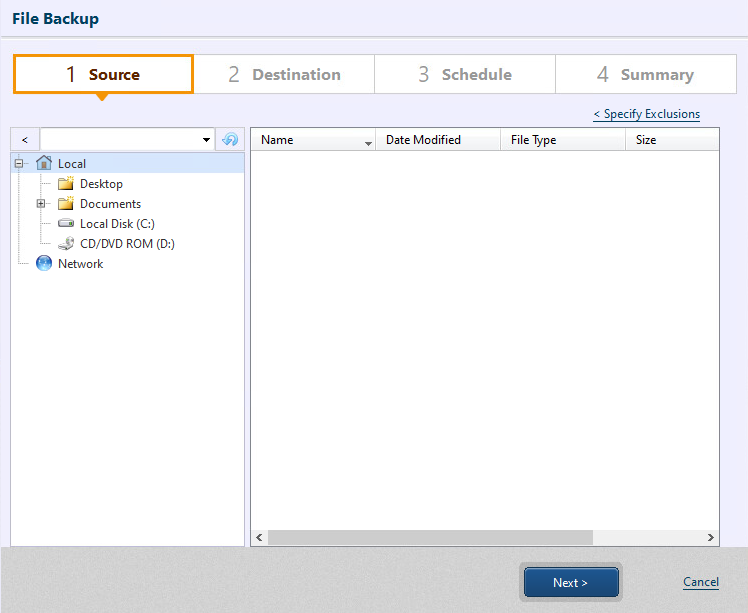
Select a file / folder to back up.
Backup feature of Desktop edition does not support the items in network shared folder.
Snapshot is not used for backing up the items in network shared folder, so that the backups are taken at the point in time when performing the process for the respective files.
After configuring the above settings, click [Next].
When configuring the settings for Excluding Items, please specify as follows. When disabling the configured settings for Excluding Items, please uncheck the unwanted items.
-
File
When excluding specific files only, please specify the file name including the file extension. Ex: EULA.txt
When excluding files with specific extension only, please use wild card “*”.
Ex:*.txtWhen excluding files of which file name includes specified character strings, please use wild card “*”.
Ex: EULA.* -
Folder
Please specify the full path for the folder.
Ex: C:\Windows\Temp
After configuring the settings, click [Next].
Step 2: Select Destination
Select a destination storage and configure the settings.
-
Task Name Specify the name for the backup task.
-
Destination Folder Specify the destination folder for the backups.
When selecting a cloud storage, please refer here.
When selecting a USB device as the storage destination, please refer here.
Actiphy ImageCenter (StorageServer) is not supported to specify as the backup destination.
-
Fine Name Specify the name of the image file to create. By default, the image file is named with the current date and time. Please edit the file name, if necessary.
-
Comment
Add a brief description in the [Comments] textbox to define for the created backup. -
Destination Isolation Option
Disconnects access to backup image storage drives after backups complete rendering the specified destination storage inaccessible. This feature is enabled on OS on which AIP is installed.The combined use of the Destination Isolation feature with a post-backup process is not supported.
-
Un-assign the drive letter from the local hard disk after completing the backup: When this option is enabled, ActiveImage Protector will automatically unassign the local hard disk’s drive letter once the backup process is complete. Before starting a subsequently scheduled task, ActiveImage Protector will automatically assign the local hard disk’s drive letter. This option can be used as a security measure for preventing data tampering in the storage connected by assigning drive letter in Explorer, etc.
-
Take the destination local hard disk offline after completing the backup: When you enable this option, ActiveImage Protector will set the destination hard disk to offline once the backup is complete. When the subsequently scheduled task runs, the destination local hard disk is set online. This option can be used as a security measure for preventing data tampering in the storage connected by assigning drive letter in Explorer, etc.
-
Eject the destination USB hard disk after completing the backup: Enabling this option causes ActiveImage Protector to eject the destination drive once the backup is complete if you save your backups to removable media, such as a USB drive. Please make sure the destination USB hard disk is plugged in before starting the subsequent task. Otherwise, the task fails in -403 error.
In order to successfully run a backup task, please manually use the following procedures so that the device is recognized on OS.
-
Plug in / out USB HDD cable or USB flash memory.
-
Restart OS.
-
-
Disable the destination network connection after completing the backup: This option will disconnect the network connection to your backup destination once the backup is complete if you save backups to a network drive. Before starting a subsequently scheduled task, the destination network connection is automatically enabled.
-
Configure backup settings and backup image protection settings.
-
Backup Enabling [Back up ACL] the backup source ACL will be backed up. When restoring, the backed-up ACL will be restored.
-
Password
Password protect the backup by assigning a unique password. This ensures that password input is required for mounting, exploring, or restoring any of the contents of the backup.
There are three levels of encryption to choose from.
* RC5 - An early encryption standard with a variable block size, key size and number of rounds. Selecting RC5 encryption provides a faster encryption processing speed.

* [AES 128 bit] and [AES 256 bit] - A stronger encryption method than RC5 with a fixed block size and a key size of 128 or 256 bits.
After configuring the above settings, click [Next].
Step 3: Create Backup Schedule
Configure the backup schedule settings from the step [3 Schedule] window and by clicking [Edit Schedule].
-
Effective Date/Time
Begin by specifying [Effective Date/Time] that the scheduled task becomes live. The [Effective Date/Time] defaults to begin 10 minutes from the start of the configuration wizard. The [Not Specified] option may be checked so that the schedule task is live for an unlimited period. -
Backup Task Type
Please select [One-time Backup] or [Scheduled Backup]. When selecting [Scheduled Backup], please select the schedule type.
IT Pro Edition does not support Scheduled Backup.
-
Base
Check the box and use the drop down menu to select the schedule type. Options include [Weekly], [Monthly], [Specified Date/Time], [Designate Specific Days]. Uncheck the box to disable the schedule instead of deleting.
Click [Add New Base] to add a new base backup schedule. Any unnecessary schedule can be deleted by clicking on ‘x’ icon. -
Incremental
Check the box and use the drop down menu to select the schedule type. Options include [Weekly], [Monthly], [Specified Date/Time]. The following options are provided to run incremental backup tasks.-
Multi-times - Please specify the time slot and interval to run recurring backup tasks. If not specifying [End Time], the incremental backup tasks regularly run until the specified time on the following day.
-
One Time Only - Specify the execution time.
Click [Add New Incremental] to add a new Incremental backup schedule. Any unnecessary schedule can be deleted by clicking on ‘x’ icon.
-
-
Event Backup Check the box for the [Shutdown / Reboot] option to enable event-triggered backups so the backup task is started upon system shutdown or restart.
Home edition or its equivalent does not provide for monitoring the progress or cancelling running backup tasks.
If Quick Start-up is enabled in the system environment, running a backup task at System Shutdown is not an option.
-
Option
-
Auto run if a scheduled task is missed By enabling this option, a skipped task at system shutdown if any, is automatically executed when the system is rebooted.
-
Prioritize a skipped base backup task When this option is enabled and if both base and incremental backup images are skipped, execution of the skipped base backup task is prioritized.
The tasks skipped due to system maintenance or installation of a Windows Update will be automatically executed when the system is rebooted. It is recommended to disable this option if you not want to automatically run the skipped tasks.
-
In the event that an enabled but undefined schedule already exists, the schedule setting cannot be configured. Disable or delete the schedule.
When completing the settings, click [OK] to create a backup schedule. Summary of the configured schedule settings are displayed.
Options
-
Enable Retention Policy
Check this box to enable a retention policy as to how many sets of incremental backup files to retain before deletion. Image set includes a base backup and the associated incremental or differential backup. Select [Delete the older image before new base backup] option to delete the most obsolete image set before a new image set is created, when the number of image sets reaches the pre-defined limit. Select option to delete the most obsolete image set before a new one is created.-
Delete both the full and incremental: Select this radio button to delete both full and incremental backups based on the retention policy settings.
-
Delete only the incremental: Selecting this option deletes only the incremental backups based on the retention policy. Full backups are not deleted.
-
-
Send email Check this box to send email notification of a task completed with a specified status. Predefine the email notification settings by selecting [Preferences] - [Notification] from the menu bar.
-
Execution Priority
Select a level of task Execution Priority.
Once the settings are complete, click [Next].
Step 4: Summary
Use the Summary window to review the backup configuration and options. Click [Done].
When One-time Backup is selected
Click [Done] to display the dialog for configuring the settings for the execution timing.
When Scheduled Backup is selected
Click [Done] to display the confirmation message for starting the first scheduled backup task.
Click [Yes] to start the task immediately. Click [No] to go back to Dashboard window. Click [Cancel] to go back to the wizard instead of completing the configured setting.
When no change is made to any of the backup source item, no backup image is created by incremental backup task execution.
Back up a file / folder on local host or network shared folder.
IT Pro does not provide this feature.
HyperBack
Step 1 : Select Backup Source
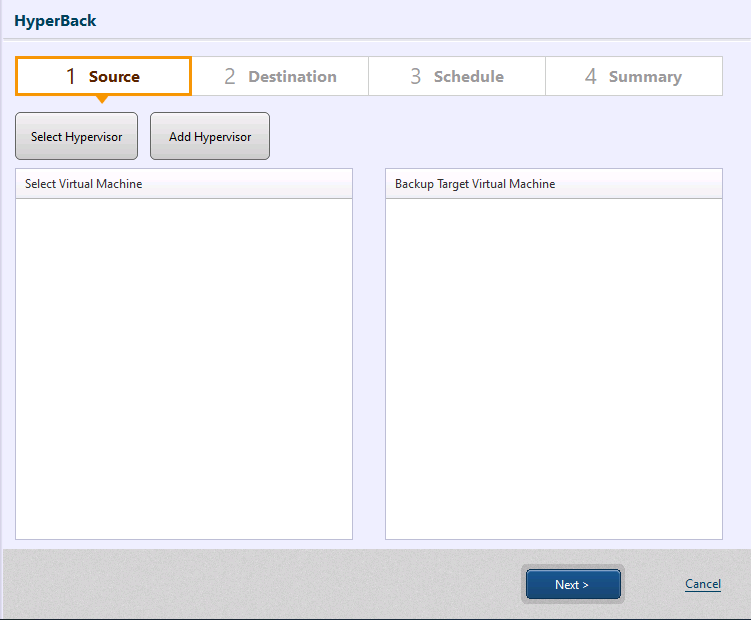
Click [Add Hypervisor] to add a hypervisor. Click [Add Hypervisor], and [Preference] - [Hypervisor] (preference.html) is displayed to add a hypervisor.
When using Virtual (HyperAgent) edition, if the number of hypervisors on which the product license is activated has reached the number of available licenses, and you still need to add another backup source hypervisor for HyperBack, you have to deactivate a license used for the existing hypervisor.
When using vCenter, the managed ESXi host is respectively registered.
To access Hyper-V on local agent, select [Connect to this host].
Click [Select Hypervisor] and select backup source virtual machine. The selected hypervisor is indicated in [Select virtual machine]. Click [+], double-click on the host name or select [Refresh] in the right-click menu to display a list of virtual machines to select for backup source. When connecting to VMware vCenter Version 7 or later, FCD is displayed and the virtual machines can be backed up.
-
All disks, when all the checkboxes are clicked, are selected for the backup source virtual machine regardless of whether the number of the disks are increased or decreased afterward.
If unchecking a checkbox for a disk, the remaining checked disks are selected as the backup source. -
You are allowed to select virtual machines configured on different hypervisors.
-
Virtual machine and FCD cannot be selected at a time.
When enabling [Include the added new VM to backup source] option, the new virtual machines are included in backup source when added on hypervisor on which the backup source virtual machine is configured. This option behaves as follows:
-
When enabling this option, you cannot add a virtual machine. Please enable this option only after selecting the backup source virtual machine.
-
This option is not available when FCD is specified as the backup source.
-
Additional judgment will be made based on the status of the final task execution.
-
The same backup settings as the original task will be configured for the task created when a new virtual machine is added.
-
If a new virtual machine is detected when [Create backup image file of multiple virtual machines] option is enabled, base backup is created.
The virtual standby replica created by vStandby, standby VM created by HyperStandby and the virtual machines moved/migrated from other hypervisor as a result of fail-over clustering or by vMotion are assumed as the added new VM.
When using Server Edition, please select the same or less number of backup source virtual machines than the number of licenses allocated to the product key. When the number of activated tasks has reached the number of the remaining available licenses, you need to deactivate the licensed tasks.
When [Include the added new VM to backup source] option is enabled, please be aware that a license will be consumed whenever a new virtual machine is added to the hypervisor.
NOTES
Microsoft Hyper-V Virtual Machine
- The check points for Hyper-V 2012/2012R2 do not work with VSS Writer of the respective virtual machines. When using domain controller, SQL Server,Exchange, Oracle, VSS-incompatible database, etc., please install ActiveImage Protector on the respective virtual machines and use agent-based backup feature.
VMware vSphere ESXi virtual machine
-
FCD supports backup when connected to VMware vCenter 7 or later, provided that the FCDs were created on VMware vSphere ESXi 7 or later.
-
FCD supports full backup only.
KVM Virtual Machine
-
When registering a host, you must allow SSH connections as root on the Linux host.
-
Virtual machines created from RAW volumes are not supported.
-
When backing up a virtual machine, the following components must be installed on the Linux host. Additionally, the firewall must allow port 3260 for the iSCSI target service.
- RHEL series targetcli
- Debian, Ubuntu targetcli-fb
-
When Virtio-win-guest-tools is not installed on Windows guest machine, the data created before execution of the backup task may not be correctly backed up. You are recommended to install this tool in advance.
Proxmox Virtul Machine
-
When running hot backup of a live virtual machine and shutting down the virtual machine, the task fails in error -701.
-
When running backup task for a virtual machine in shut-down state, if you need to use the system, select [Resume] on Web console or remote console.
-
You are recommended to run a backup task under the following conditions on Windows guest machine. If the conditions are not met, the data created prior to the execution of the backup task may not be correctly backed up.
- Install Virtio-win-guest-tools
- Install Virtio-win-guest-tools and enable [QEMU Guest Agent]in the settings for backup source virtual machine.
- When backing up the virtual machines on cluster-configured nodes, if the backup source virtual machine moves to another node as a result of the migration, the subsequenly executed task fails in error.
Click [Next].
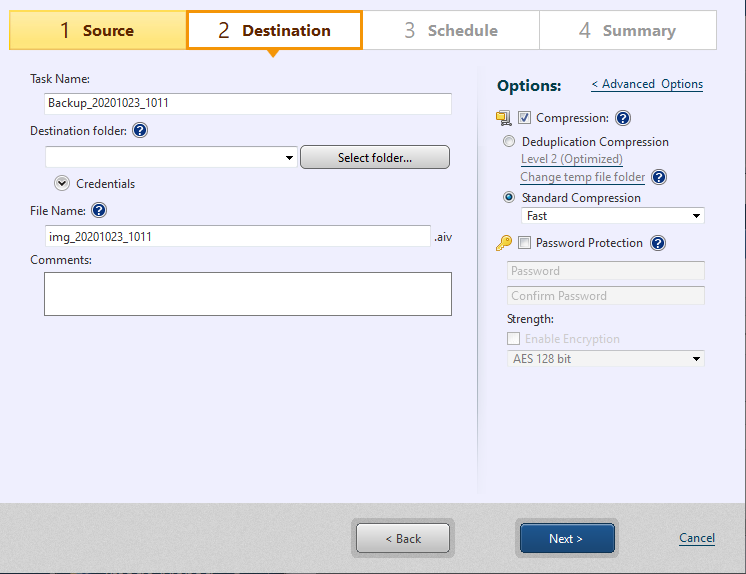
Step 2: Select Destination
Select a destination storage for the backups and configure the settings.
-
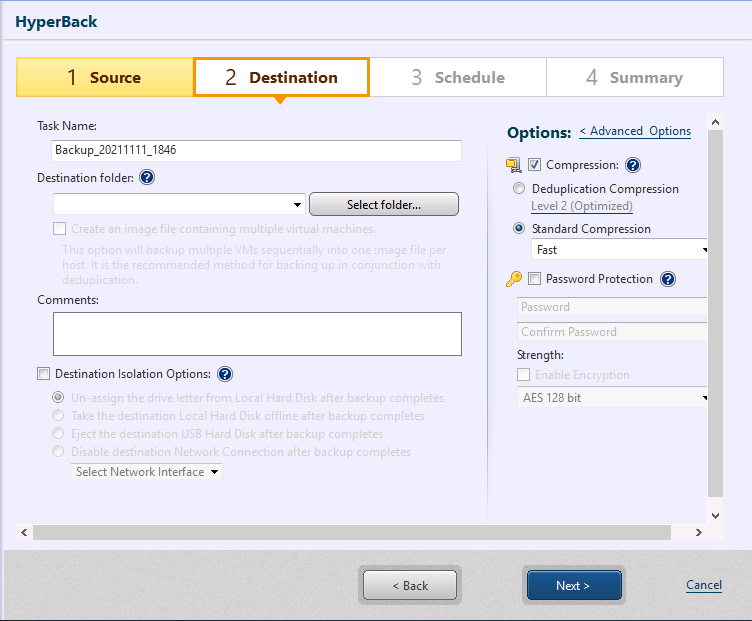
Task Name Specify the name for the backup task.
-
Destination Folder
The created backups are saved in a sub-folder created under the specified destination folder. The sub-folder is created under a unique name.
Enabling [Create multiple virtual machines image file], multiple virtual machines on a single hypervisor are backed up in one backup. Enabling both this option and Deduplication Compression, the overall backup processing time may be increased but minimizes the size of the backup.
You are not allowed to edit the unique backup image file name.
When selecting a cloud storage, please refer here.
When a bucket in Actiphy ImageCenter (StorageServer) is selected for backup destination, even when backup process has completed with this product, if the processing of backup image files with Actiphy ImageCenter (StorageServer) has not completed yet and the subsequent schedule comes, then, the process does not gain from 0.1% until the processing of backup image files completes with Actiphy ImageCenter (StorageServer).
-
Comments
Add a brief description in the [Comments] textbox to define the created backup. -
Destination Isolation Option
Disconnects access to backup image storage drives after backups complete rendering the specified destination storage inaccessible. This feature is enabled on OS on which AIP is installed.The combined use of the Destination Isolation feature with a post-backup process is not supported.
-
Un-assign the drive letter from the local hard disk after completing the backup: When this option is enabled, ActiveImage Protector will automatically unassign the local hard disk’s drive letter once the backup process is complete. Before starting a subsequently scheduled task, ActiveImage Protector will automatically assign the local hard disk’s drive letter. This option can be used as a security measure for preventing data tampering in the storage connected by assigning drive letter in Explorer, etc.
-
Take the destination local hard disk offline after completing the backup: When you enable this option, ActiveImage Protector will set the destination hard disk to offline once the backup is complete. When the subsequently scheduled task runs, the destination local hard disk is set online. This option can be used as a security measure for preventing data tampering in the storage connected by assigning drive letter in Explorer, etc.
-
Eject the destination USB hard disk after completing the backup: Enabling this option causes ActiveImage Protector to eject the destination drive once the backup is complete if you save your backups to removable media, such as a USB drive. Please make sure the destination USB hard disk is plugged in before starting the subsequent task. Otherwise, the task fails in -403 error.
In order to successfully run a backup task, please manually use the following procedures so that the device is recognized on OS.
-
Plug in / out USB HDD cable or USB flash memory.
-
Restart OS.
-
-
Disable the destination network connection after completing the backup: This option will disconnect the network connection to your backup destination once the backup is complete if you save backups to a network drive. Before starting a subsequently scheduled task, the destination network connection is automatically enabled.
-
-
Compression Enabling compression reduces storage requirements by further compacting the backup. Begin by checking the [Compression] box, then selecting the desired type and level of compression.
-
Deduplication Compression: Select one of the three levels of deduplication available.
-
Level 1 - Deduplication is performed at the highest level. This level of compression may increase the overall backup processing time but achieves the most tightly compressed backup.
-
Level 2 - This preset level provides the best balance between process time and compression performance. (This is the default setting).
-
Level 3 - The backup will be generated at a lower compression rate and deduplication requires less backup processing time.
Temporary File Folder: Set the location for deduplication to process temporary files.
The maximum size of the temporary file folder will be 1% of the used space of backup source.
It is recommended to specify a folder on SSD that delivers fast read and write speeds.
-
-
Standard Compression: The dropdown menu provides three levels of standard compression.
-
Standard - Backup processing time and storage requirements are at an optimum.
-
Fast - Backup processing time is the shortest.
-
High - The compression process will place a higher demand on system resource usage and an increase in processing time but the result is a smaller backup image.
-
-
-
Password Protection Password protect the backup by assigning a unique password. This ensures that password input is required for mounting, exploring, or restoring any of the contents of the backup.
There are three levels of encryption to choose from.
* RC5 - An early encryption standard with a variable block size, key size and number of rounds. Selecting RC5 encryption provides a faster encryption processing speed.

* [AES 128 bit] and [AES 256 bit] - A stronger encryption method than RC5 with a fixed block size and a key size of 128 or 256 bits.
Advanced Backup Options
Click [Advanced Options] to access the advanced backup options settings page.
-
General
-
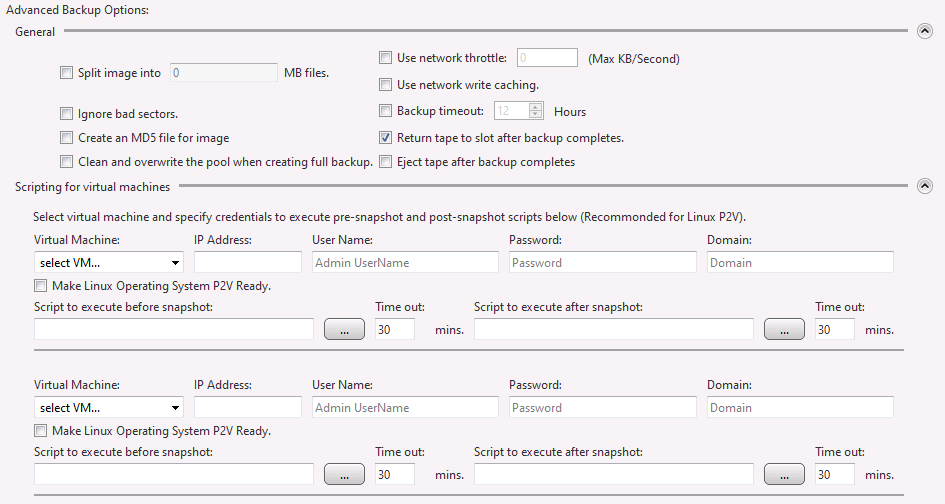
Split image into xx MB files The backup is split into multiple backups of the specified size (MB).
-
Ignore bad sectors
By enabling this option, encountering unreadable sectors will not interrupt the backup task. -
Create an MD5 file for image
MD5 file is created for backup. -
Use network throttle
Define the maximum throughput in KB/second by using network throttle if destination drive is located on a network shared folder or cloud storage. -
Use network write caching When storing backups in network shared folder, cached data are used.
-
Backup time-out
Specify the time-out and the maximum time to wait for a backup task to complete the backup process. If the backup process has not completed when time-out occurs, the task will be canceled. -
In the process of base (full) backup, the pool is overwritten. When specifying a tape device for backup destination, the pool is blanked out and overwritten in the midst of base (full) backup process.
-
Return tape to slot after backup completes When a tape library is selected as the backup destination and backup images are saved in tape media, tape media is moved from the drive to the original slot or an available slot.
When there is no available slot other than mail slot, the tape media is not moved from the drive and “Not found free slot for moving tape.” is recorded in log.
-
Eject tape after backup completes When a tape media is selected as the backup destination, the tape media is ejected after backup process completes.
When a tape library is selected as the backup destination and there is no available space in mail slot, the backup task fails in error. {: .alert .alert-info }
Either [Move the tape media back to the slot after completing the backup] or [Eject tape after backup completes] option is selectable.
-
-
Specify Hyper-V Database VMs When backing up Hyper-V virtual machine on Windows Server 2016 or later, please specify the virtual machine.
Go to [Preference] - [HyperBack] and you need to select [Using Microsoft Resilient Change Traking (RCT)].
-
Special settings for virtual machine Scripts can be set to run before and / or after snapshots are taken for a virtual machine.
-
Virtual Machine Select a virtual machine to run the script.
-
IP Address Enter the IP address assigned to the virtual machine.
-
User Name / Password / Domain Enter the account information to log in the virtual machine.
-
Create Virtual Machine VSS Snapshot This option is available only when KVM/Proxmox virtual machine is selected. Please use this option when selecting Windows virtual machines on which Virtio-win-guest-tools cannot be used / enabled.
Please do not enable Virtio-win-guest-tools if this option is enabled on backup source virtual machine.
This option is not available when Hyper-V or VMware vSphere virtual machine is selected.
-
Make Linux Operating System P2V Ready
Performs the same process as required for [Virtualization] during backup on Linux virtual machines running the following supported distributions. When enabling this option, virtual machines can be started on different virtualization platforms by using HyperRecovery or HyperStandby .-
CentOS 5.x or later
-
RHEL 5.x or later
-
Oracle Linux 5.x or later
-
SLES 11 SP3 or later
-
OpenSuse 5.x or later
Before Virtualization, please enable SSH on the source Linux OS and configure the firewall to open port 22.
-
Script to execute before the snapshot is taken Specify a script or batch file to run before the snapshot of hypervisor is taken. Optionally, set the amount of time before timeout action will be taken.
-
Script to execute after the snapshot is taken Specify a script or batch file to run after the snapshot of hypervisor is taken. Optionally, set the amount of time before timeout action will be taken.
Enter the path and script to run or use the browse button […] button to select a script to be executed. (Scripts run must be non-user interactive.)
Ex:Execute a script that places a database into a paused state before a snapshot is taken.-
Windows Backup Source VM
Please configure the firewall settings to allow [File and printer sharing] on the computer. If the firewall settings are configured for Group Policy, please select [Network] - [Network Connection] - [Windows Firewall] and enable [Allow inbound file and printer sharing exception]. -
Linux Backup Source VM
The specified user has to be authorized for an SSH connection.
-
Depending on the number of the backup source virtual machines, you can configure the additional settings by clicking [Add Settings].
-
-
Scripts(HyperAgent) Scripts can be set to run for a backup source computer (HyperAgent).
- Script to execute after image creation Specify a script to run after the backup image has been created. You can specify the time-out and the maximum time to wait for a backup task to complete and start executing the script.
-
Click [Next] to create the schedule.
Step 3: Create Backup Schedule
Configure the schedule settings. To create a schedule, at least one schedule type needs to be enabled.
-
Effective Date/Time The [Effective Date/Time] defaults to begin 10 minutes from the start of the configuration wizard. The [Not Specified] option may be checked so that the schedule task is live for an unlimited period.
-
Base
Check the box and use the drop down menu to select the schedule type. Options include [Weekly], [Monthly], [Specified Date/Time], [Designate Specific Days]. Uncheck the box to disable the schedule instead of deleting.
Click [Add New Base] to add a new base backup schedule. Unnecessary schedules can be deleted by removing them to recycle bin. -
Incremental Check the box and use the drop down menu to select the schedule type. Options include [Weekly], [Monthly], [Specified Date/Time]. Uncheck the box to disable the schedule instead of deleting. The following options are provided to run incremental backup tasks.
-
Multi-times - Please specify the time slot and interval to run recurring backup tasks. If not specifying [End Time], the incremental backup tasks regularly run until the specified time on the following day.
-
One Time Only - Specify the execution time.
Click [Add New Incremental] to add a new Incremental backup schedule. Any unnecessary schedule can be deleted by clicking on ‘x’ icon. Click the icon of recycle bin to remove unnecessary schedules.
-
In the event that an enabled but undefined schedule already exists, the schedule setting cannot be configured. Disable or delete the schedule.
Click [Next].
Post-Backup Process
Configure the settings for post-backup processing to execute when a backup is created. For more details, please refer here.
When you specified Amazon S3, Microsoft Azure for the destination storage, Post-backup Process is not supported.
Options
-
Enable Retention Policy
Check this box to enable a retention policy as to how many sets of incremental backup files to retain before deletion. Image set includes a base backup and the associated incremental or differential backups. Select [Delete the older image before new base backup] option to delete the oldest image set before a new image set is created, when the number of image sets reaches the pre-defined limit. Select option to delete the oldest image set before a new one is created.-
Delete both the full and incremental: Select this radio button to delete both full and incremental backups based on the retention policy settings.
-
Delete only the incremental: Selecting this option deletes only the incremental backups based on the retention policy. Full backups are not deleted.
-
-
Sending Email Send a notification email to inform recipients of the status of the task execution. Go to [Preferences] - [Notification] and predefine the E-Mail settings.
-
Execution Priority: Task execution priority may be selected
Click [Next].
Step 4: Summary
Use the Summary window to review the configuration and options.
Click [Done] to display the confirmation message for starting the first scheduled backup task.
Click [Yes] to start the task immediately. Click [No] to go back to Dashboard window. Click [Cancel] to go back to the wizard instead of completing the configured setting.
When specifying the first generation virtual machine on Hyper-V for the backup source, a checkpoint ‘VG_Snapshot1(or 2)’ is created upon completion of a backup task. When deleting this checkpoint, the subsequent incremental backup process takes mostly the same time as a base backup.
HyperBack (agentless Backup) enables backup of virtual machines on specific hypervisor (Microsoft Hyper-V, VMware vSphere ESXi, KVM or Proxmox).
HyperBack backs up virtual machines or hosts without having to install an agent on source hypervisor or virtual machine, while minimizing the consumption of CPU and memory resources on hypervisor machines.
This feature is not available on Desktop, Cluster, Cloud and IT Pro Editions.
Backup CSV
Step 1: Select Backup Source
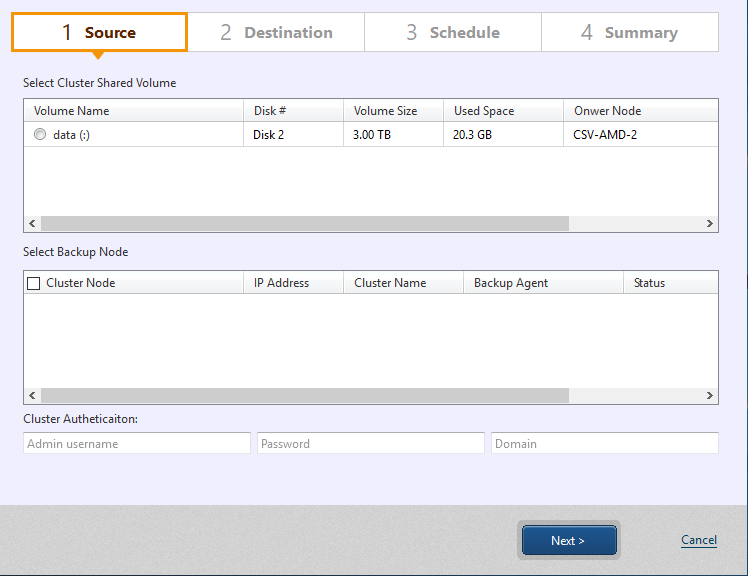
Select backup source CSV volumes. Select only one CSV per a backup task.
When selecting CSV, cluster node is displayed. Please select backup node.
Backup task runs on the owner node of the backup source CSV volumes. It is recommended to configure every nodes as the backup node, so that incremental backup chains of CSV volumes can be continued on the other node even when the owner node of CSV volumes shifts to another node.
You should not be able to select a node as backup node on which agent is configured but cannot be activated.
Click [Next].
Step 2: Select Destination
Select a destination storage for the backups, specify names for both the backups and the backup task.
-
Task Name Specify the name for the backup task.
-
Destination Folder Specify the backup destination storage. The created backups are saved in a sub-folder created under the specified destination folder. The sub-folder is created under a unique name. You can select only network shared folder for the destination storage.
You are not allowed to edit the unique backup image file name.
-
Comment
Add a brief description in the [Comments] textbox to define the created backup. -
Compression Enabling compression reduces storage requirements by further compacting the backups. Begin by checking the [Compression] box, then selecting the desired type of compression.
-
Deduplication Compression: Select one of the three levels of deduplication available.
-
Level 1 - Deduplication is performed at the highest level. This level of compression may increase the overall backup processing time but achieves the most tightly compressed backups.
-
Level 2 - This preset level provides the best balance between process time and compression performance. (This is the default setting).
-
Level 3 - The backup will be generated at a lower compression rate and deduplication requires less backup processing time.
Temporary File Folder: Set the location for deduplication to process temporary files.
The maximum size of the temporary file folder will be 1% of the used space of backup source.
You are recommended to specify a folder on SSD that delivers fast read and write speeds.
-
-
Standard Compression: The dropdown menu provides three levels of standard compression.
-
Standard - Backup processing time and storage requirements are at an optimum.
-
Fast - Backup processing time is the shortest.
-
High - The compression process will place a higher demand on system resource usage and an increase in processing time but the result is a smaller backup image.
-
-
-
Password Protection Password protect the backups by assigning a unique password. This ensures that password input is required for mounting, exploring, or restoring any of the contents of the backup.
There are three levels of encryption to choose from.
-
RC5 - An early encryption standard with a variable block size, key size and number of rounds. Selecting RC5 encryption provides a faster encryption processing speed.
-
[AES 128 bit] and [AES 256 bit] - A stronger encryption method than RC5 with a fixed block size and a key size of 128 or 256 bits.
Advanced Backup Options
Click [Advanced Options] to access the advanced backup options settings page.
-
General

-
Backup by disk If including multiple disks in backup source, backups are created per disk.
-
Split image into xx MB files The backup is split into multiple files of the specified size (MB)
-
Ignore bad sectors
By enabling this option, encountering unreadable sectors will not interrupt the backup task. -
Create an MD5 file for image
MD5 files are created for backups. -
Ignore inaccessible volumes By enabling this option, encountering inaccessible volumes will not interrupt the backup task.
-
Use network throttle
Define the maximum throughput in KB/second by using network throttle if destination drive is located on a network shared folder or cloud storage. -
Use network write caching When storing backups in network shared folder, cached data are used.
-
Backup time-out
Specify the time-out and the maximum time to wait for a backup task to complete the backup process.
-
-
VSS Settings
Edit the VSS settings for a backup task. Changing this setting in most cases is not necessary (for IT Technicians).
-
Operation Mode
Check in the check box for [Component Mode] to run VSS in component mode in backup process. Enabling VSS component mode runs the additional Verify data task (if supported) before execution of a backup task.-
Component Mode : VSS component mode is enabled for every VSS writer.
-
Non-component mode : VSS component mode is disabled for every VSS writer.
-
-
Excluding Files
Specify the items to exclude from backup process.
-
-
Deduplication Compression
Select the option to ensure that the backup task completes without interruption if insufficient disk space is detected in the temporary file folder before operation.
-
Auto-switch from default to an alternate folder The temporary file folder used by deduplication will automatically switch over if insufficient disk space is detected.
-
Continue operation with [Standard] Compression Will complete the backup task using the default Standard Compression.
-
Temporary File Folder Specify the location for deduplication to process temporary files. The maximum size of the temporary file folder will be 1% of the used space of backup source or less. The higher the deduplication level, the larger the temporary file size will be.
-
-
Scripting
Scripts can be implemented to run before and or after snapshots are taken or after the backup has been created. Use the dialog box to execute scripts.
-
Script to execute before the snapshot is taken Specify a script or batch file to run before the snapshot is taken.
-
Script to execute after the snapshot is taken Specify a script or batch file to run after the snapshot is taken.
-
Script to execute after image creation Specify a script or batch file to run after the backup image has been created.
-
Force script execution Checking this box ensures that all specified script or batch files will be executed even if an error occurs during the backup operation.
-
Run on
Select the backup type to run the specified script.
-
Click [Next].
Step 3: Create Backup Schedule

Configure the backup schedule settings from the step [3 Schedule] window and by clicking [Edit Schedule].
-
Effective Date/Time
Begin by specifying [Effective Date/Time] that the scheduled task becomes live. The [Effective Date/Time] defaults to begin 10 minutes from the start of the configuration wizard. The [Not Specified] option may be checked so that the schedule task is live for an unlimited period. -
Base
Check the box and use the drop down menu to select the schedule type. Options include [Weekly], [Monthly], [Specified Date/Time], [Designate Specific Days]. Uncheck the box to disable the schedule instead of deleting.
Click [Add New Base] to add a new base backup schedule. Any unnecessary schedule can be deleted by clicking on ‘x’ icon. -
Incremental
Check the box and use the drop down menu to select the schedule type. Options include [Weekly], [Monthly], [Specified Date/Time]. Uncheck the box to disable the schedule instead of deleting. The following options are provided to run incremental backup tasks.-
Multi-times - Please specify the time slot and interval to run recurring backup tasks. If not specifying [End Time], the incremental backup tasks regularly run until the specified time on the following day.
-
One Time Only - Specify the execution time.
Click [Add New Incremental] to add a new Incremental backup schedule. Any unnecessary schedule can be deleted by clicking on ‘x’ icon.
-
-
Option
-
Auto run if a scheduled task is missed By enabling this option, a skipped task at system shutdown if any, is automatically executed when the system is rebooted.
-
Prioritize a skipped base backup task When this option is enabled and if both base and incremental backup images are skipped, execution of the skipped base backup task is prioritized.
The tasks skipped due to system maintenance or installation of a Windows Update will be automatically executed when the system is rebooted. It is recommended to disable this option if you not want to automatically run the skipped tasks.
-
When an unconfigured but enabled schedule exists, an additional schedule cannot be created. Please disable or delete the unconfigured schedule.
When completing the settings, click [OK] to create a backup schedule. Summary of the configured schedule settings are displayed.
Post-backup Process
When [Scheduled Backup] is selected, you can configure the settings for post-backup processing to execute when a backup file is created.

For more details, please refer here.
Options

-
Enable Retention Policy
Check this box to enable a retention policy as to how many sets of incremental backups to retain before deletion. Image set includes a base backup and the associated incremental or differential backups. Select [Delete the older image before new base backup] option to delete the oldest image set before a new image set is created, when the number of image sets reaches the pre-defined limit. Select option to delete the oldest image set before a new one is created.-
Delete both the full and incremental: Select this radio button to delete both full and incremental backups based on the retention policy settings.
-
Delete only the incremental: Selecting this option deletes only the incremental backups based on the retention policy. Full backups are not deleted.
-
-
Send email Check this box to send email notification of a task completed with a specified status. Predefine the email notification settings by selecting [Preferences] - [Notification] from the menu bar.
-
Execution Priority
Select a level of task Execution Priority.
When completing the settings, click [Next].
Step 4: Summary
Use the Summary window to review the backup configuration and options.
Click [Done].
When One-time Backup is selected
Click [Done] to display the dialog for configuring the settings for the execution timing.
When Scheduled Backup is selected
Click [Done] to display the confirmation message for starting the first scheduled backup task.
Click [Yes] to start the task immediately. Click [No] to go back to Dashboard window. Click [Cancel] to go back to the wizard instead of completing the configured setting.
If selecting to perform a post-backup process, the process starts immediately after the backup image is created according to the settings configured.
Backup task for CSV (cluster shared volume) will be regularly executed.
Cluster Edition only displays the window.
CBC (Changed Block Comparison) is selected to run backup tasks.
Incremental Backup using IT Pro
While IT Pro does not support scheduled backup, incremental backups of the changes from the preceding backup can be created by specifying the same backup source and destination as the preceding backup.
When specifying the same destination as the preceding backup, you get the following dialog. Please specify the original backup to create the incremental backup including the changes.
When continuing to create incremental backup based on the existing incremental backup, the new incremental backup is created based on the latest incremental backup.
Incremental backup is supported when the backups are saved in local storage or network shared folder or Actiphy ImageCenter (StorageServer).
Only Full Backup supports Microsoft BitLocker encrypted device.
Tips
Precautions when using Deduplication Compression in boot environment
When backing up in a boot environment and using Deduplication, please be aware of the following points.
-
Boot environment boots up by reserving the minimum required memory area on host for booting up the system.
-
When using Deduplication Compression, a temporary file folder is required. The maximum size of the temporary file folder will be 1% of the used space of backup source or less.
-
By default, a folder on memory deployed on a boot environment is specified as the temporary file folder.
Due to the above described conditions, backup task using Deduplication Compression fails in error when processing large amount of data.
When executing a backup task using Deduplication Compression in a boot environment, please make sure the specified temporary file folder has sufficient available space.
Execute a backup task after specifying an additional storage for temporary files
-
Please connect an external storage device such as USB device to the system you run a backup task. Please make sure the external storage has available space more than 1% of the backup source system.
-
Insert the boot environment media and boot up boot environment.
-
Launch Backup Wizard and select [Deduplication Compression].
-
Select [Change Temporary File Folder] or click [< Advanced Setting].
-
Please select the folder in the external storage connected with the above step 1 for the temporary file folder for Deduplication Compression.
-
Complete the setting and start the backup task.
Specify a folder included in backup source and run backup task
-
Insert the boot environment media and boot up boot environment.
-
Launch Backup Wizard and select [Deduplication Compression].
-
Select [Change Temporary File Folder] or click [< Advanced Setting].
-
Please select the folder in the external storage connected with the above step 1 for the temporary file folder for Deduplication Compression.
-
Complete the setting and start the backup task.
Notes on backing up Hyper-V host
When backing up Hyper-V host (volume/disk on which the resources of the virtual machine are located), it is recommended to shift the backup task to a later schedule than when a Windows Update on a virtual machine is being applied. Depending on the timing of applying a Windows Update, the virtual machine of a restored volume/disk may not properly run.
Please be aware of the following when backing up a Hyper-V host. When the following conditions are not satisfied, restoring a virtual machine from the created backup image file (ReZoom) fails.
Stand-alone Hyper-V host
When the following conditions are not satisfied, restoring a virtual machine from the created a backup (ReZoom) fails.
ReZoom does not support a backup created by Cold Backup.
- The volume (disk) that includes the configuration file of the virtual machine, virtual hard disk file and the created snapshot, and the system volume (disk) must be included in backup source.
Hyper-V host configuring the cluster
When backing up cluster shared volumes (CSV) on Hyper-V host configured by using Windows Server failover clustering (WSFC), please be aware of the following.
When the following conditions are not satisfied, restoring a virtual machine from the created backup (ReZoom) fails.
-
Please select CSVFS volume that includes the configuration file of the virtual machine, virtual hard disk file and the created snapshot, and system volume (disk) must be included in backup source.
-
Please make sure the above option is not disabled when multiple backup tasks are scheduled on multiple nodes at the same time. Depending on the ownership of the backup source volume, a VSS conflict could occur when executing backup tasks.
-
One backup task can be configured to back up only one CSVFS volume. ReZoom does not support a virtual machine spanning multiple CSVFS volumes.
-