Post-backup Process
The Post-backup process is executed upon completion of a backup task or at a specified time.
The Post-backup Process does not support backup tasks which a tape device or cloud storage is specified for the backup destination.
BootCheck does not support backup tasks in which an SFTP server, Wasabi or Lyve Cloud is specified for the backup destination. The process time may increase.
When Actiphy ImageCenter (StorageServer) is enabled to use for saving backup image files and [Immediate] option is selected, or [After each xx new image files being created] is selected, unless backup process has completed with this product and the processing of backup image files with Actiphy ImageCenter (StorageServer) has completed, post-backup process does not start. The backup images in wait for post-backup process will undergo the process when the next backup processing completes.
When the multiple tasks configured for the same image set are set to run immediately and concurrently, the order of the task operation by default is as follows. The other tasks configured with schedule settings are not included.
1) Backup task runs to create the backup image
2) Verfiy and BootCheck tasks start to run
3) Replication task starts to run
4) Consolidation task starts to run upon completion of Replication task
BootCheck
The following hypervisors are supported for BootCheck.
- Microsoft Hyper-V:Windows Server 2012 or later
Server, Desktop, Cluster Editions provides this feature.
The BootCheck process requires 1024 MB of memory on the hypervisor.
If your backup does not include the system volume, please do not enable this feature.
When installed on Windows 7 or later, BootCheck will not succeed if the active partition, such as a system reserved partition, is not included in the backup source.
BootCheck does not support systems where the boot and system partitions are configured on separate disks.
-
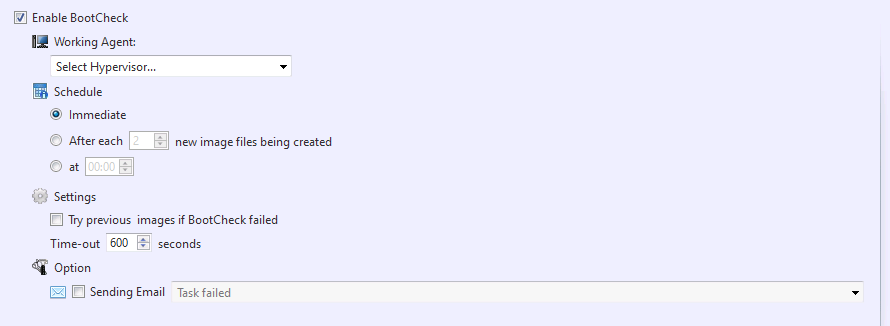
Working Agent
Specify a hypervisor for running the BootCheck process.BootCheck on Windows 10, 11 supports only Hyper-V on the local host.
When using [Hypervisor on other host], configure your firewall to allow File and Printer sharing, and Windows Management Interface (WMI).
-
Schedule
-
Immediate The BootCheck process starts immediately upon creation of a new backup.
-
After each xx new image files being created When the specified number of incremental backups are created, the BootCheck process is started.
-
At xx:xx The BootCheck process is started at a specified time.
-
-
Settings
- Time-out xx seconds Specify the maximum time to wait for the BootCheck process to complete.
-
Option
- Sending Email Send a notification email to inform recipients of the BootCheck results.
-
Select VM and BootCheck Setting
- When using backup created using HyperBack, please specify the target VM and the OS.
BootCheck quickly tests if a created backup of system volumes can successfully boot on a specified hypervisor.
ImageVerify
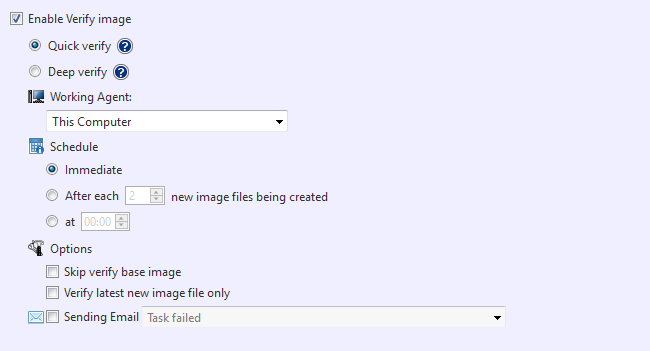
You can select Quick or Deep Verify and the timing to run the task.
-
Quick Verify
Deep Verify verifies that the created backup image has not been tampered. -
Deep Verify
Deep Verify verifies the integrity of the backups. -
Schedule
-
Immediate The ImageVerify process starts immediately after creation of a new backup.
-
After each xx new image files being created When the specified number of incremental files are created, the ImageVerify process will start.
-
At xx:xx The ImageVerify process is started at the specified time.
-
-
Option
-
Skip verify base image Skip verifying base backup. Only incremental backups are verified.
-
Verify latest new image file only Verify only the latest backup that was created.
-
Sending Email Send an email notification to specified recipients of the verification results.
-
ImageVerify verifies the integrity of a created backup.
Consolidation

Consolidation can be scheduled to consolidate the incremental backups in a single backup image set.
Problems may occur if using ActiveImage Protector and ImageCenter to consolidate the same image file set.
-
Option
-
Leave latest xx incremental image file(s) Specify the number of incremental files that should be excluded from consolidation.
-
Keep original image files By default, the original backup will be deleted after the consolidated file is created. Check this box to retain the original backups and specify the number of days to retain in [Keep xx days], or otherwise, select the radio button for [Until next consolidation].
-
Re-consolidate already consolidated incremental image files Check this box to re-consolidate the already consolidated incremental backups. Select the [Keep xx consolidated incremental image files] option to retain the consolidated backups and then specify the number of backups to retain. The oldest backup not to be retained will be re-consolidated with the next oldest backup.
-
Use Smart Consolidation Should the source incremental backups to consolidate include deleted data, the consolidated backup size is reduced by the deleted data size.
-
-
Schedule
-
Immediate The consolidation process is started immediately after a new backup is created.
-
After each xx new image files being created The consolidation process is started after the specified number of incremental backups are created.
-
At xx:xx The consolidation process is started at the specified time.
-
-
Performance
- Execution Priority Select a level of execution priority.
Consolidate ActiveImage Protector backups according to the predefined schedule.
Replication
-
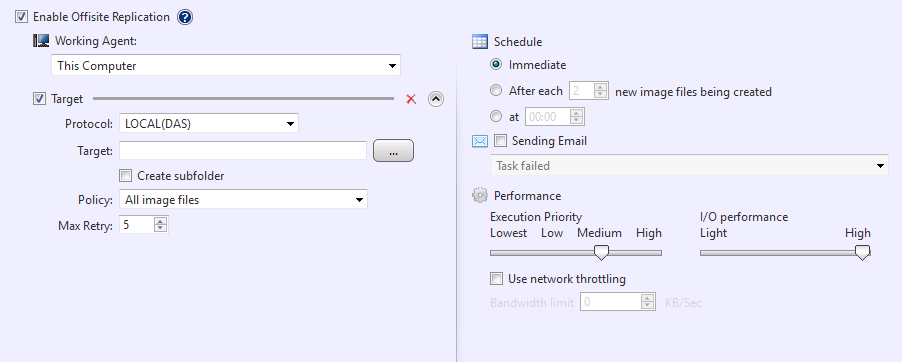
Protocol
Select a replication protocol target from the following.Local Folder
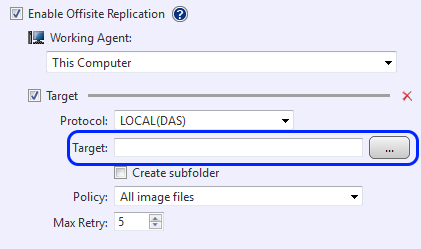
Click […] to browse to a folder or specify the path to the location of the folder. Click [Apply] or [End] to start verifying.
Network Shared Folder
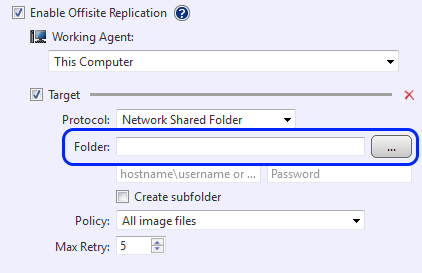
Click […] to browse to a folder or specify the path to the location of the folder and enter the credentials information.
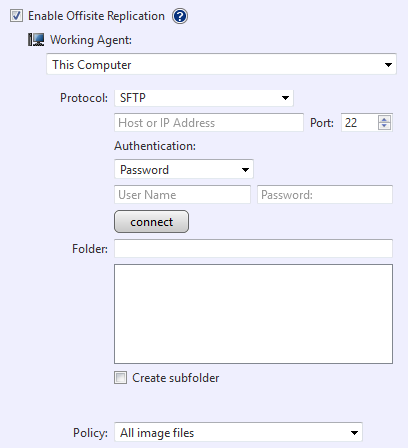
Click [Apply] or [Finish] to start verify process.SFTP
Enter the host name or IP address assigned to the SFTP server as well as the Port number. Enter the credentials information and click [Connect]. You can select [Password] or [Private Key] for authentication. When the connection to the server is successfully established, select a folder in tree view for replication target. Right-click on a specific folder to create a new folder. Click [Apply] or [Finish] to start verify process.
FTP
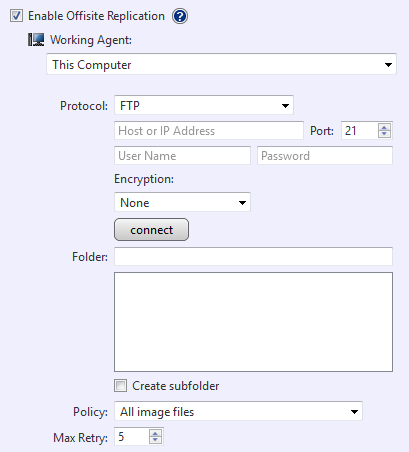
Enter the host name or IP address assigned to the FTP server as well as the Port number. Enter the credentials information and click [Connect]. Select an encryption method and FTPS. When the connection to the server is successfully established, select a folder in tree view for replication target. Right-click on a specific folder to create a new folder. Click [Apply] or [Finish] to start verify process.
WebDAV(https or http)

Enter the host name or IP address assigned to the WebDAV server as well as the Port number. Enter the credential information and click [Connect]. When the connection to the server is successfully established, select a folder in tree view for replication target. Right-click on a specific folder to create a new folder. Click [Apply] or [Finish] to start verify process.
Amazon S3
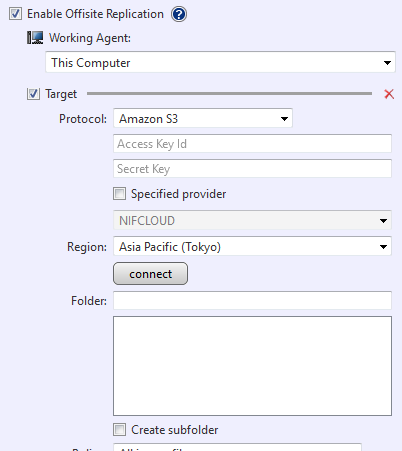
Enter the credentials information and click [Connect]. When the connection to the service is successfully established, select a bucket/folder in tree view for replication target. Right-click on a specific folder to create a new folder.
A new bucket cannot be created.
Click [Apply] or [Finish] to start verify process.
Enable [Enter Provider] option to specify the provider. By default, you can select [NIFCLOUD (east-1)]. When selecting QNAP, Oracle Cloud Infrastructure, or other provider, click [Add New Target] and configure the following setting:
-
Name Specify any display name you like
-
End Point Enter the end point provided by the provider.
-
Region Enter the region provided by the provider. If not provided, this item may be left blank.
For more details about how to obtain or verify the respective information, please contact the provider.
Azure

Enter the credentials information and click [Connect].
When the connection to the service is successfully established, you can select a container/folder in tree view for replication target. Right-click on a specific folder to create a new folder. Click [Apply] or [Finish] to start verify process.For more details about how to obtain or verify the respective information, please contact the provider.
OneDrive
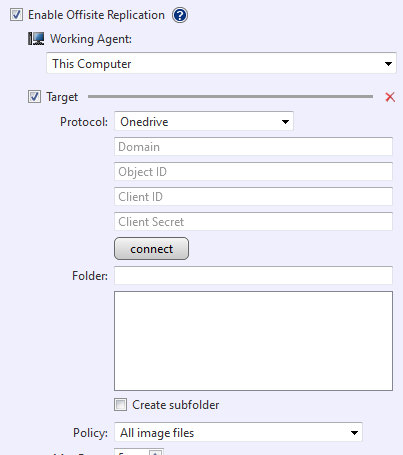
Replication supports OneDrive for Office 365 Business.
Replication supports the maximum file size 15360MB for processing. A Replication task for a backup exceeding the maximum size will be cancelled. It is recommended to select [Advanced Setting] - [General] and enable [Split image into xx MB files] before starting the task.
Enter the credentials information and click [Connect].
-
Domain Enter the domain name confirmed with Microsoft Azure portal. (Ex: replication.onmicrosoft.com)
-
Object ID Enter Object ID for OneDrive Account User confirmed with Azure portal.
-
Client Secret Enter the client secret confirmed with Microsoft Azure portal.
When the connection to the service is successfully established, select a folder in tree view for replication target. Right-click on a specific folder to create a new folder. Click [Apply] or [Finish] to start verify process.
Dropbox
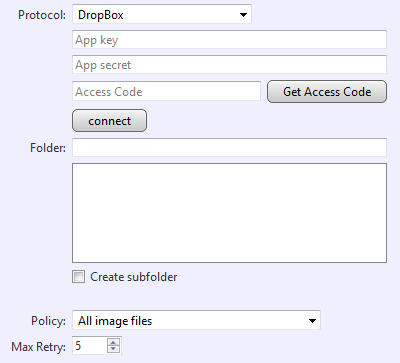
Replication supports the maximum file size 20480MB for processing. A Replication task for a backup exceeding the maximum size will be cancelled. It is recommended to select [Advanced Setting] - [General] and enable [Split image into xx MB files] before starting the task.
Enter [App key] and [App secret] registered for Dropbox Developer. Click [Obtain Access code] and Web browser will be launched. Follow the instructions from Dropbox API and obtain Access Code. Click [Connect] button. When the connection to the service is successfully established, select a folder in tree view for the replication target. Right-click on a specific folder to create a new folder. Click [Apply] or [Finish] to start verify process.
Specify only a folder located under ‘Dropbox > Apps >
'. If a folder is not specified, 'Dropbox > Apps > ' will be specified as the target folder. For more details about how to obtain the access token, please contact the provider.
Google Drive
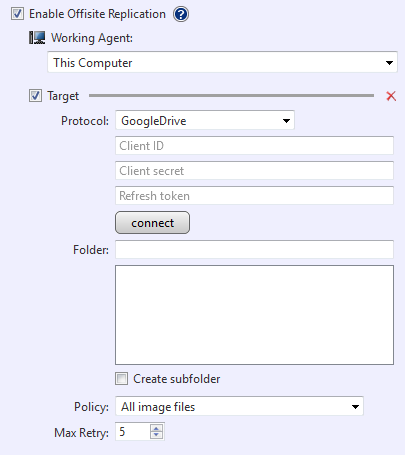
Replication supports the maximum file size 10240MB for processing. A Replication task for a backup exceeding the maximum size will be cancelled. It is recommended to select [Advanced Setting] - [General] and enable [Split image into xx MB files] before starting to run the task.
Enter the credentials information and click [Connect].
-
Client ID Enter the Client ID for OAuth client ID issued by Google Cloud Platform.
-
Client Secret Enter the Client Secret for OAuth client ID issued by Google Cloud Platform.
-
Refresh Token Enter the Refresh Token issued by Google Developers.
When the connection to the service is successfully established, select a folder in tree view for the replication target. Right-click on a specific folder to create a new folder.
Click [Apply] or [Finish] to start verify process.For more details about how to obtain or verify the respective information, please contact the provider.
Please make sure Google Drive API is enabled on Google Cloud Platform.
Wasabi

Enter the credentials information and click [Connect]. When the connection to the service is successfully established, select a bucket/folder in tree view for replication target. You can also right-click on a specific folder to create a new folder.
A new bucket cannot be created.
Clicking [Apply] or [Finish] to start verify process.
Neutrix Cloud Storage
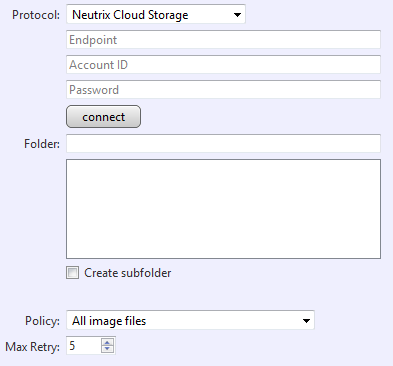
Enter the credentials information and click [Connect]. When the connection to the service is successfully established, select a bucket/folder in tree view for replication target.
A new bucket cannot be created.
Click [Apply] or [Finish] to start verify process.
-
Click [Add New Target] to add a new replication target.
Click ‘X’ to delete the unnecessary replication target.
To stop the replication process, uncheck the box for the replication target instead of deleting.
-
Target Settings
Configure the following settings and policies for the respective profiles.- Create sub-folder A sub-folder is created in the specified location to save the replicated backups (the sub-folder is created in the task name).
-
Replication Policy
Select an option for the replication policy from the following:-
Replicate all target image files Check the box to enable replication of all target backups.
-
Replicate only the last generation Check the box to enable replication of only the last generation of backups (including incremental backup).
When a new generation of backup is created in the destination, the oldest generation of backup is deleted from the replication target upon execution of the subsequent replication task.
-
Replicate only incremental files Check the box to enable replication of only incremental backups.
-
Replicate only incremental files of the last generation Check the box to enable replication of only the last generation of incremental backups.
When a new generation of backup is created in the destination, the oldest generation of backup is deleted from the replication target upon execution of the subsequent replication task.
- Keep target items the same with source
Check the box so that the target files mirror the files from the source.
If the [Keep target items same with source] option is not enabled, the incremental backup created as a result of the Reconcile settings and numbered back or the consolidated incremental backup will not be replicated. The backups deleted from the destination storage according to the predefined retention policy will not be deleted from the replication target.
Synchronization occurs according to the specified schedule.
-
-
Maximum number of retries
The maximum number of attempts to retry the replication task if the initial task fails. -
Schedule
-
Immediate Replication task runs immediately when a new incremental backup is created.
-
After each xx new incremental files Replication task is set to run after a specified number of incremental backup have been created.
-
At xx:xx Replication task is scheduled to replicate at a specified time of a day everyday or specific day(s) of a week.
-
-
Sending E-Mail Check this box to send E-Mail
-
Performance
-
Execution Priority Set Replication task execution priority.
-
I/O Performance Set the I/O performance for replication to a local disk or network shared folder.
-
Use network throttling Set the amount of network bandwidth in KB/sec to define the maximum throughput for replication to local disk, network shared folder, SFTP and FTP only.
-
Replication of the created backups can be executed according to the predefined schedule.