In-Cloud Standby
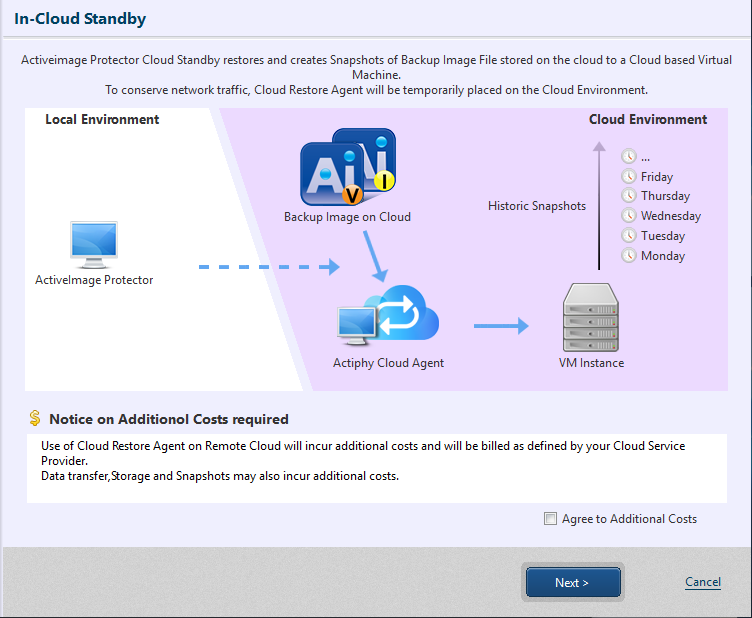
In-Cloud Standby feature enables to create a snapshot on cloud using a backup file accessible from the instance of Amazon Web Service (AWS) or Microsoft Azure. Create a volume from the created snapshot and attach the volume to the instance so that the system restored to the point-in-time can be booted up. Additional costs by the use any of the cloud services may be incurred with the execution of this process and operation of the restored virtual machine. To proceed with further operation, please click the checkbox to [Agree to additional cost] and click [Next].
Desktop and Cluster editions do not provide this feature.
When editing the created task, you are only allowed to edit the schedule and option settings.
AWS
Step 1 : Connect

Select [Amazon AWS] and enter the credential information. Click [Next].
Step 2 : Setting
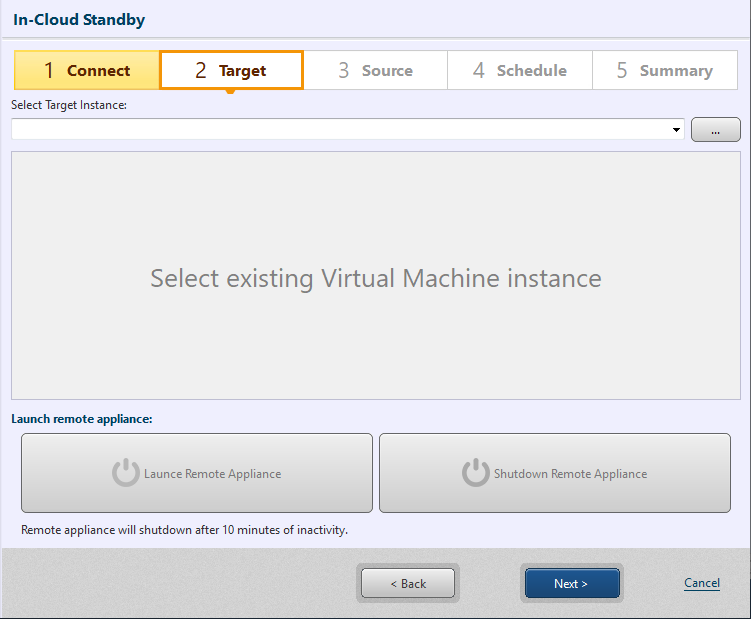
Click […] and specify the instance for template.
Only instances in the connected region are supported and can be selected.
Please make sure that the template instance is prepared in advance.
After specifying the template instance, boot up the remote appliance and click [Next].
When you do not proceed with further operation with the wizard after booting up the remote appliance, the remote appliance will automatically shut down after a lapse of 10 minutes. Then, you need to boot up the remote appliance again.
Step 3 : Recovery Point
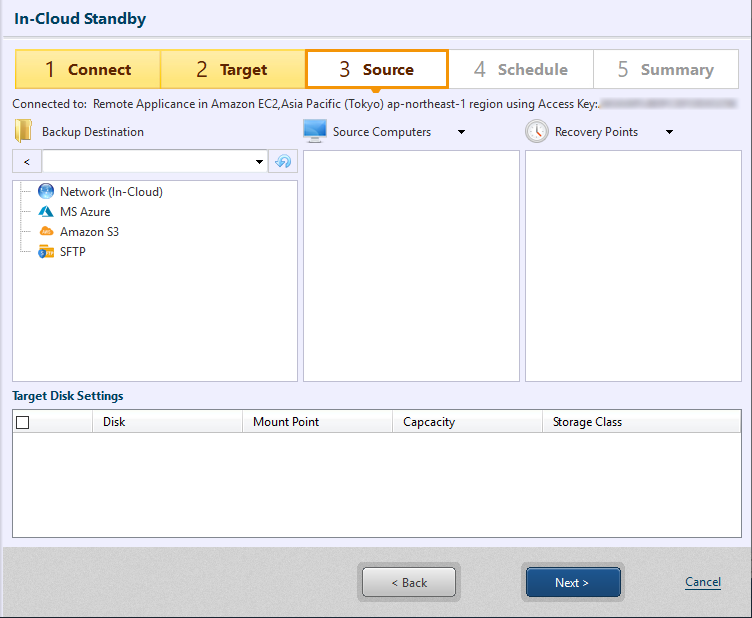
Please specify the backup file to use. When selecting a computer, a recovery point is displayed. When selecting a recovery point, disk setting dialog is displayed.
You are allowed to use the backup file accessible from the appliance booted in Step 2.
Before using backup files located in Wasabi, please select Amazon S3, go to [Enter Provider] - [Add New Target] and select Wasabi.
The process is performed for the entire recovery points of the selected computer.
Please use the backup image file created by enabling [Make backup image Cloud ready] option. When using a backup image file created without enabling [Make backup image Cloud ready] option, remote connection to the instance attaching the volume created by using a snapshot is disabled in the event of a system failure.
When using an agentless backup image created by using HyperBack, please make sure the following preprocesses are performed for the target virtual machine. If not, remote connection to the instance booted from a snapshot is disabled.
1. Install required drivers depending on the type of instance to use for AWS.
Disk Settings
Please configure the settings for the volume to restore (size / type).
When restoring to a disk smaller than the minimum size of the selected storage type, it will be the minimum size of the selected storage type.
When restoring system disk, do not select [Cold HDD(sc1)].
Configure the disk setting and click [Next].
Step 4 : Schedule
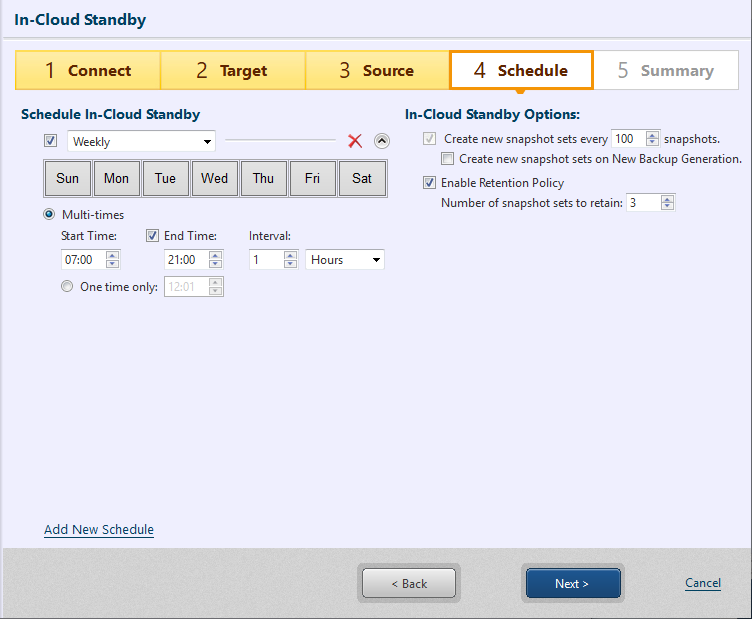
Please select the schedule type. Options include [Weekly], [Monthly], [Designate Specific Days]. Uncheck the box to disable the schedule instead of deleting.
The following options are provided.
-
Multi-times - Please specify the time slot and interval to run recurring tasks. If not specifying [End Time], the tasks regularly run until the specified time on the following day.
-
One Time Only - Specify the execution time.
Click [Add New] to add a new task execution schedule. Any unnecessary schedule can be deleted by clicking on ‘x’ icon.
-
Option
-
Create snapshot set for xx backup files
When enabling [Create snapshot set for new backup generation], a snapshot set is created when a new backup generation is created. -
Enable Retention Policy
Check this box to enable a retention policy as to how many sets of snapshots to retain before deletion.
-
In the event that an enabled but undefined schedule already exists, the schedule setting cannot be configured. Disable or delete the schedule.
When completing the settings, click [Next].
Step 5 : Summary
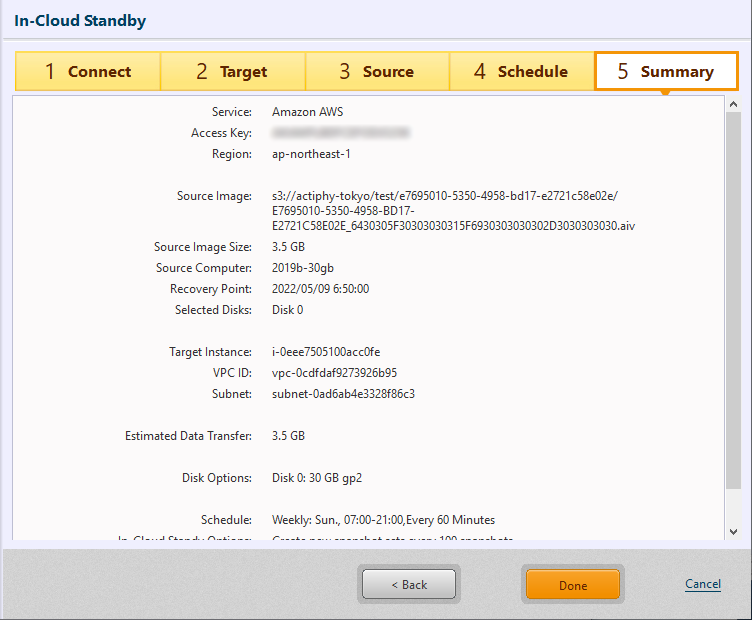
Use the Summary window to review the configured settings and options.
Click [Done].
Click [Done] to display the confirmation message for starting the first scheduled backup task.
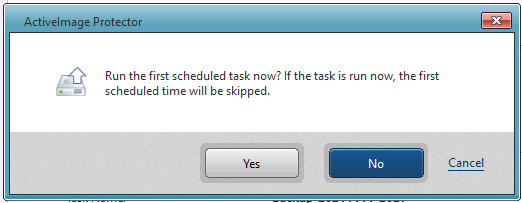
Click [Yes] to start the task immediately. Click [No] to go back to Dashboard window. Click [Cancel] to go back to the wizard instead of completing the configured setting.
Disaster recovery procedure when a disaster strikes
When a disaster strikes on the source computer, please use the following operating procedures to restore the system using snapshot.
-
Please prepare an instance for booting to the time at the point in time the snapshot was created.
You are recommended to prepare an instance equivalent to the target instance specified when creating In-Cloud Standby task.
-
Go to [EC2] - [Elastic Block Store] - [Snapshot] and select the snapshot created at the point of time to restore to. The created snapshot is named in [AIPInCloudSnap_YYYYMMDDhhmmss] format.
-
Go to [Action] or select [Create a volume from snapshot] in the right-click menu.
Please specify the same availability zone as the target instance to attach.
-
Detach every volumes from the target instance to attach the created volume.
Please delete the detached volume, depending on your needs.
-
Attach the created volume to the instance.
Please specify “/dev/sda1” device for the system volume.
-
Boot up the instance. When the system boots up, please migrate the required settings.
When using a backup image file created by enabling [Make backup image file P2V ready for In-Cloud Standby] option, virtualization is processed on the instance attaching the volume created by using a snapshot and the system automatically reboots.
When the system reboots on the instance, [AWSAgent] is added to firewall and enabled on the instance, so the firewall is configured to open port 3389 allowing communication with remote desktop. If not using this setting, please disable / delete the setting.When attaching a volume created by using a snapshot to an instance on which AWS PV driver or Intel 82599 VF driver is used for NIC, virtualization process does not normally complete and network communication fails.
If you have the problem, please manually restart the instance 15 - 30 minutes after rebooting the system on the instance. When the instance boots up, take a screenshot of the instance. When the network communication is enabled, remote communication via remote desktop is enabled.When remote communication is disabled, please check and see if the access to the port for remote communication in security group of the instance is allowed.
Ex: Please open TCP Port 3389 for remote desktop communication.
Create a snapshot from backup for the instance of Amazon EC2.
Azure
You need Global IP address which the instance of remote appliance can use. Please keep in mind that when the allocated number has reached the number of available Global IP address, the execution of the task fails.
Step 1 : Connection
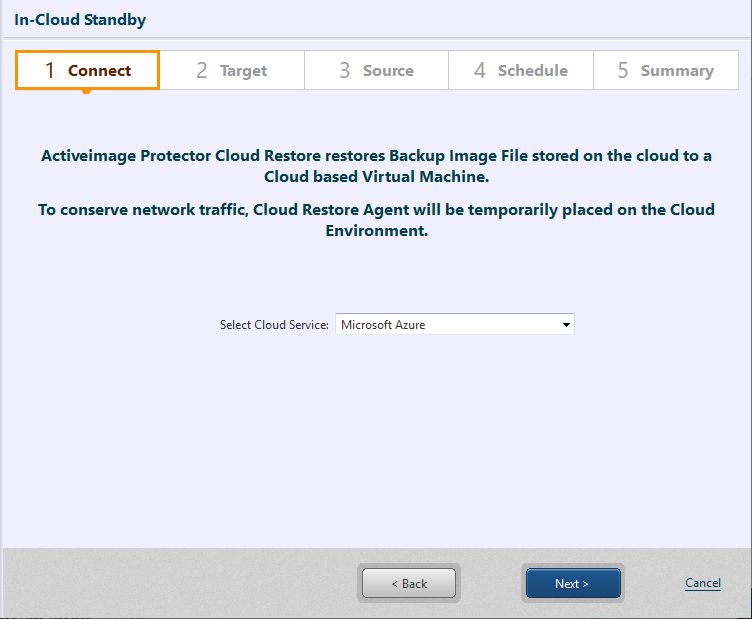
Please select [Microsoft Azure] as the service to establish the connection, and click [Next]. Web browser is launched and log in Azure. When authenticated, you can proceed to the subsequent step.
Step 2 : Setting
Please browse in […] and select the template instance.
Only instances in the connected region can be selected. Only instances created by selecting [Standard] for [Security Group] are supported.
When using backup of the computer on Azure, you are recommended use the virtual machine provided by the same publisher as the backup source as template instance. If you use the virtual machine provided by the different publisher from the backup source as template instance, according to Azure rules, the standby virtual machine may fail to power on.
When using backup of the computer on cloud service other than Azure, please make sure the template instance is pre-created by using the virtual machine which Microsoft is the publisher.
After specifying the template instance, boot up the remote appliance and click [Next].
When you do not proceed with further operation with the wizard after booting up the remote appliance, the remote appliance will automatically shut down after a lapse of 10 minutes. Then, you need to boot up the remote appliance again.
Step 3 : Recovery Point
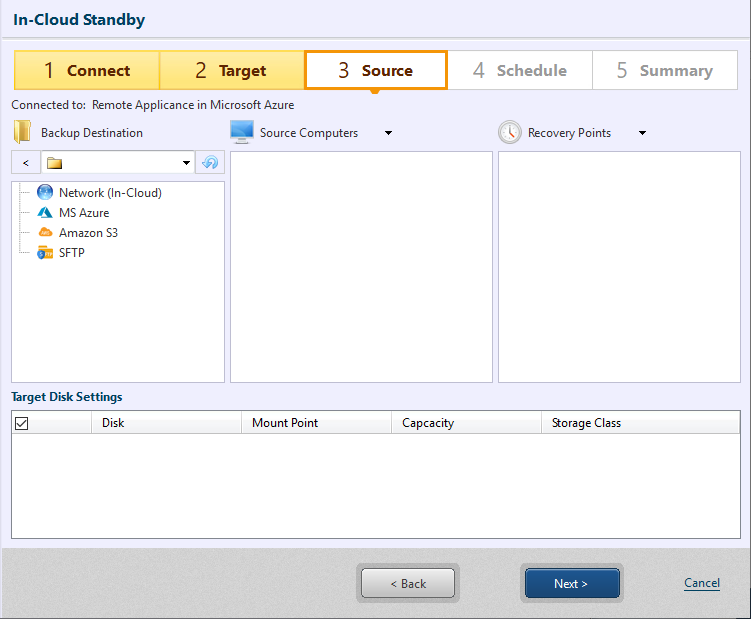
Please specify the backup to use.
Select a computer and a recovery point. Disk setting dialog is displayed.
You are allowed to use the backup file accessible from the appliance booted in Step 2.
The process is performed for the entire recovery points of the selected computer.
Please use the backup image file created by enabling [Make backup image file P2V ready for In-Cloud Standby] option. When using a backup image file created without enabling [Make backup image file P2V ready for In-Cloud Standby] option, remote connection to the instance attaching the volume created by using a snapshot is disabled in the event of a system failure.
When using an agentless backup image created by using HyperBack, please make sure remote desktop is enabled on the target virtual machine.
Before specifying a shared folder on an Azure instance, please establish the connection using the public IP.
After the computer and recovery point are selected, the window is displayed for target disk setting.
Disk settings
Please configure the settings for the volume to restore (size / type).
When restoring to a disk smaller than the minimum size of the selected storage type, it will be the minimum size of the selected storage type.
Please do not specify the backup of a disk in which Azure virtual machine’s Temporary Storage is included as the restore source.
Configure the disk setting and click [Next].
Step 4 : Schedule

Please select the schedule type. Options include [Weekly], [Monthly], [Designate Specific Days]. Uncheck the box to disable the schedule instead of deleting.
The following options are provided.
-
Multi-times - Please specify the time slot and interval to run recurring tasks. If not specifying [End Time], the tasks regularly run until the specified time on the following day.
-
One Time Only - Specify the execution time.
Click [Add New] to add a new task execution schedule. Any unnecessary schedule can be deleted by clicking on ‘x’ icon.
-
Option
-
Create snapshot set for xx backup files
When enabling [Create snapshot set for new backup generation], a snapshot set is created when a new backup generation is created. -
Enable Retention Policy
Check this box to enable a retention policy as to how many sets of snapshots to retain before deletion.
-
In the event that an enabled but undefined schedule already exists, the schedule setting cannot be configured. Disable or delete the schedule.
When completing the settings, click [Next].
Step 5 : Summary
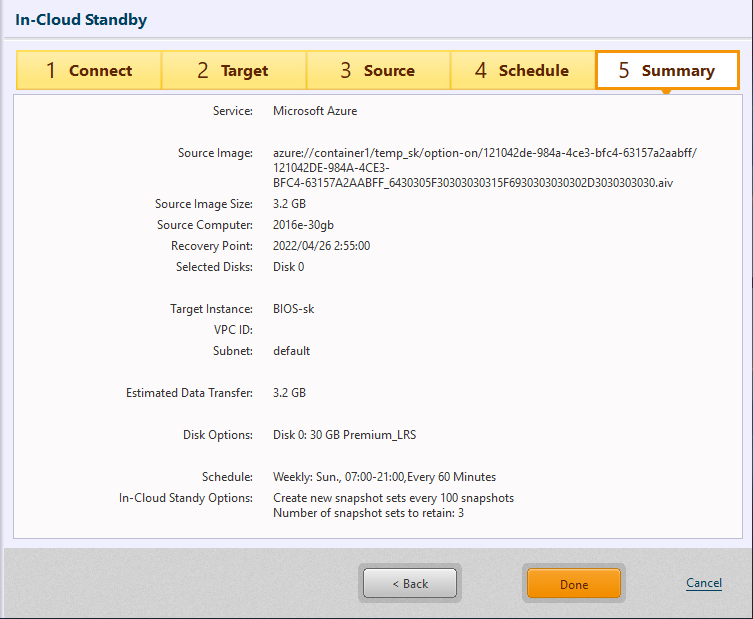
Use the Summary window to review the configured settings and options.
Click [Done].
Click [Done] to display the confirmation message for starting the first scheduled backup task.
Click [Yes] to start the task immediately. Click [No] to go back to Dashboard window. Click [Cancel] to go back to the wizard instead of completing the configured setting.
Disaster recovery procedure when a disaster strikes
When a disaster strikes on the source computer, please try the following disaster recovery procedures by using a snapshot.
-
Please prepare an instance for booting to the time at the point in time the snapshot was created.
You are recommended to prepare an instance equivalent to the target instance specified when creating In-Cloud Standby task.
-
Go to [All Services] - [Snapshot] and click on the snapshot created at the point of time to restore to. The created snapshot is named in [AIPInCloudSnap_YYYYMMDDhhmmss_xxxxxxxx] format.
-
Click [Create disk] and configure the required settings.
-
Select the instance to attach the created volume, click [Disk] - [Swap OS disk], select the disk created from the snapshot and swap.
Please delete the volume of the source OS disk, if necessary.
-
Boot up the instance. When the system boots up, please migrate the required settings.
When using a backup image file created by enabling [Make backup image file P2V ready for In-Cloud Standby] option, virtualization is processed on the instance attaching the volume created by using a snapshot and the system automatically reboots.
When the system reboots on the instance, [AWSAgent] is added to firewall and enabled on the instance, so the firewall is configured to open port 3389 allowing communication with remote desktop. If not using this setting, please disable / delete the setting after configuring any other setting.When remote communication is disabled, please check and see if the access to the port for remote communication in the instance’s network .
Ex: Please open TCP Port 3389 for remote desktop communication.
Create a snapshot from backup for Azure instance.