Utilities
The Utilities menu provides disk copy, tape management features and launching Recover Media Maker.
Copy Disk and Volume
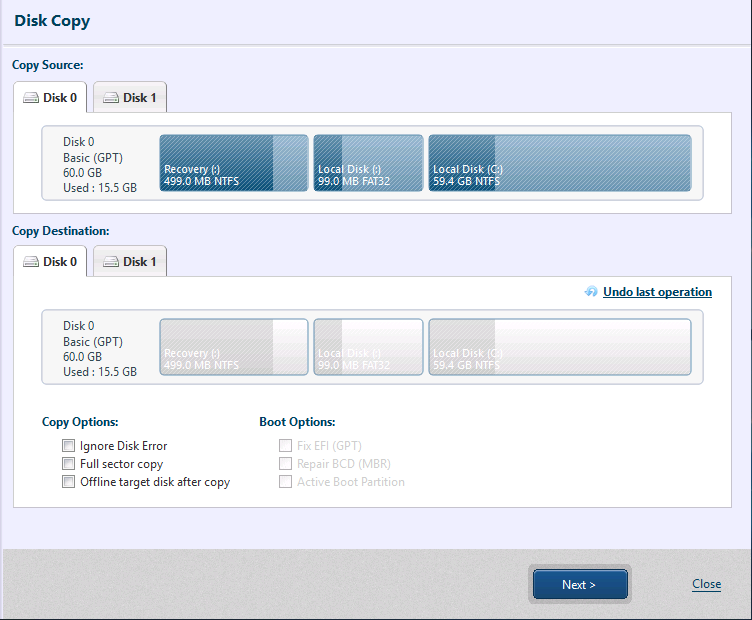
Drag and drop the copy source item from [Copy Source] to [Copy Target] or right-click on the copy target.
Initializing the disk is required when copying to bare metal disk.
Right-click on the item moved to [Copy Target] and configure the following settings.
By Disk
-
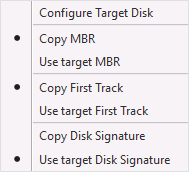
Configure MBR
The MBR (master boot record) is contained in the first sector of the hard disk drive. Master boot record consists of master boot code and partition table.-
Copy MBR Select this option to copy MBR of the copy source.
-
Use target MBR
The MBR of the coy target is used.
-
-
First Track
First track copies the data excluding the first 1 sector (MBR). (As for a GPT disk, partition table is also excluded.)
Some boot loader programs need the data for booting up the system.-
Copy First Track First track of the copy source is copied.
-
Use target First Track First track of the copy target is used.
-
-
Disk signature
Disk signature is used for Windows OS to identify physical disk.-
Copy Disk Signature Disk signature of the copy source is copied.
-
Use target Disk Signature Disk signature of the copy target is used.
Copying disk signature causes conflict with the copy source disk signature and goes offline. Please be aware that when copy source disk is connected and gets online, a different signature will be assigned. When using the disk which the disk signature is copied on the system on which the copy operation is executed, it is recommended to connect the disk to the same port as copy source disk after removing the copy source disk. When the disk is connected to the port different from the copy source disk, the copied disk may be recognized as [Read Only]. {: .alert .alert-info }
-
By Volume
Configure the settings for volume size and starting position.
Configure the following option settings.
Copy Option
-
Ignore Disk Error
By enabling this option, the copy task will continue uninterrupted if encountering copy source disk error. -
Copy including free space All sectors are copied including the free space of the copy target item.
When enabling this option and copying a volume in reduced size, the sectors in the reduced volume size are copied.
-
Disable copy target network connection post copy Disconnects access to copy target disk after copy completes. Upon completion of the copy task, the specified copy target disk becomes inaccessible.
Boot Option
-
EFI Boot system
Enable this option only when coping [EFI system partition] for uEFI boot system and the system volume (c drive) to be bootable from the copied disk. -
Restore BCD boot system
When copying only the system volume (c drive) of BIOS boot system on Windows 7 or later, BCD boot system is newly created to be bootable from the copied disk. -
Activate Boot Partition Enabling this option activates the copied partition.
You are recommended to enable this option when copying only the system volume (C drive) of a BIOS-boot system running Windows 7 or later and setting the destination disk bootable.
Tips
-
When copying a disk, the copy source disk may be copied to larger sized target disk.
When a BIOS boot system disk including system reserved area is copied to larger sized disk, the system reserved area is also proportionately larger.
-
When copying a volume to available space and the available space is larger than the copy source, the volume size can be changed.
-
When copying a system disk, it is recommended to remove the copy target disk during the system maintenance. If the copy target disk is set with a high boot-up priority, the system may boot up from the copy target disk.
-
If you want to assign the original drive letter to the copy target disk, please delete the drive letter from the copy source disk / volume. When the copy source disk includes data such as database, please make sure the database is placed into a paused state before proceeding with further operation.
Copy a disk and volume.
Cloud Edition does not provide this feature.
Tape Manager

When saving backups to tape device or restoring the system by using backups in tape device, please refer here.
The process time may increase when moving or reading tape media.
The list information may not be updated. If you encounter the problem, please restart the console.
Operation Menu
-
Information
The information of the selected tape media is indicated.-
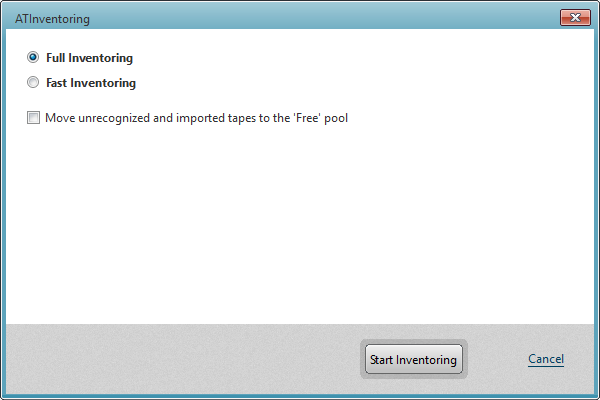
Inventory
You can check / categorize the tape media in the selected device.
-
Complete Inventory
Insert the entire target media in the drive and load the contents to process. -
Quick Inventory
Read bar code attached to the target media and execute processing.
When enabling [Move tapes in [Unrecognized media] and [Imported media] to [Empty media]] option, the entire media are automatically moved to [Empty media].
-
-
Move to Slot
Move the selected tape media to the specified slot. The slots in use are grayed out.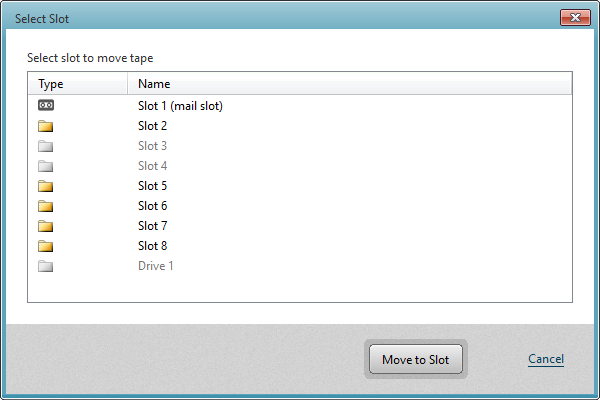
-
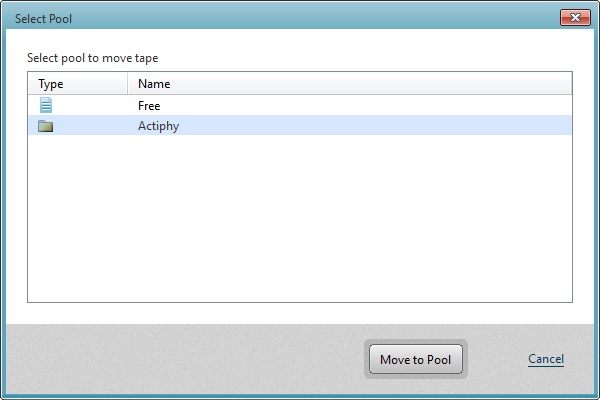
Move to Pool
Move the selected tape media to the specified tape pool.
-
Edit Tape
Edit the name of the selected tape media or add comments.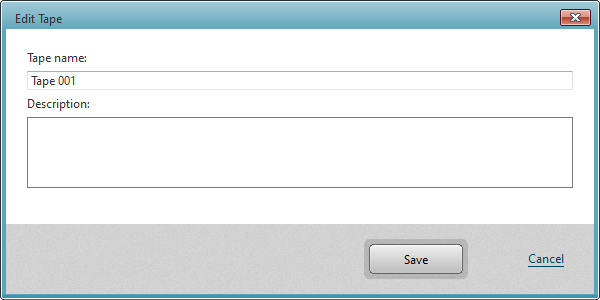
-
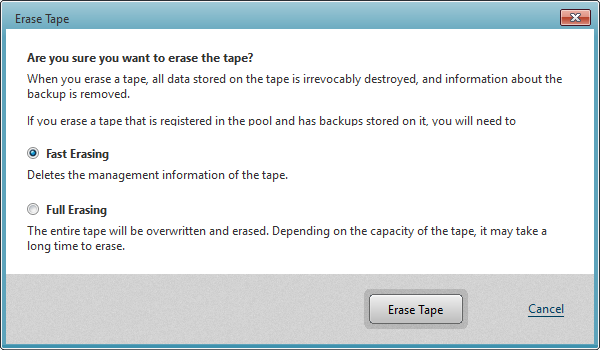
Erase
Erase the data in the selected tape media.
-
Re-scan
The related media are moved to the specified pool.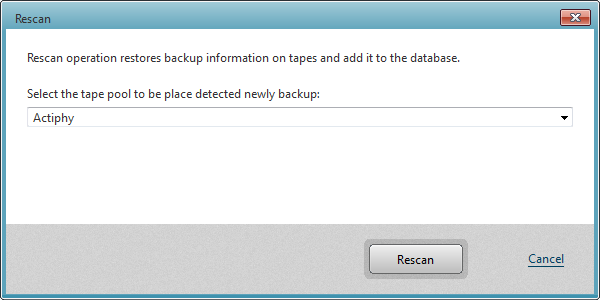
-
Eject
Eject the selected tape media.
When selecting [Move to slot], [Movet to pool], [Erase] or [Rescan] in [Tape Manager], the tape media after the processing is moved to an available slot (if no available slot, move to mail slot).
Enable to manage tape devices.
Desktop and Cloud Editions do not provide this feature.
When accessing a remote agent, the menu is not displayed.
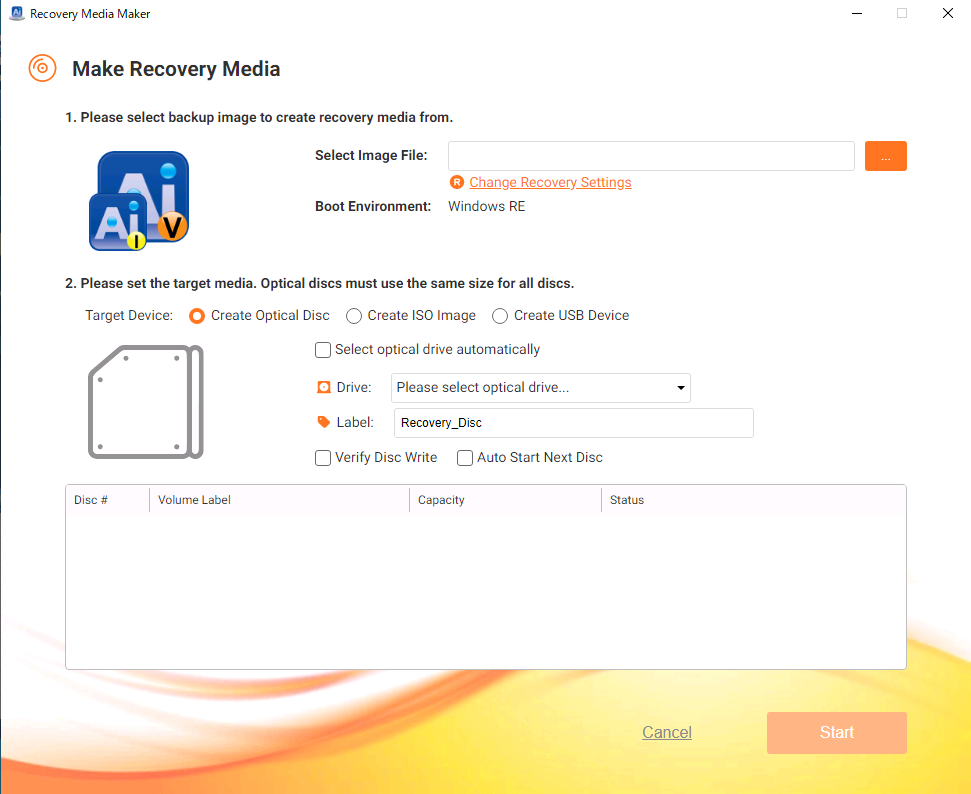
Recovery Media Maker
You are recommended to go to [Preference] - [Boot Environment Setting] and add the device driver for the storage to use.
Select restore source image
Please select the restore source image to embed in Restore media.
The disks are restored sequentially from Disk 0 in boot environment. Please be aware that the system may recognize the disks in the different order from when the disks were backed up. In the environment as such, you are recommended to restore the disks in boot environment built by using Boot Environment Builder.
Only the backup images located in local or shared folder are supported to use.
When embedding the backup image in optical disk, please make sure that the optical disk has sufficient available space larger than the backup image size.
When embedding a password protected backup image, you will be prompted to enter the password.
Only the selected backup image file is embedded in the restore media. Please be careful when selecting a backup image split into multiple disks.
When using split image, the process time for creating the restore media increases in comparison to when using an unsplit image.
The backup image created by using ActiveImage Deploy USB is not supported to use.
You can change restore setting if necessary.
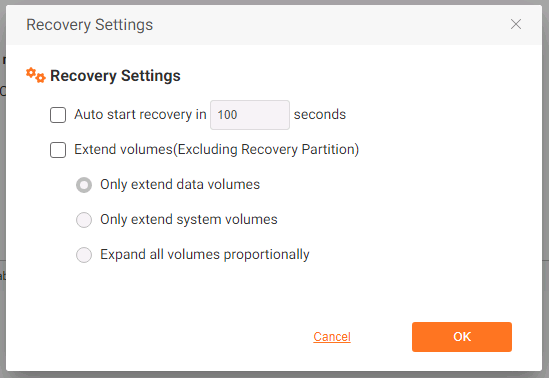
- Auto-start recovery process after xx seconds
After booting from the created media, recovery process automatically starts after the specified time.
-
Restore the volume in enlarge size
The following options are provided.
-
Only data volume is restored in enlarged size
Only data volume behind the system volume is enlarged.
-
Only system volume is restored in enlarged size.
Only system volume is enlarged.
-
Every volumes are proportionally enlarged.
Every volumes are proportionally enlarged. This is not applied to the volume in front of the system volume.
-
Setting
Create as optical disk
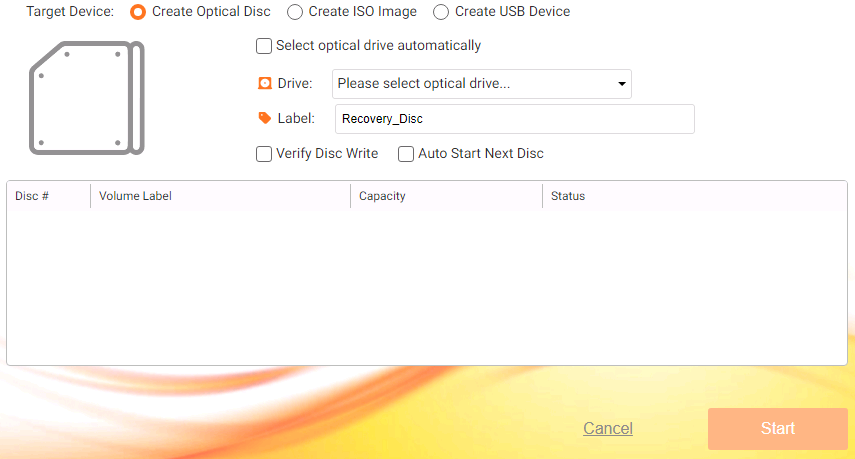
Please select the optical drive in which the optical media to use for creating restore media is set.
DVD-R, DVD-R DL, DVD-RW, BD-R, BD-R DL, BD-RE are supported to use.
The following options are provided.
-
Automatically select optical drive
Optical drive, when connected to the system, is automatically selected to use. -
Label
You can specify a volume label to assign to the restore target disk. When dividing into multiple media, the specified labels are assigned with numbers. -
Verify disk after writing
After writing, the data are verified. The process time will increase. -
The next disk is automatically created.
When a new blank media is set to the drive, creating the disk automatically starts.
Click [Start] to start processing.
When the entire data cannot be accommodated in the optical media to use, the data are accommodated in multiple media. In this case you need to prepare a media of the same specifications with same capacity.
Create as ISO image
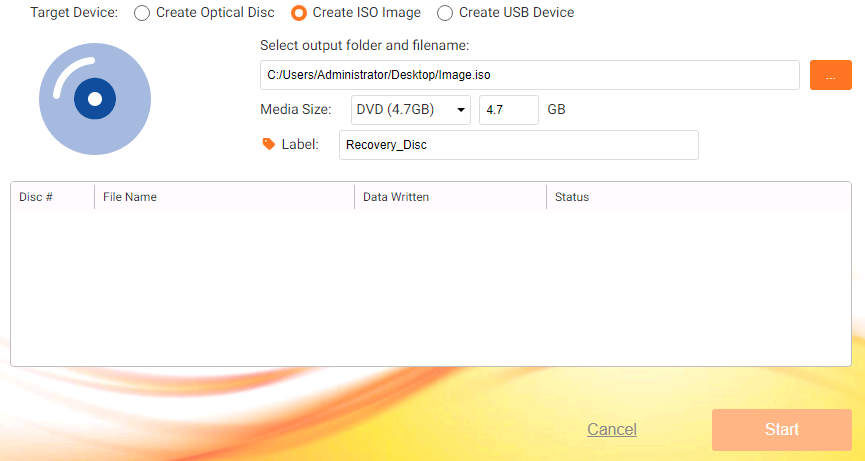
Please specify the path of the location to create the ISO image and label.
Click [Start] to start processing.
Create as USB media
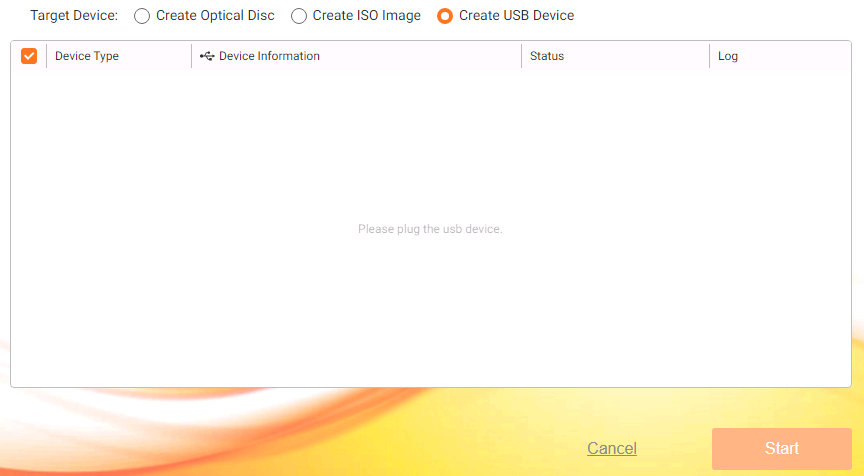
Please specify the USB media to use.
Windows Server 2016 does not support USB memory to create recovery media.
Click [Start] to start processing.
How to check if the storages are recognized in boot environment
Press Ctrl+Alt+c to launch the command prompt. Enter “diskpart” and run list disk command to list the currently reconized storages. If no storages are recognized, press Ctrl+Alt+d to run the driver loader. Please load the driver for the storage and see if the storage is recognized. When ActiveImage Protector is installed on the computer booted into boot environment, the loaded device driver is copied in the default path and will be added to the Recovery media to create next time.
You can create restore media embedded with a selected backup image file.
Windows Server 2012 R2 is not supported.
Run RescueBoot
Starts up the Actiphy Boot Environment from RescueBoot.
Utilities in Boot Environment
Windows RE/PE Boot Environment
-
File Explorer Files and folders in boot environment can be browsed. Copy, cut, or paste a specific file.
When accessing a network shared folder, enter the address in the \IP format, and then entering the user name as \IP\username and the password on the network authentication screen. -
Network Setting
Configure the settings for a network adapter, IP address, and DNS for the ActiveImage Protector Boot Environment. To use a network shared folder, go to the [Network Drive] tab and mount it as a network drive. -
Driver Loader A specific device driver can be loaded.
-
Launch Command Prompt Launch Windows command prompt.
-
Launch AIP CLI ActiveImage Protector command line interface to operate the program in command line mode.
-
Repair Boot Configuration Restore MBR, create BCD, and activate or deactivate a partition.
-
Launch A.I.R. Launch the A.I.R. (Architecture Intelligent Restore) feature to configure the settings to use the restored system in an environment that’s dissimilar from the backup source.
Linux Boot Environment
-
Network Setting Configure the settings for network adapter, IP address, and DNS for ActiveImage Protector Boot Environment.
-
Mount (Network) Mount the network shared folder to the local system.
-
Mount (Local) Local volumes can be mounted or unmounted.
-
Open Terminal Start the terminal to run commands from the command line on Linux system.
-
File Explorer Files and folders in the boot environment can be browsed. Copy, cut, or paste a specific file.
-
Display Settings Display Resolution settings can be changed.
-
Run AIP CLI ActiveImage Protector command line interface is provided to operate the program in command line mode.