vStandby
vStandby
vStandby is a software solution that creates and maintains dormant virtual replicas of physical or virtual machines to provide a switch-over option in the event of failure of the source machine.
Actiphy’s real-time Physical to Virtual technology is used to create the virtualized replicas of the source machine’s infrastructure. This virtual standby replica is implemented into an ESXi, Hyper-V host, Proxmox or KVM virtual environment and is kept current by taking scheduled incremental P2V boot points of the source machine. This ensures a successful startup of the standby virtual machine at the time of the switch-over.
vStandby is equally valuable as a tool for migrating legacy physical machines to an ESXi, Hyper-V host, Proxmox or KVM virtual machine in real-time. Minimal downtime can be expected as Actiphy’s P2V technology is utilized for the migration of the legacy machines.
Step 1: Select Source
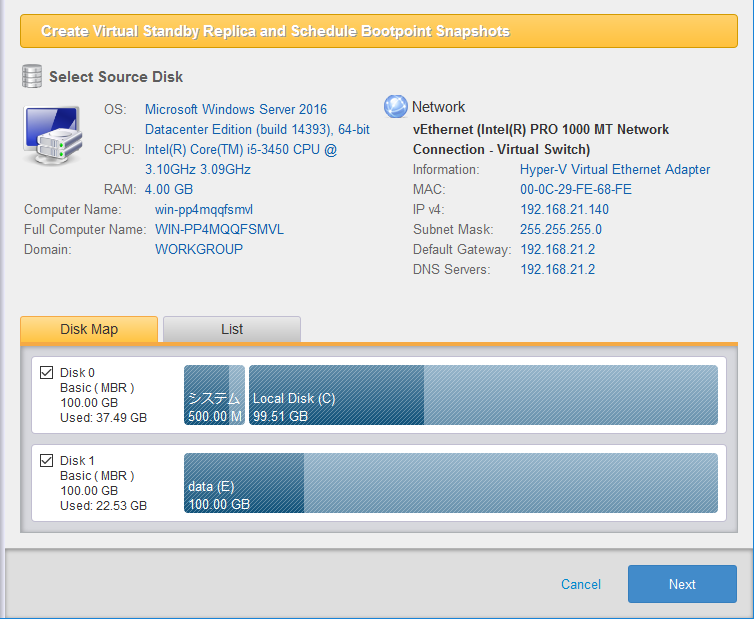
Select a backup source disk. The selected disk is created on the virtual machine.
Select the source disk to create the standby virtual machine by clicking the checkbox for the source disk in the disk map or the list. The selected disk is created on a virtual machine.
Dynamic disk, storage space, bare-metal disk, unpartitioned disk, offline disk are not supported as the source disk.
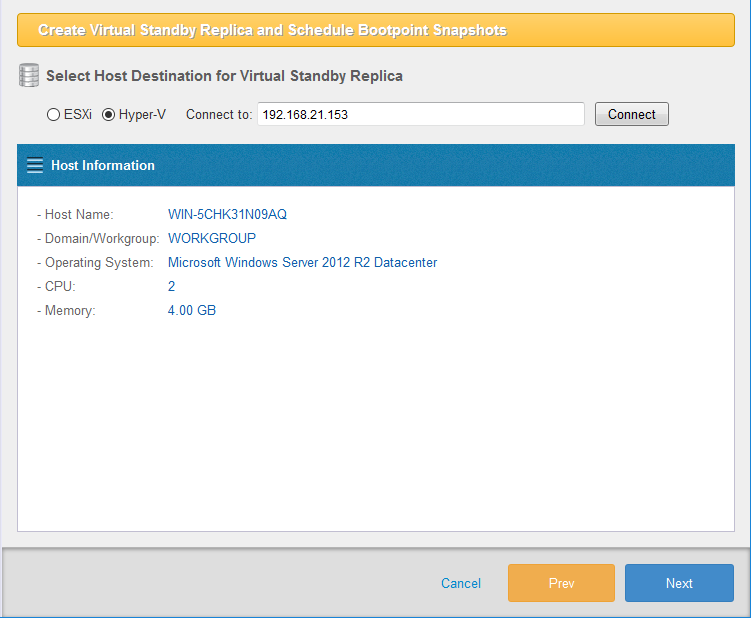
Step 2: Select Target Host
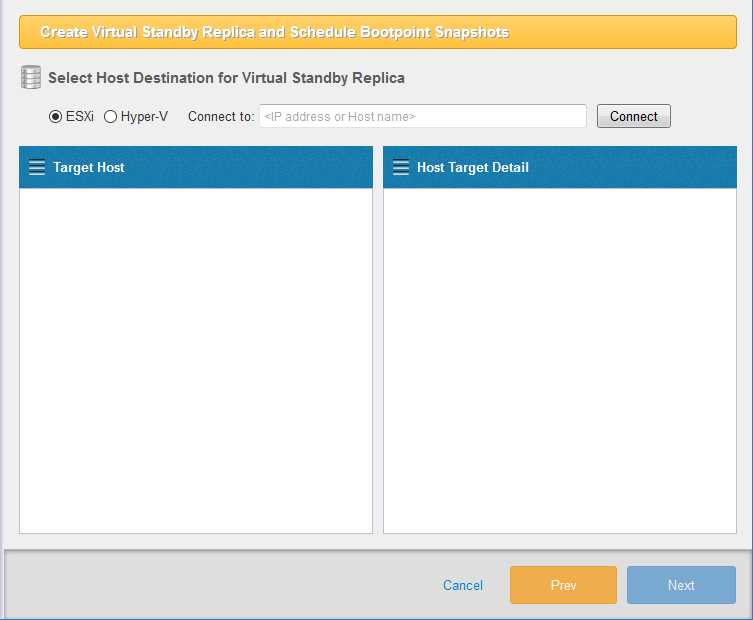
Select ESXi, Hyper-V, KVM for the target to create virtual standby replicas. Select the Target Host and click [Connect].
For more detailed operating procedures depending on the target host, please select the respective link.
Select ESXi host as the target host.
-
Select [ESXi] and type in the IP address or Host Name and click [Connect].
-
Enter credentials to log in ESXi host. Check the box for [Save Credentials] so that login credentials are no longer required.
To establish connection with the ESXi host, log in as the root account.
-
The information of ESXi host is displayed. Select the datastore in [Select Datastore] to use as the destination to create the virtual machine.
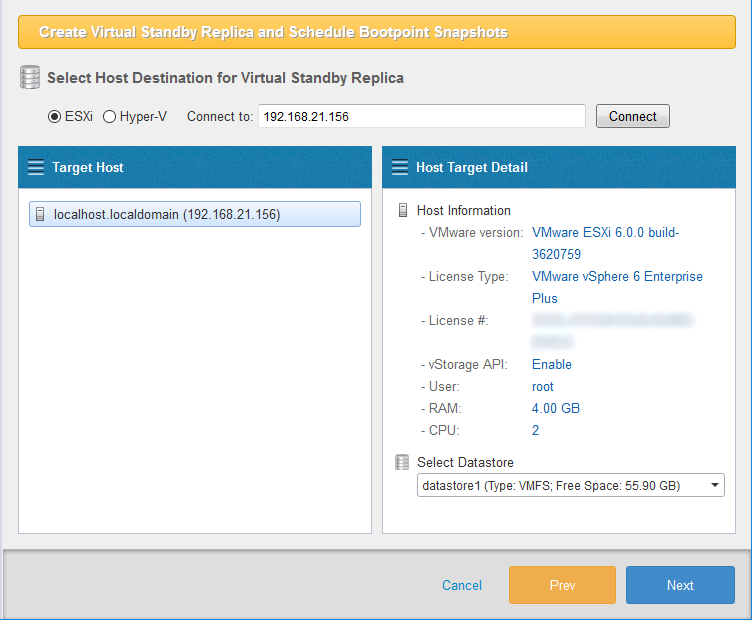
Click [Next].
-
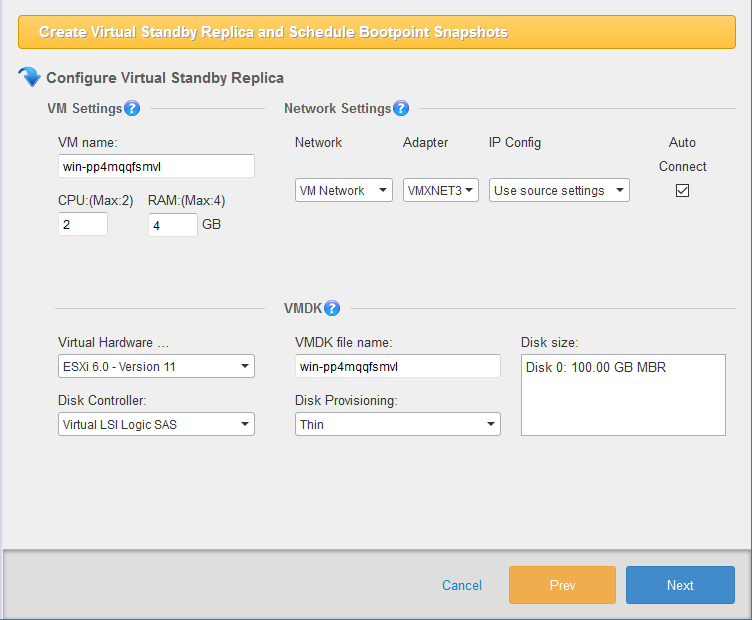
[Configure Virtual Standby Replica] window is displayed to configure the settings for the virtual standby replica to create.
-
Configure Standby Virtual Machine
-
VM name Specify a name for the newly created standby virtual machine.
-
CPU
Assign the number of CPUs for the standby VM. -
RAM
Specify the amount of memory allocated to the standby VM.
-
-
Network Settings
-
Network
Select the virtual switch to use for network adapter. -
Adapter By default, VMXNET 3 is selected.
-
IP Config Use the setting for the source machine or select DHCP / static IP.
-
Auto Connect Automatically network connection is established, when OS boots up.
-
-
VMDK
-
VM Version
VM Version is automatically detected. -
Disk Controller The disc controller to use is automatically detected.
-
VMDK file name Specify the file name of the virtual hard disk to use for the virtual machine.
-
Disk Provisioning Select Thick or Thin provisioning for the disk type to create.
-
Thin Depending on the size of the data virtual machine guest OS writes on the file, the file size dynamically expands.
-
Thick (Zeroed) The same capacity as the virtual disk size is reserved on the physical disk at the beginning.
-
-
Resource Pool If a resource pool is created on ESXi host, standby VM may be created in a specified resource pool.
-
After configuring the above settings, click [Next].
-
Select Hyper-V as the Target Host
Follow these procedures to select the Hyper-V host for the target host to create the virtual standby replica.
Ensure that Administrative share is enabled on the managed remote computer.
-
Select [Hyper-V] for the target host, type in the IP address or the host name for [Hyper-V] and click on [Connect] button.
-
Enter the credentials to log in Hyper-V host. Check the box to [Save Credentials] so that login credentials are no longer required.
To establish connection to the Hyper-V host, log in as administrator or domain administrator of the connected host.
-
The Hyper-V host information is displayed as follows. Click on [Next].
-
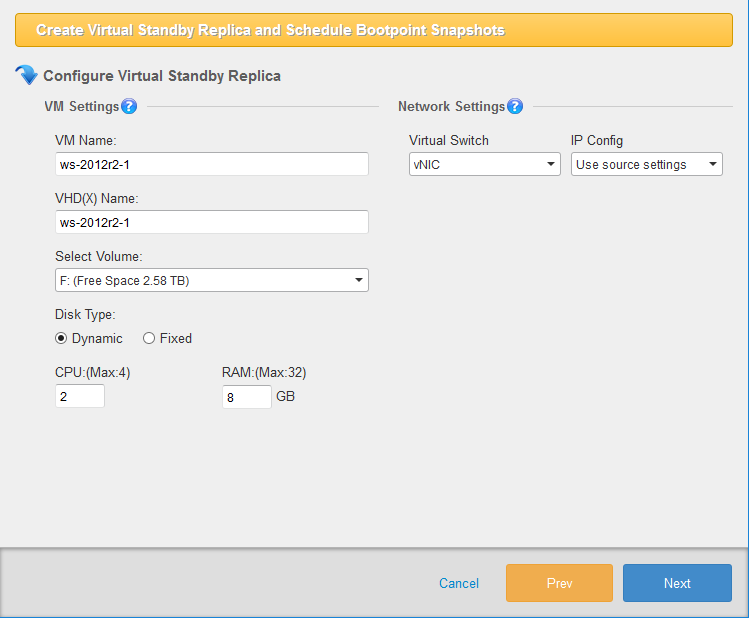
The [Configure Virtual Standby Replica] window is displayed. Please configure the settings for the virtual standby replica to create.
-
Configure Virtual Standby Replica
-
VM Name The name of created standby virtual machine.
-
VHD(X) Name Virtual hard disk name of the standby VM.
-
Volume Specify a target volume on Hyper-V host to create the virtual hard disk or a mount point for CSVFS volume.
-
Folder Select a folder in the selected volume. A new folder may be created.
-
Disk Type Select Dynamic or Fixed for the disk type to create.
-
Dynamic Depending on the size of the data virtual machine guest OS writes on the file, the file size dynamically expands.
-
Fixed - The same capacity as the virtual disk size is reserved on the physical disk at the beginning.
-
-
CPU Specified number of virtual CPUs is assigned for the standby VM.
-
RAM The specified amount of memory is allocated to the standby VM.
-
-
Network Settings
-
Virtual Switch Use the drop-down menu to assign the preferred network for the standby virtual machine.
-
IP Address Config Select the settings configured for the source machine, DHCP or Fix IP.
-
-
Click on [Next] button.
After virtual conversion to virtual machines on CSVFS volumes, please follow the procedures detailed here to take on the conversion target cluster node.
 {: .alert .alert-info }
Select KVM as the target host.
Please use the following operating procedures when selecting KVM host for the target to create virtual standby replica.
-
Select [KVM] for the target host, type in the IP address or the host name and click on [Connect] button.
-
Enter the credentials to log in KVM host. Check the box to [Save Credentials] so that login credentials are no longer required.
To establish connection to the KVM host, enter the credentials as root account. Also, you need to allow SSH connection on Linux host as root account.
Please make sure that the following are installed on Linux host and please configure your firewall to allow port 3260 for iSCSI-target service.
RHEL series targetcli
Debian, Ubuntu targetcli-fb -
The information of KVM host is displayed. Click [Next].
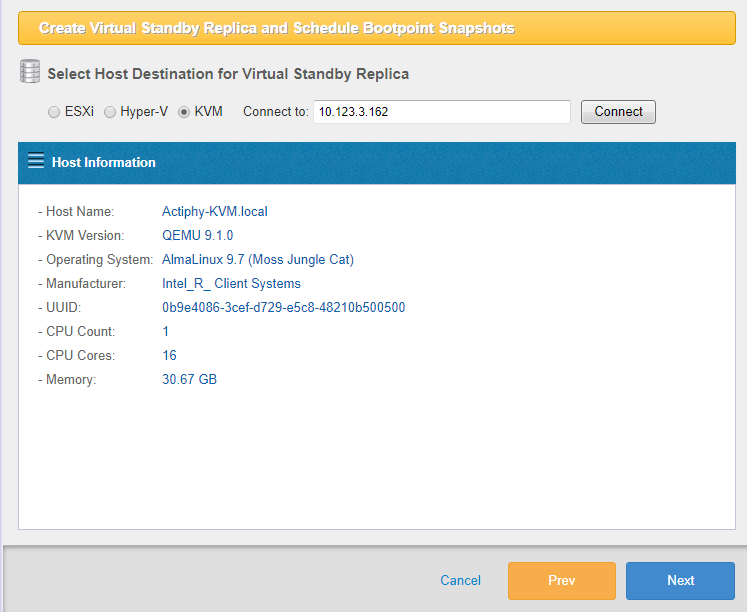
-
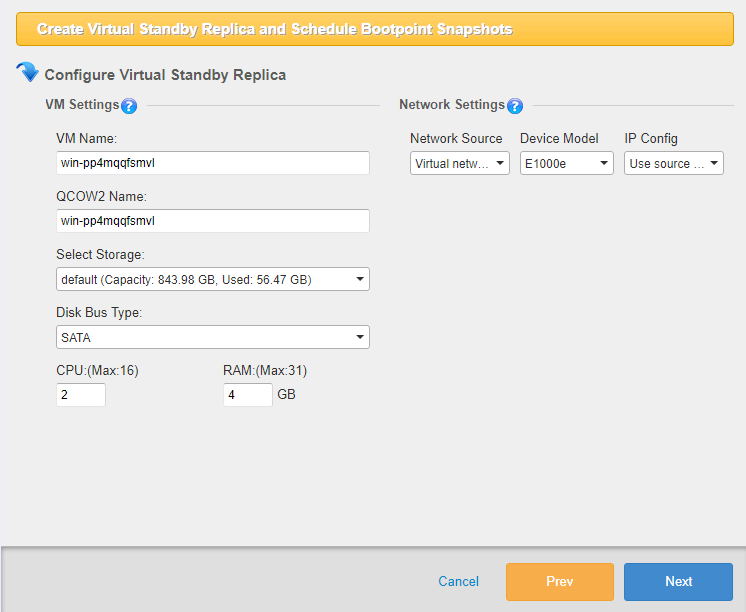
The [Configure Virtual Standby Replica] window is displayed. Please configure the settings for the virtual standby replica to create.
-
Configure Virtual Standby Replica
-
VM Name
Specify the name of created standby virtual machine. -
QCOW2 Name
Specify the file name of the virtual hard disk to use on the standby VM. -
Select Storage
Specify a storage on KVM host to create the virtual hard disk or a mount point for CSVFS volume. -
Disk bus type The same capacity as the virtual disk size is reserved on the physical disk at the beginning.
-
CPU
Specified number of virtual CPUs is assigned for the standby VM. -
RAM
The specified amount of memory is allocated to the standby VM.
-
-
Network Settings
-
Network Source Select the Network Source to use.
-
Device Model Select the Device Model to use.
-
IP Config Select the settings configured for the source machine, DHCP or Fix IP.
-
Click on [Next] button.
-
Select Proxmox as the target host.
Please use the following operating procedures when selecting Proxmox host for the target to create virtual standby replica.
-
Select [Proxmox] for the target host, type in the IP address or the host name and click on [Connect] button.
-
Enter the credentials to log in Proxmox host. Check the box to [Save Credentials] so that login credentials are no longer required.
-
The information of Proxmox host is displayed. Click [Next].
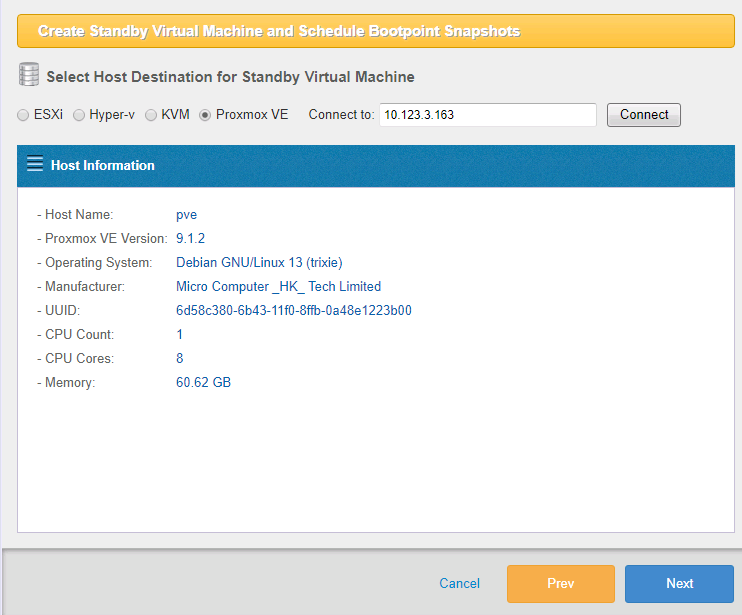
-
The [Create Standby Virtual Machine and Schedle Bootpoint Snapshots] window is displayed. Please configure the settings for the virtual standby replica to create.

-
Configure Standby Virtual Replica
-
VM Name
Specify the name of the created standby virtual machine. -
Select Storage
Specify a storage on Proxmox host to create the virtual hard disk.Depending on the storage type or Proxmox version, rollback to the specified snapshot may be limited. You are recommended to verify that creating a snapshot and rolling-back to a specifiec snapshot is allowed on a virtual machine configured on the specified storage.
-
Disk bus type/Disk format Specify the bus type of the virtual disk and format.
-
CPU
Specified number of virtual CPUs is assigned for the standby VM. -
RAM
The specified amount of memory is allocated to the standby VM.You can add TPM or EFI disks as needed.
When creating a virtual standby replica with SecureBoot enabled, you are recommended to add an EFI disk with [Standard Distribution Key] enabled. If not enabling, SecureBoot is disabled on the created virtual standby replica.
-
-
Network Settings
-
Network Source Select the network source to use.
-
Device Model Select the device model to use.
-
IP Config
Select the settings configured for the source machine, DHCP or Fixed IP.
-
Click [Next].
-
Step 3:Schedule Setting
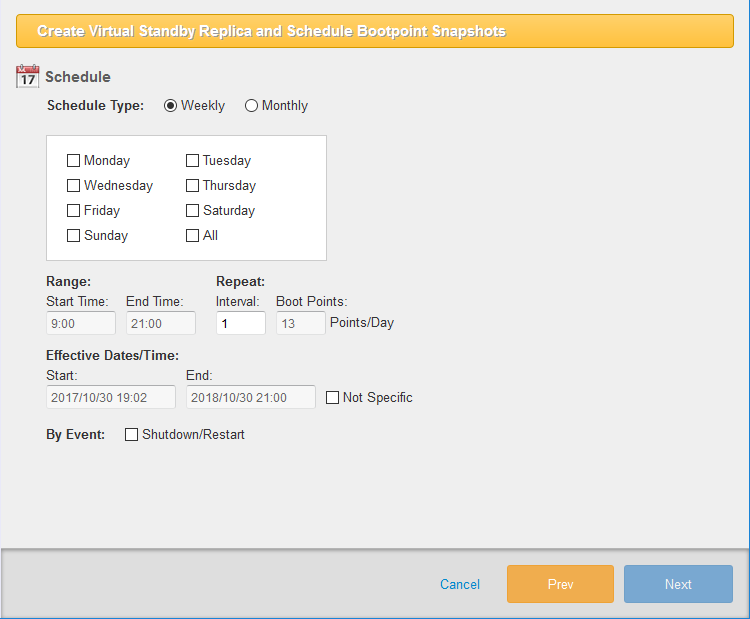
Configure the weekly or monthly intervals for creating incremental boot points of the standby virtual machine.
Select [Weekly] and specify the day of a week to configure the schedule settings.
Select [Monthly] and specify the date to configure the schedule settings.
-
Range Set the start and end times of the window for creating boot points.
-
Repeat Set the time interval for creating boot points.
-
Effective Date/Time Specify the start and end date/time of the period when the boot points are to be created.
When configuring schedule settings for creating incremental boot points of the standby virtual machine, specify the time to execute the task for [Start Time] and ‘24’ for [Interval]. {: .alert .alert-info }
Check [Shutdown/Restart] for [By Event] to run the scheduled task upon system shutdown or restart.
Click [Next].
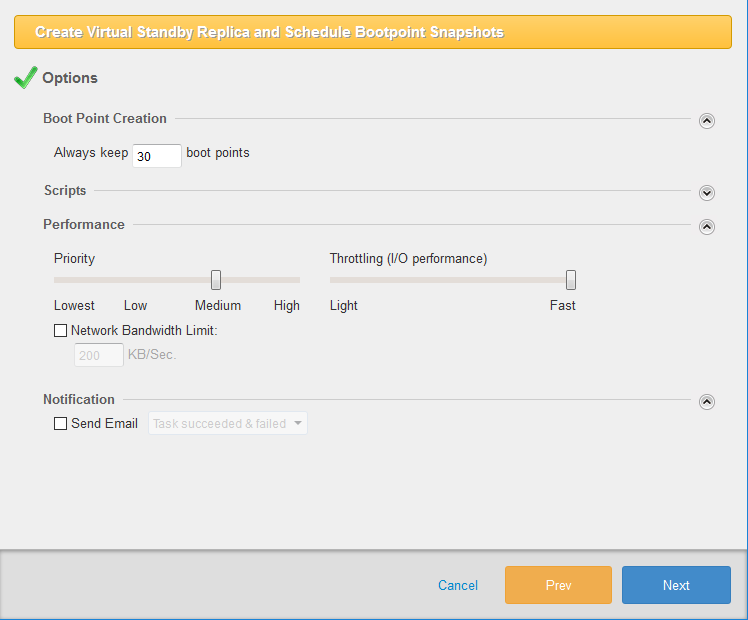
Step 4:Options
-
Boot Point Creation Specify the maximum limit for the number of boot points to create virtual standby replicas (up to 30). When the number of the boot points reaches the predefined limit, the most and the second most obsolete boot points are merged.
When selecting KVM, up to the maximum number of 22 boot points can be created.
-
Scripts Scripts can be implemented to run before and or after snapshots are taken or after the boot point has been created. Ex: ‘Log off all of the inactive users’ or ‘places a database into a paused state’ before a snapshot is taken. After a snapshot is taken, ‘restart the paused database’.
-
Performance
-
Priority Set the priority for the vStandby Windows process.
-
Throttling (/O performance)
Throttle the I/O speed. -
Network Bandwidth Limit Check the box to define the maximum throughput in KB/second allowed to access the target host when vStandby is creating the standby virtual machine or taking incremental P2V snapshots of the protected server.
-
-
Notification
Configure vStandby to email notifications of the specified task status upon completion.
Click [Next].
Step 5:Summary/Create Virtual Standby Replica
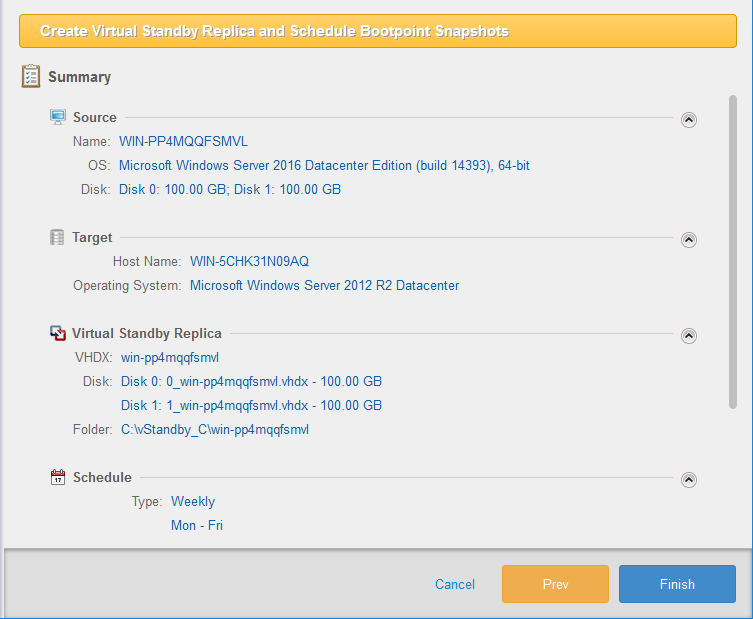
Use the Summary window to review the configuration and options. Click [Finish] to proceed.
The task is started and begins to create the virtual standby replica. When the virtual standby replica is created, click [OK] if the scheduled task should run for the first boot point creation.
Dashboard
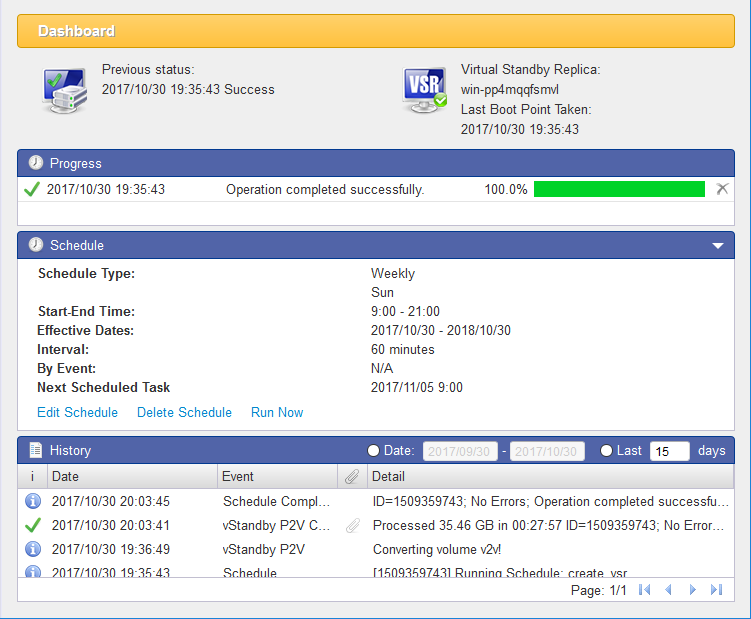
Viewing Scheduled Tasks
When the task schedule is configured, the Console defaults to Dashboard view. Dashboard monitors recurring tasks and events related to the schedules that maintain the Standby Virtual Machine. Dashboard provides the information whether regularly scheduled incremental P2V boot points have been successfully created, thereby a number of snapshots are provided to select should a switchover to the standby virtual machine become necessary.
-
All events within a scheduled task are dated and time-stamped.
-
Scheduled tasks are individually tagged with a unique ID number for easy reference.
-
The amount of data for each incremental P2V boot point event is recorded. This can be a valuable tool to measure trends by how much and how often data changes on the source machine.
Event History and Task Log
Click [Date] in [History] bar to set the start and end dates of the log information. Or, click the radio button for [Last xx days] to set the specific dates or review only the most recent events. Click on the column header name to sort the displayed items (Ex. Date, Event, etc.):
50 log entries can be viewed on a single screen. Use the navigation bar arrows located at the bottom of the task viewer to page through each of the log entries.
On the [History] bar, click the paper clip in the column associated with the event log for viewing details of a particular task for creating boot points.
Use the scroll bar to navigate from the beginning to the end of the log. To save the log for later analysis, click the [Save log] button and save to a preferred directory. The log is saved as a text file for viewing by using any text editor such as Notepad.
Cancel Tasks
The [Progress] bar displays the status of a running task. Click the [X] to the right of the progress bar. A dialog box appears. Clicking [OK] will confirm the cancellation of the current task and the event will be displayed in [History].
Edit Schedule
Edit Schedule, Summary, Next Run, Delete are in the box in the center of the console.
-
Disable/Enable Schedule
Disable or enable a schedule. -
Edit Schedule Edit the current schedule.
-
Run Now Manually run the task.
-
Delete Schedule Deletes the task. When deleting a virtual standby replica from the target host, check the checkbox for [Delete Virtual Standby Replica] to remove the standby virtual machine and schedule from the target host. Click [OK].
Create Virtual Standby Replica of the local system on hypervisor.
Cluster and Cloud Editions do not provide this feature.
VMware vSphere Version 5.1 or later is supported. VMware vSphere Hypervisor (ESXi) free license version is not supported.
Windows Hyper-V Server 2008 R2 or later is supported. The free license version of Windows Hyper-V Server 2008 R2 or later is also supported.
HyperStandby
HyperStandby creates and maintains dormant virtual replicas of physical or virtual machines from ActiveImage Protector (AIP) backups to provide a switch-over option in the event of failure of the source machine. This ensures a successful startup of the standby virtual machine from the most current backup. Minimal downtime can be expected, bypassing a lengthy restore process or virtual conversion. This virtual standby replica is added into a VMware ESXi, Microsoft Hyper-V host or KVM host and kept current by taking scheduled incremental P2V snapshots of the source machine. This ensures a successful startup of the standby virtual machine in the event of switchover.

Add Image
Click [Add Image] in the list dialog.
Check the box to select the backup.
If there are multiple generations, the file selected here and the subsequent generations are the source files.
Click ← icon to go one level up from the specified path.
The list is displayed as follows when the backup is added.
Supported AIP Images:
| Agent-based | Agentless | |
| Backup image of Windows system | 〇 | 〇 |
| Backup image of Linux system | △ Only Basic is supported. |
〇 |
Create Task
Select a backup from the backup list to create a standby VM and click [Create vStandby Task] or right-click on the selected backup to select [Create vStandby Task] in the right-click menu.
For detailed operating procedures to configure the target setting, please click [here] (create_hyperstandby_task.md).
Dashboard
The dashboard is useful to review task logs, monitor currently running tasks, and summary of the created profiles, and if necessary edit, disable, run a task outside of the configured schedule or delete a profile.
Task tab

Monitor the progress of the currently running task.
Task Log tab
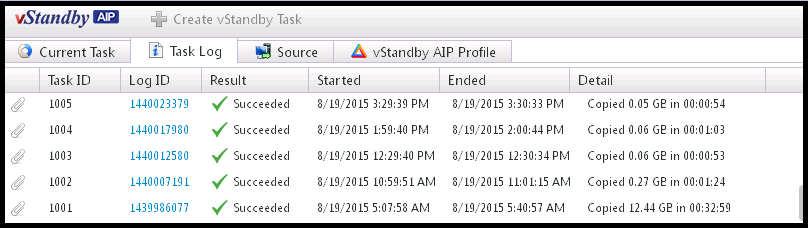
Review previously completed tasks in Task Log. Click Log ID to view the detailed log.
Source tab

The Source tab displays the source backup file information that is converted to a standby virtual machine.
Profile tab
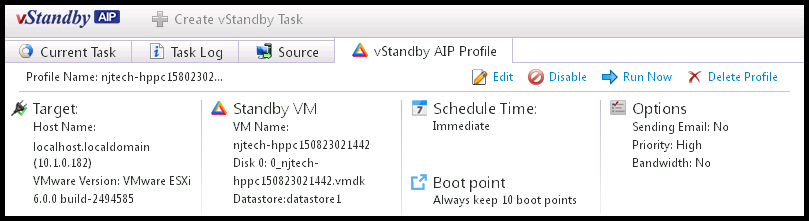
The Profile tab displays the summary of the profile configured for the created standby virtual machine.
The Profile tab also provides utilities to reconfigure options for the profile.
-
Edit Edit the existing profile’s schedule and options.
-
Disable/Enable Disable and enable a schedule.
-
Run Now Run a configured profile immediately. This option cannot be selected if [Immediate] was selected when configuring the schedule.
-
Delete Profile Delete a configured profile completely.
Create standby VM on hypervisor by using backup image.
Desktop, Cluster and Cloud Edition do not provide this feature.
Tips
Knowledge Base
Boot up from a boot point
Depending on the cause of the source machine’s system down, you may be recommended to boot up a boot point. In case of virus or malware attack which causes the leakage or corruption of data, you are recommended to boot up a standby VM by using an early boot point.
Boot up a standby virtual replica instead of a boot point
Depending on the period from the time the standby VM was first created until when the source machine’s system down, you may be recommended to boot up a standby virtual replica, if the period is too short to make changes, you are recommended to boot up the standby VM without selecting a boot point. However, if the transaction data, updates of applications or OS have been applied, you are recommended to boot up the most recently created boot point.
How to boot up from a boot point (snapshot)
The latest virtual standby replica / standby VM is listed under vStandby1 or vStandby2 level. The respective processes are repeatedly numbered under this level with no chance of displaying the both in Snapshot or Checkpoint window.
VMware Sphere
Please select a standby VM / standby VM on Management console (vSphere Client, Web Client, etc.) Right-click the standby VM, highlight [Snapshot] in the pop-up menu and click [Snapshot Manager]. The time-stamped snapshots are listed in the chronological order. Select the optimum boot point and boot up the virtual standby replica / standby virtual machine from the boot point.
Hyper-V
Please select a virtual standby replica / standby VM from Hyper-V Manager. The time-stamped snapshot tree is displayed in [Checkpoint] or [Snapshot]. Select an optimum boot point and boot up virtual standby replica / virtual standby machine.
KVM
When booting from the latest snapshot, please directly boot up the virtual standby replica / standby VM.
When selecting a boot point other than the latest snapshot to restore and boot up, please use AipControl.exe and run the following command from a command line interface.
-
Obtain the list of VM on KVM host.
aipcontrol kvm listvm <host ip> <username> <password> -
Obtain the list of snapshots for virtual standby replica / standby VM. Snapshots taken at any given point in time are named in a timestamped format (V<yyyymmdd_hhmmss>).
aipcontrol kvm list_snapshot <ip> <username> <password> <vm uuid> -
Restore virtual standby replica / standby VM to the snapshot taken at the specified point in time.
aipcontrol kvm revert_snapshot <ip> <username> <password> <vm uuid> <snapshot name>Snapshots taken at any point in time are named in [V<yyyymmdd_hhmmss>] format.
The management tools such as Cockpit and Virt Manager do not support recovery from a snapshot.
Restore to CSVFS volume / post-conversion processing
Please take the following operating procedures after restoring / conversion of a virtual machine to CSVFS volume.
Restore as / conversion to a new virtual machine
The restored / created virtual machine configured for high availability by using Faileover Cluster Manager can be used to provide failover capability.
You are recommended to configure the standby virtual machine / virtual standby replica created by using HyperStandby, vSatndby for high availability when booting / operating the standby virtual machine.
When configured for high availability and fail-over from the ownership node to the other cluster node takes place, the backup task fails.
Restore disk only
A folder named with the virtual machine is created in the specified CSVFS, and a virtual hard disk is restored / created. When creating a new virtual machine in CSVFS by using Hyper-V Manager and virtual hard disk is connected, the virtual machine configured for high availability by using Faileover Cluster Manager can be used to provide failover capability.