Deploy
Deploy tasks and settings to specified client computers.
The detailed operating procedures are described below.
-
Client
-
Select [Deploy] in Operation ribbon and a template type. When selecting a client in the list, the currently selected client is added to the list.
-
Select a client and the template type in the right-click menu. The currently selected client is added to the list.
-
-
Task
- Select [Deploy] in Operation ribbon and a template type.
-
Template
- Select [Deploy] in Operation ribbon and a template type.
When selecting a template in the list, the currently selected template is added to the list.
- Select [Deploy] in Operation ribbon and a template type.
The following are the detailed operating procedures of deploying a template.
Deploy tasks and settings to Version 2018 client is not supported.
Deploy Backup Template
-
Select a backup template and schedule template. Or, click [Add new…] to create a template.
-
Review the configured settings of the selected template. Click [Show Detail] for summary information. Select a schedule template and Deploy Options are displayed.
-
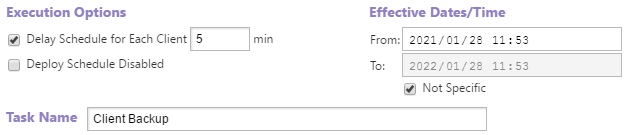
Execution Options
-
Delay schedule for Each Client xx min
Run deploy tasks to multiple clients by shifting the set task timing with the specified time interval. -
Deploy Schedule Disabled
Disable the deployed schedules.
-
-
Effective Dates/Time
Specify the period for enabling the scheduled task to deploy. If you select [Not specific], the schedule will be enabled for unlimited period. -
Task Name
Specify a deploy task name.
-
-
Check the deploy target.
-
Add new… Add a new client computer to the list.
-
Add a client after deploy task
Client computers with a history of deploying the specified backup template can be added to the list.
When removing the added client from the list, mouse over the recycle bin column on the client computer to remove and click on the appearing [x] icon.
-
-
Click [Deploy] to start the deploy process.
Deploy Backup Tasks Schedules
The list of the target clients with a backup task are listed in the Operation dialog.
-
Select [Deploy Schedule] for the deploy type and select a schedule template. Or, click [Add new…] to create a template.
When selecting [Delete Schedule], [Disable Schedule] or [Enable Schedule], multiple clients can be selected at a time.
When selecting [Delete Schedule], the selected task will be deleted.
-
Review the configured settings of the selected template and select the Execution Options.

-
Execution Options
-
Delay schedule for each client xx min
Enable this option to deploy schedules to multiple clients by shifting the timing with the specified time interval. -
Deploy schedule disabled
Disable the deployed schedules.
-
-
Effective Dates/Time
Specify the period for enabling the schedule task to deploy. If you select [Not specific], the schedule will be enabled for unlimited period.
-
-
Check in the box in [Deploy] column, specify the deploy target client and the profile for scheduled deployment.
-
Click [Deploy] to start the deploy process.
Deploy vStandby Tasks
-
Select a template. Or, click [Add new…] to create a template.
-
Review the configured settings in the template and then select deployment options.
-
Review the configured settings in the template and select deployment options.
-
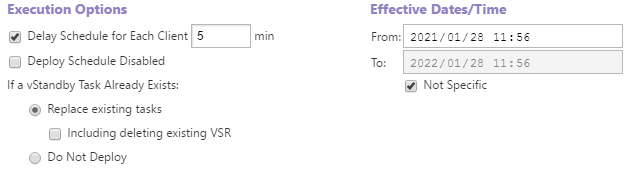
Execution Options
-
Delay schedule for each client xx min
Enable this option to deploy tasks to multiple targets by shifting the timing with the specified time interval. -
Deploy Schedule Disabled
Enable this option to disable the deployed schedules.
-
-
If vStandby task already exists
Select how ActiveVisor should behave if there already is a vStandby task.-
Replace existing tasks Replace the existing task with the deployed one. Enable [Including deleting existing VSR] option to delete VSRs created with the existing task.
-
Do not deploy Deploy task is not deployed.
-
-
Effective Dates/Time
Specify the period the deployed schedule task is enabled. If you select [Not specific] the deployed schedule will be enabled for unlimited period.
-
-
Check the deploy target clients.
-
Add new… Add a new client computer to the list.
-
Add a client after deploy task
Client computers with a history of deploying the specified backup template can be added to the list.
When removing the added client from the list, mouse over the recycle bin column on the client computer to remove and click on the appearing [x] icon.
-
-
Click [Deploy] to start the deploy process.
Deploy Clint Settings
-
Select a template. Select [Show Summary] to check the summary of the template.
-
Identify the target client computer for deployment.
-
Add new… Add a new client computer to the list.
-
Add a client after deploy task
Client computers with a history of deploying the specified backup template can be added to the list.
When removing the added client from the list, mouse over the recycle bin column on the client computer to remove and click on the appearing [x] icon.
-
-
Click [Deploy] to start the deploy process.