Backup
The following features for ActiveImage Protector are as follows.
Volume Backup
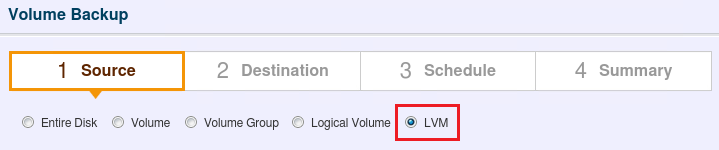
Step 1: Select Backup Source
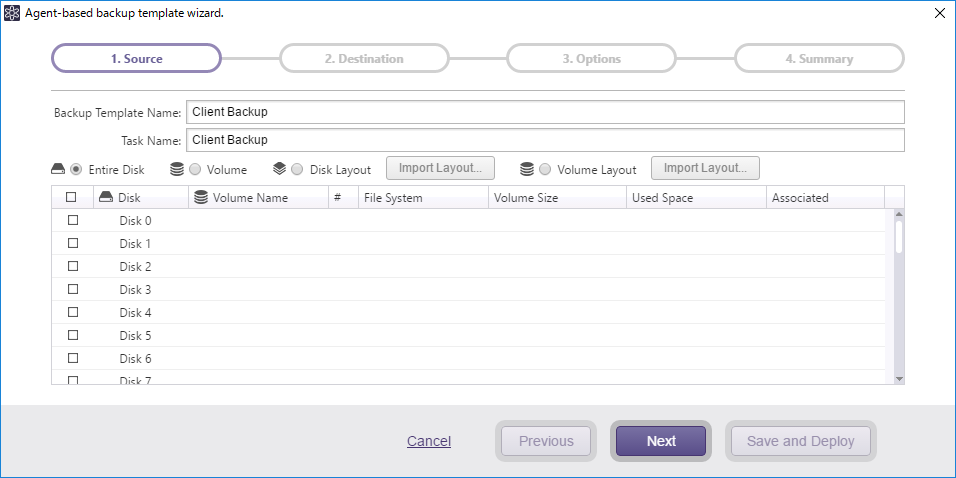
Use one of the following operating procedures to select a backup source. Click a radio button to specify the backup type and the backup source.

-
Disk: Select if backing up the entire physical disk (to include all volumes).
-
Volume: Select if backing up the specified volume only.
-
Volume Group (VG): Select if backing up the specified volume group.
-
Logical Volume (LV): Select if backing up the specified logical volume.
-
LVM: Select if backing up the specified LVM. Please select a volume group (VG) and related disks.
After configuring the above settings, click [Next].
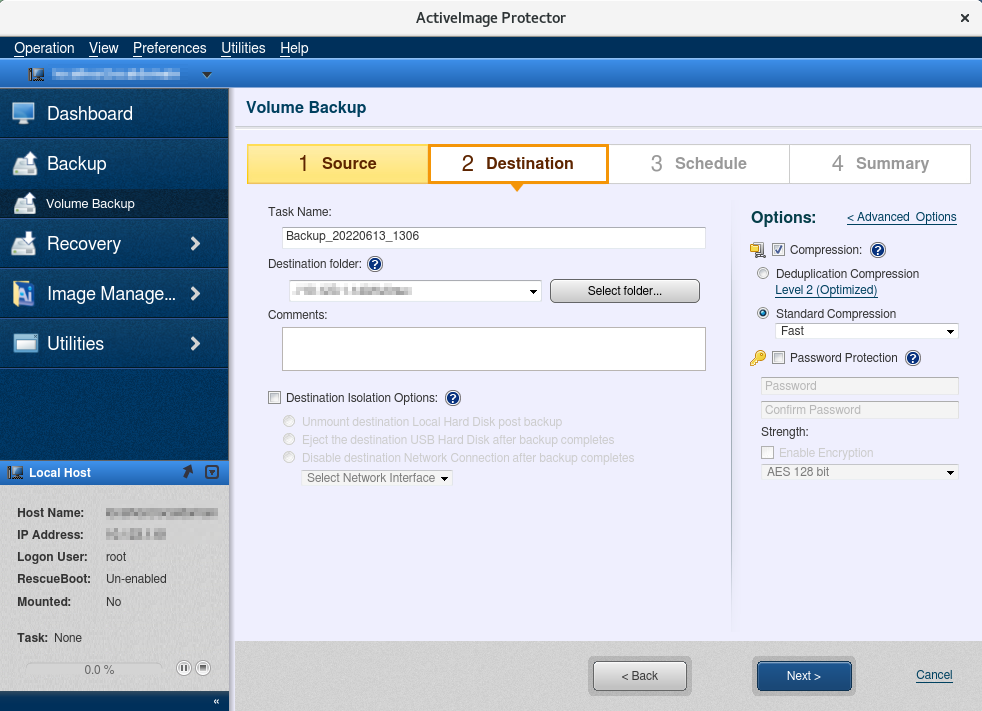
Step 2: Select Destination
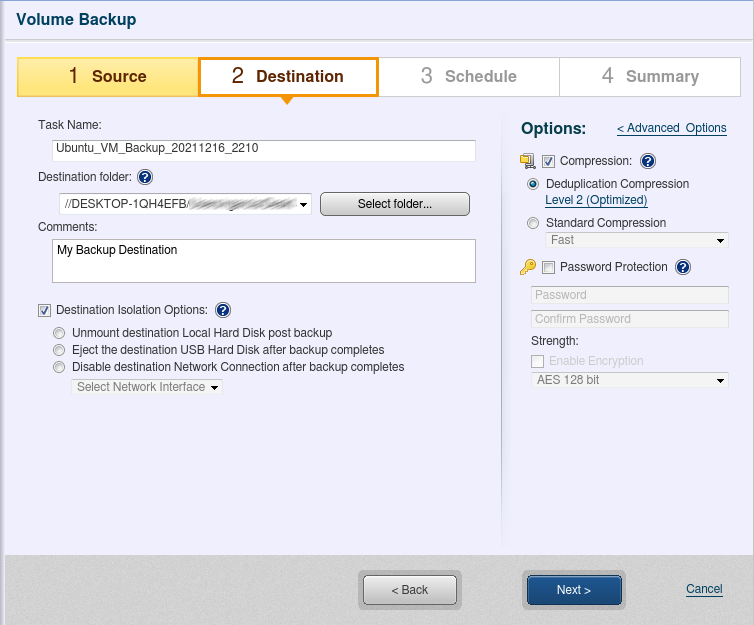
Select a destination storage and configure the settings.
-
Task Name Specify a name for the backup task.
-
Destination Folder Specify the destination folder for the backups. The created backups are saved with a unique name in a sub-folder created under the specified destination folder.
You are not allowed to edit the unique backup image file name.
When specifying cloud storage as the destination, please refer here for the details.
When specifying Actiphy ImageCenter with StorageServer as the destination, please enter IP address.
-
Comment
Add a brief description in the [Comments] textbox to define for the created backup. -
Destination Isolation Option
Disconnects access to the backup image storage drives after backups complete. This feature is enabled on the system on which AIP is installed. Upon completion of the backup task, the specified destination storage becomes inaccessible.The combined use of the Destination Isolation feature with a post-backup process is not supported.
-
Un-assign the mount point from the local hard disk after completing the backup: When this option is enabled, ActiveImage Protector will unassign the local hard disk’s mount point once the backup process is complete. Starting the subsequently scheduled task, the mount point is automatically created and assigned to the destination for the backup task. This feature protects the backup storage location and the backups stored there from internal tampering or ransomware attacks.
-
Eject the destination USB hard disk after completing the backup: When this option is enabled, ActiveImage Protector will automatically unassign (delete) mount point for the hard disk on which the destination folder is located. Therefore, you need to manually attach the USB HDD to the system before starting the subsequently scheduled task.
-
Disable the destination network connection after completing the backup: This option will disconnect the network connection to your backup destination once the backup is complete if you save backups to a network drive. The network connection to the backup destination is automatically re-established when starting the subsequently scheduled backup task.
-
-
Compression Enabling compression reduces storage requirements by further compacting the backups. Begin by checking the [Compression] box, then selecting the desired type of compression.
-
Deduplication Compression: Select one of the three levels of deduplication available.
-
Level 1 - Deduplication is performed at the highest level. This level of compression may increase the overall backup processing time but achieves the most tightly compressed backups.
-
Level 2 - This preset level provides the best balance between process time and compression performance. (This is the default setting).
-
Level 3 - The backups will be generated at a lower compression rate and deduplication requires less backup processing time.
Change temporary file folder: Set the location for deduplication to process temporary files.
The maximum size of the temporary file folder will be 1% of the used space of backup source.
It is recommended to specify a folder on an SSD that delivers fast read and write speeds.
-
-
Standard Compression: The dropdown menu provides two levels of standard compression.
-
Fast - Backup processing time and storage requirements are at an optimum.
-
High - The backup task will place a higher demand on system resource usage and an increase in processing time but the result is a smaller backup image.
-
-
-
Password Protection Password protect the backups by assigning a unique password. This ensures that password input is required for mounting, exploring, or restoring any of the contents of the backups.
-
RC5 - An early encryption standard with a variable block size, key size and number of rounds. Selecting RC5 encryption provides a faster encryption processing speed.
-
[AES 128 bit] and [AES 256 bit] - A stronger encryption method than RC5 with a fixed block size and a key size of 128 or 256 bits.
-
Advanced Backup Options
Click [Advanced Options] to access the advanced backup options settings page.
-
General

-
Backup by disk If including multiple disks in backup source, backups are created per disk.
-
Include free space in image Backup of all sectors is taken including the free space of the selected volume.
-
Split image into xx MB files The backup is split into multiple files of the specified size (MB)
-
Ignore bad sectors
By enabling this option, encountering unreadable sectors will not interrupt the backup task. -
Create an MD5 file for image
An MD5 file is created for the created backup. -
Use network throttle
Define the maximum throughput in KB/second by using network throttle if destination drive is located on a network shared folder or cloud storage. -
Use network write caching When storing backups in network shared folder, cached data are used.
-
Backup time-out
Specify the time-out and the maximum time to wait for a backup task to complete the backup process.
-
-
Deduplication Compression
Select the option to ensure that the backup task completes without interruption if insufficient disk space is detected in the temporary file folder before operation.
* Continue operation with [Standard] Compression
Will stop Deduplication and continue the backup task using the default Standard Compression. The backup image is recognized as Deduplicated.

* Temporary File Folder
Specify the location for deduplication to process temporary files. The maximum size of the temporary file folder will be 1% of the used space of backup source or less. The higher the deduplication level, the larger the temporary file size will be.
-
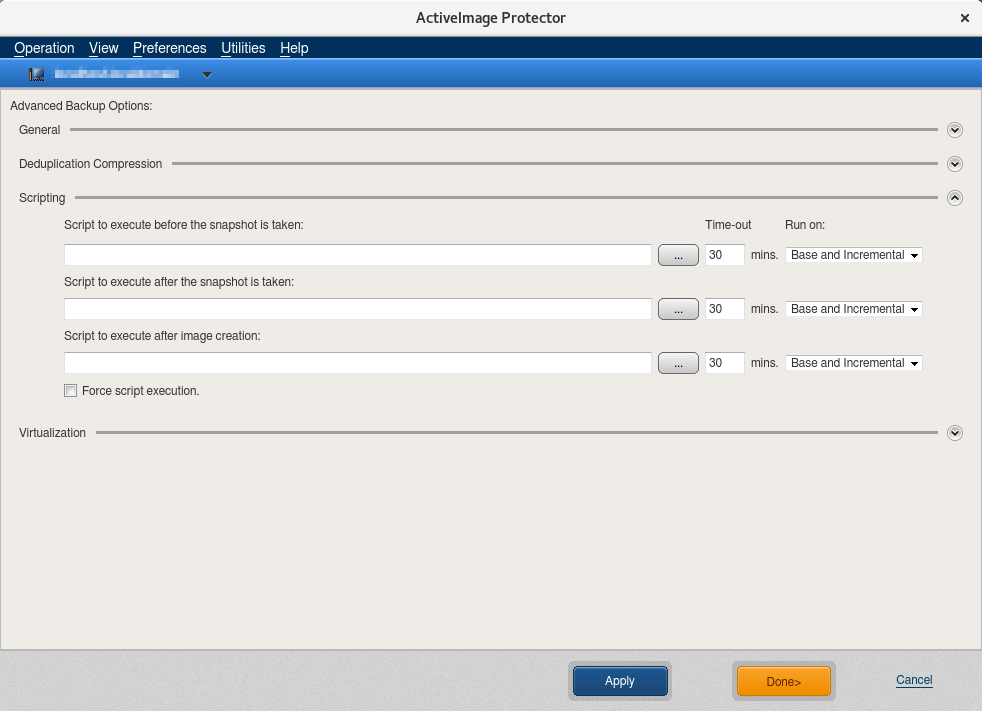
Scripting
Scripts can be implemented to run before and or after snapshots are taken or after the backup been created. Use the dialog box to execute scripts.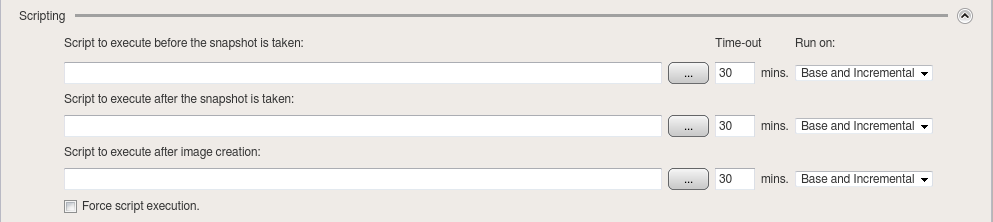
-
Script to execute before the snapshot is taken Specify a script or batch file to run before the snapshot is taken.
-
Script to execute after the snapshot is taken Specify a script or batch file to run after the snapshot is taken.
-
Script to execute after image creation Specify a script or batch file to run after the backup has been created.
-
Force script execution Checking this box ensures that all specified script or batch files will be executed even if an error occurs during the backup operation.
-
Run on
Select the backup type to run the specified script.
-
-
Virtual Conversion The following option is provided to perform the same process as required for Virtualization.

- Create a virtual machine compatible image
Performs the same process as required for restoring a backup image to a virtual disk (Hyper-V, VMware, KVM).
Cold backup image is not supported.
- Create a virtual machine compatible image
When completing the settings, click [Next] to create a backup schedule.
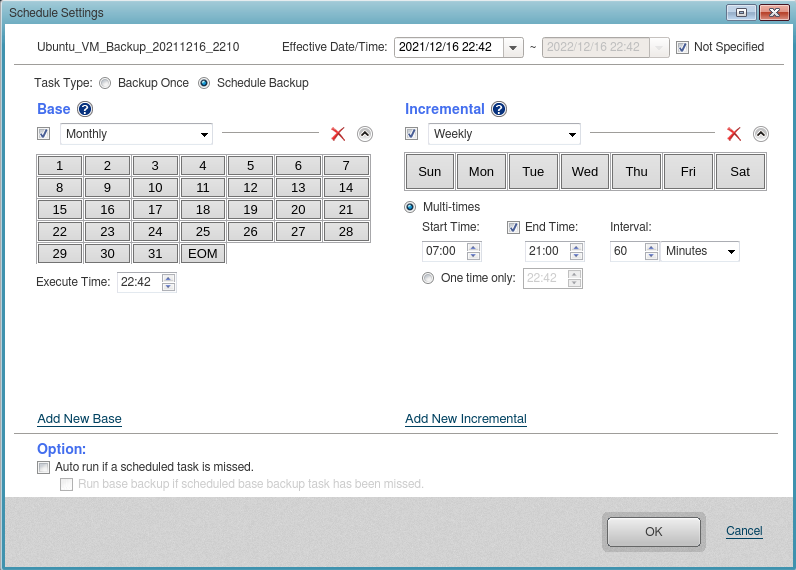
Step 3: Create Backup Schedule
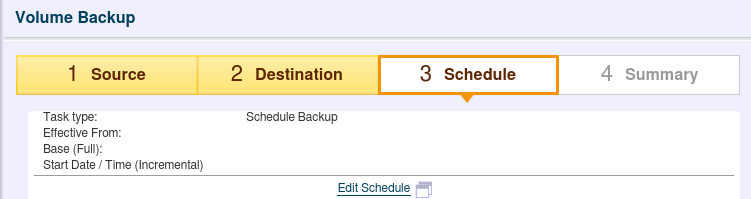
Configure the backup schedule settings from the step [3 Schedule] window and by clicking [Edit Schedule].
-
Effective Date/Time
Begin by specifying [Effective Date/Time] that the scheduled task becomes live. The [Effective Date/Time] defaults to begin 10 minutes from the start of the configuration wizard. The [Not Specified] option may be checked so that the schedule task is live for an unlimited period. -
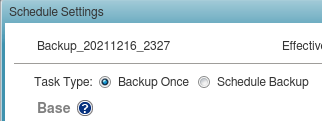
Backup Task Type
Please select [One-time Backup] or [Scheduled Backup]. When selecting [Scheduled Backup], please select the schedule type. -
Base
Check the box and use the drop down menu to select the schedule type. Options include [Weekly], [Monthly], [Specified Date/Time], [Designate Specific Days]. Uncheck the box to disable the schedule instead of deleting.
Click [Add New Base] to add a new base backup schedule. Any unnecessary schedule types can be deleted by clicking on ‘x’ icon. -
Incremental
Check the box and use the drop down menu to select the schedule type. Options include [Weekly], [Monthly], [Specified Date/Time]. The following options are provided to run incremental backup tasks.-
Multi-times - Please specify the time slot and interval to run recurring backup tasks. If not specifying [End Time], the incremental backup tasks regularly run until the specified time on the following day.
-
One Time Only - Specify the execution time.
Click [Add New Incremental] to add a new Incremental backup schedule. Any unnecessary schedule types can be deleted by clicking on ‘x’ icon.
-
-
Event Backup Check the box for the [Shutdown / Reboot] option to enable event-triggered backups so the backup task is started upon system shutdown or restart.
-
Option
-
Auto run if a scheduled task is missed By enabling this option, a skipped task at system shutdown, if any, is automatically executed when the system is rebooted.
-
Prioritize a skipped base backup task When this option is enabled and if both base and incremental backup images are skipped, execution of the skipped base backup task is prioritized.
-
In the event that an enabled but undefined schedule already exists, the schedule setting cannot be configured. Disable or delete the schedule.
When completing the settings, click [OK] to create a backup schedule. Summary of the configured schedule settings are displayed.
Post-backup Process

When a [Scheduled Backup] is selected, you can configure the settings for post-backup tasks to be executed when a backup file is created. For more details, please refer here.
When specifying Amazon S3, Microsoft Azure for the destination storage, Post-backup Process is not supported.
Options
-
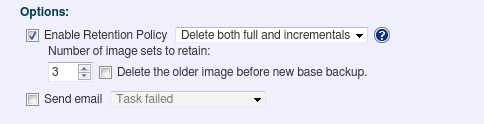
Enable Retention Policy
Check this box to enable a retention policy as to how many sets of incremental backup files to retain before deletion. Image set includes a base backup and the associated incremental or differential backup. Select [Delete the older image before new base backup] option to delete the oldest image set before a new image set is created, when the number of image sets reaches the pre-defined limit. Select option to delete the oldest image set before a new one is created.-
Delete both the full and incremental: Select this radio button to delete both full and incremental backups based on the retention policy settings.
-
Delete only the incremental: Selecting this option deletes only the incremental backups based on the retention policy. Full backups are not deleted.
-
-
Send email Check this box to send email notification of a task completed with a specified status. Predefine the email notification settings by selecting [Preferences] - [Notification] from the menu bar.
-
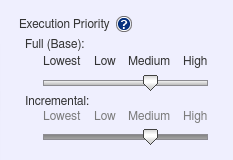
Execution Priority
Select a level of task Execution Priority.
When completing the settings, click [Next].
Step 4: Summary
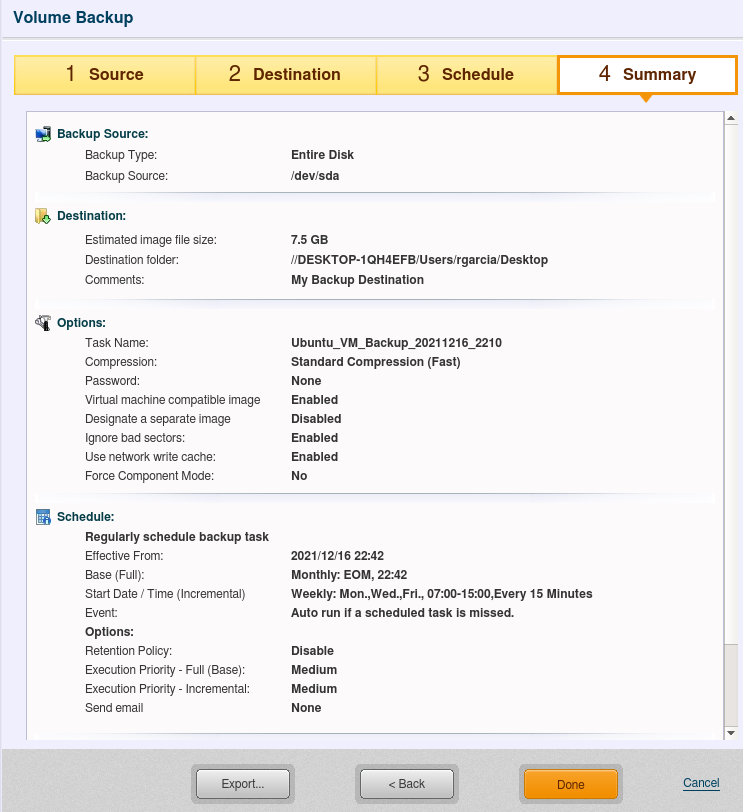
Use the Summary window to review the backup configuration and options.
Click [Done].
When Backup Once is selected
Click [Done] to display the dialog for configuring the settings for the execution priority.
When Scheduled Backup is selected
Click [Done] to display the confirmation message for starting the first scheduled backup task.

Click [Yes] to start the task immediately. Click [No] to go back to Dashboard window. Click [Cancel] to go back to the wizard instead of completing the configured setting.
If selecting to perform a post-backup process, the process starts immediately after backup is created according to the settings configured.
Allows you to select a specific disk on local system or a volume for backup source.
Tips
Backup LVM system
Step 1 : select backup source
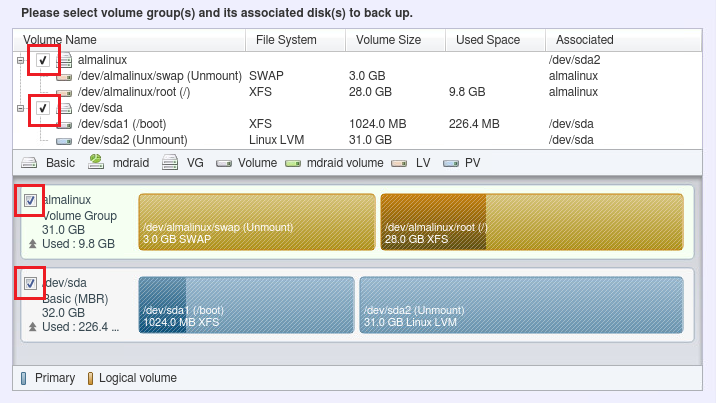
When backup up LVM system, please use the following operating procedures.
- Select [LVM] in [Select Source] window and use one of the following for the backup source.
-
Select the volume group and related disks to back up.
-
Volume Group (VG)
-
Physical volume (PV) configuring the selected volume group (VG) and the disk including ‘/boot’ or ‘/boot/efi’
-
Click [Next] and configure the destination and schedule settings.
Using script for backup KVM virtual machine
The use of the script included in the product enables to back up the virtual machine configured on KVM host while the virtual machine is up and running.
Install AIP Linux on KVM host and backup the entire host while the virtual machine is live.
Setting
-
Configure the backup schedule settings on KVM host.

-
Go to [Advanced Setting] and implement the script.
Enter ‘/opt/Actiphy/scripts/vm_freeze.sh’ and execute the script before the snapshot is taken. Enter ‘/opt/Actiphy/scripts/vm_thaw.sh’ and execute the script after the snapshot is taken.
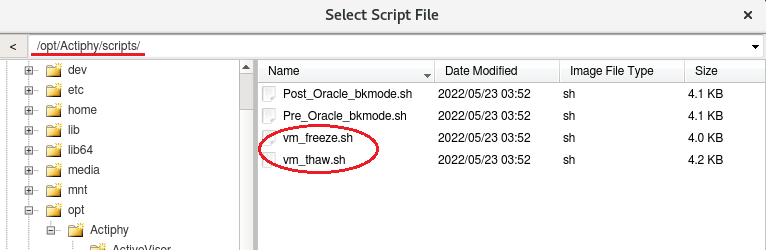
Enter ‘3’ minutes for the timeout setting.
Please adjust the timeout setting depending on the system environment.
Enabling [Force script execution] option ensures that all specified scripts will be executed even if an error occurs during the backup operation.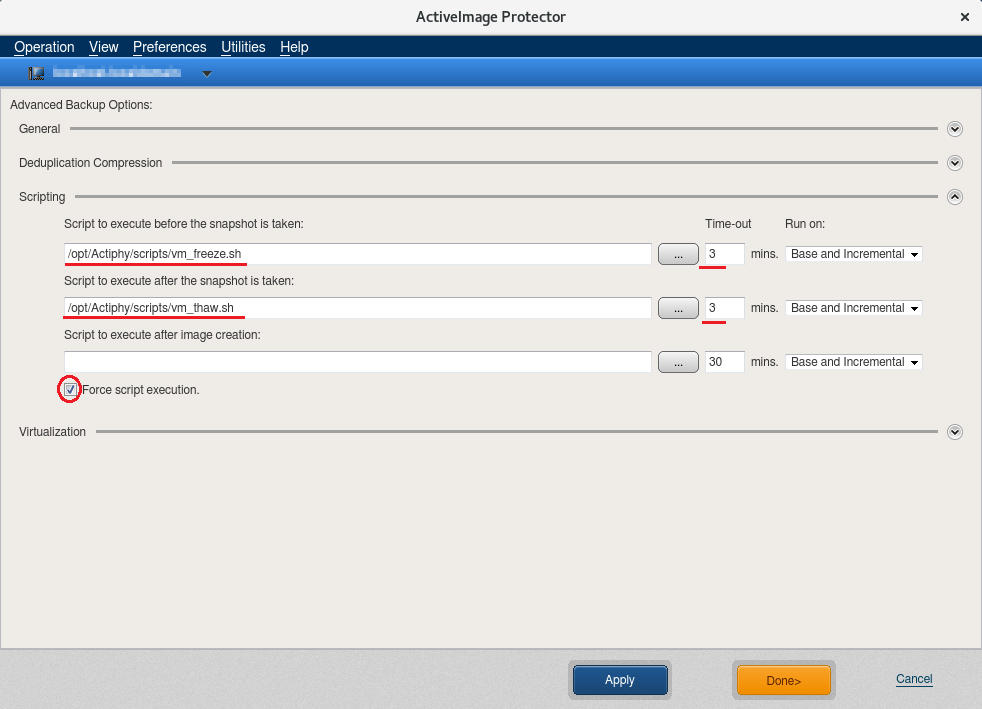
-
Run the backup task.
Recovery
Restore virtual machine
- Restore the partition in which the virtual machine is saved from the backup image. Or, restore the entire host from the backup image.
Restore a specific virtual machine
- Mount a specific backup image
- Overwrite the virtual hard disk of the virtual machine to restore from the mounted directory.
Using script for backup Oracle Database
The use of the script included in the product enables to back up the database while the database is live.
Requirements
Must be in archive mode.
If not in archive mode, please set to archive mode in advance.
Setting
-
Configure the backup schedule settings.
-
Go to [Advanced Setting] and implement the script.

Enter ‘/opt/Actiphy/scripts/Pre_Oracle_bkmode.sh’ and execute the script before the snapshot is taken. Enter ‘/opt/Actiphy/scripts/Post_Oracle_bkmode.sh’ and execute the script after the snapshot is taken.
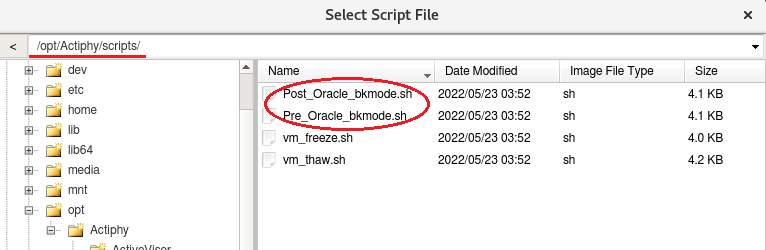
Enter ‘1’ minute for the timeout setting.
Please adjust the timeout setting depending on the system environment.
Enabling [Force script execution] option ensures that all specified scripts will be executed even if an error occurs during the backup operation.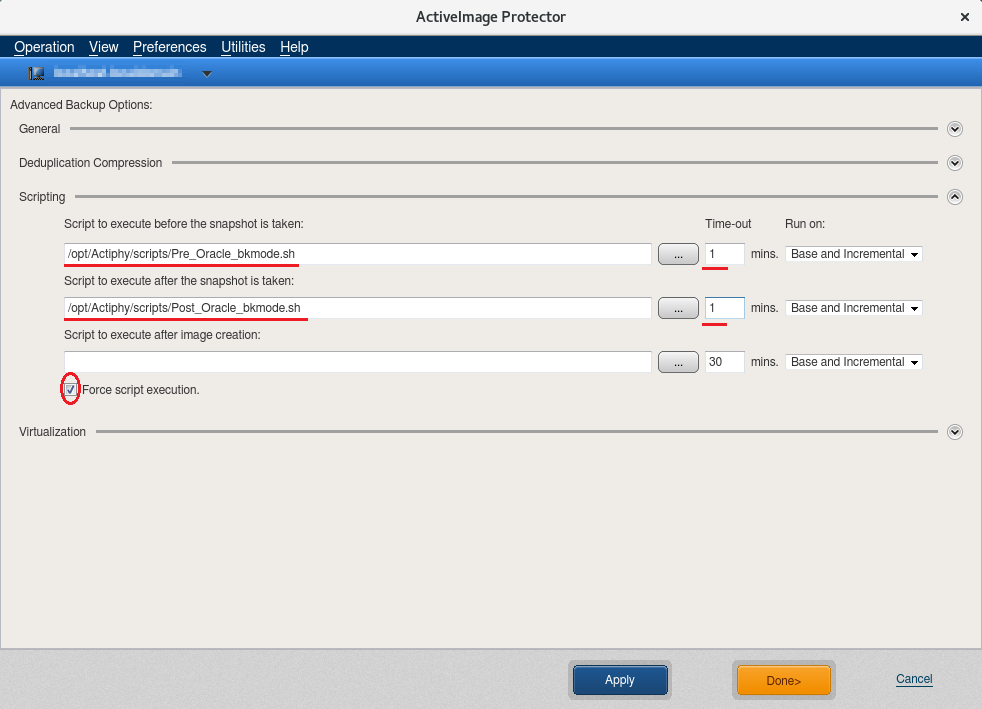
-
Run the backup task.
Restore Oracle database
-
Restore the Oracle database from a backup image.
-
Boot up OS.
-
Reset backup mode.
When the database is restored, the database must be mounted.
When the database is in backup mode, the database cannot be opened.
Execute ‘/opt/Actiphy/scripts/Post_Oracle_bkmode.sh’ to reset backup mode.
-
Please open the database.
Precautions when using Deduplication Compression in boot environment
When backing up in boot environment by using Deduplication Compression feature, please be aware of the following.
-
The boot environment boots up by reserving the minimum required memory area on host for booting up the system.
-
When using the Deduplication Compression feature, a temporary file folder is required. The maximum size of the temporary file folder will be 1% of the used space of backup source or less.
-
By default, a folder on memory deployed on boot environment is specified as the temporary file folder.
Due to the above described conditions, a backup task using Deduplication Compression fails in error when processing large amount of data.
When executing backup task using Deduplication Compression in the boot environment, verify that the specified temporary file folder has sufficient available space.
Execute a backup task after specifying an additional storage for temporary files
-
Please connect an external storage device such as USB device to the system you run a backup task. Please make sure the external storage has available space more than 1% of the backup source system.
-
Insert the boot environment media and boot up boot environment.
-
Launch Backup Wizard and select [Deduplication Compression].
-
Select [Change Temporary File Folder] or click [< Advanced Setting].
-
Please select the folder in the external storage connected with the above step 1 for the temporary file folder for Deduplication Compression.
-
Complete the setting and start the backup task.
Specify a folder included in backup source and run backup task
-
Insert the boot environment media and boot up to the boot environment.
-
Launch Backup Wizard and select [Deduplication Compression].
-
Select [Change Temporary File Folder] or click [< Advanced Setting].
-
Please select the folder included backup source for the temporary file folder for Deduplication Compression.
-
Complete the settings and start the backup task.