Recovery
An entire disk, a specific volume or a selected file can be restored from a backup.
After recreating the virtual environment or exchanging a motherboard, you need to recreate the boot entry.
Volume Recovery
Step 1: Select Recovery Point

Specify the folder in which the backup files are located.
When the backups are saved in a network shared folder, please mount the network shared folder or use the mount command (cifs) from the terminal.
Specify the backup source host and the recovery point.

The information of the selected recovery point is displayed in [Backup Information].

Click [Next].
Step 2: Select Restore Target
The disk selected at Step 1 is displayed under [Recovery Item:]. Drag and drop the item (a disk or a volume) to the restore target disk. You can also right-click on the restore source and select the target.

Using the mouse, select a disk (VG) or volume (LV) as the restore source in the disk map displayed in the top part of the window.
Drag and drop the selected restore source to the restore target in the disk map at the bottom of the window.

The restore target may be selected from the displayed context menu.

When restoring and overwriting a volume to an existing volume in the Linux boot environment, please make sure the target volume is unmounted. Go to [Utilities] - [Mount (Local) and select the volume to unmount the volume.
Target Settings
Right-click on the disk information of the restore target disk and disk restore options are displayed in the menu to restore MBR, First Track, and Disk Signature.
Right-click on a volume of the restore target disk and the volume restore options are displayed in the menu to restore drive letter, activate the boot partition, and change the volume size (to the specified size).
The volume size of the restore target can be adjusted by dragging the right edge of the volume.
Restore settings for VG is not supported.

Configure Target Disk

-
MBR
The MBR (master boot record) is contained in the first sector of the hard disk drive. Master boot record consists of master boot code and partition table.-
Restore MBR Select this option to restore the master boot record in the backup.
-
Create new MBR Select this option to create Windows standard MBR.
-
Use target MBR The MBR of the destination is used.
-
-
First Track
First track represents the 63 sectors at the beginning of disk drive. ActiveImage Protector excludes the first sector (MBR) and restores the subsequent 62 sectors. For a GPT disk, the first track represents 2048 sectors at the beginning of the disk. ActiveImage Protector excludes the first sector (MBR) and restores the subsequent 2047 sectors. Some boot loader applications require the data to boot up the system.-
Restore first track First track of the backup is restored.
-
Use target First Track First track of the destination is used.
-
-
Disk signature
Disk signature is used for the Windows OS to identify the physical disk.-
Restore Disk Signature Disk signature of the backup is restored.
-
Use target disk signature Disk signature of the destination is used.
When restoring a connected backup disk to enlarged size, please enable the [Use target disk signature] option. When restoring by enabling [Restore Disk Signature] option, the task fails in Error -999.
-
Volume Settings
Configuration of Volume Settings is not supported on Linux system.

-
Assign drive letter
Configure the settings for assigning drive letters to the restored volumes.-
Restore Drive Letter
Drive letters assigned to the drives in backup image file are restored. -
Auto assign Drive Letter
Drive letter is automatically assigned to the restored volume.
-
-
Make Active To restore the boot partition, the partition is activated.
-
Resize Volume
If a larger/smaller volume is selected as restore destination, you can specify the restored volume size.
For operating procedures of how to restore a volume in reduced size, please refer here.
Others
Enable [Ignore checksum error] to ignore a checksum error that occurred with a backup and continue the process.
Enable [Post-restore process] to execute the post-restore process upon completion of a restore task.
Additional Options
The following operations are not supported in Linux boot environment.
-
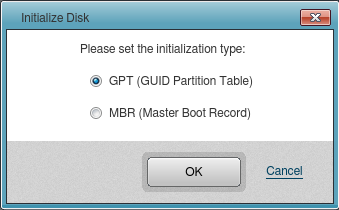
Initialize Disk
If restore target disk is bare metal disk, the disk may be initialized. If a restore by volume is performed to a bare metal disk, please make sure that the disk is initialized. Right-click on the disk information on the disk, context menu is displayed.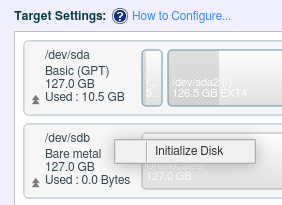
Please select the disk initialization type.
-
Create Partition
The available space may be partitioned if necessary. Right-click on the space to display the context menu.
Enter the volume size in [Create Partition] dialog.

ActiveImage Protector does not support formatting the created partition.
Creating partitions and overwriting restore to the created partitions cannot be performed by a single task execution.
Click on [Next].
Summary
Review the summary.

Click [Done] to initiate the restore task.
Restore a volume or a disk to local system.
Agentless backup created by using HyperBack is not supported.
File Recovery
File Recovery
A specific file or folder can be restored from a backup to a specified location.
When the backups are saved in a network shared folder, please mount the network shared folder or use the mount command (cifs) from the terminal.
File Recovery does not support backups saved in cloud storage or SFTP server. Please download the backups to local storage or network shared folder to restore.{: .alert .alert-info }
-
Select the destination folder where the backup is saved.
-
Specify the backup source host and recovery point. Click [Next].
The information of the selected recovery point is displayed in [Backup Information].
-
Click the checkbox for the items in [Backed up files] to restore.
The selected items are listed in [Recovery Items].

To exclude the listed items from restore source, click the [X] button or uncheck the checkbox in [Backed up files].
- To display [X] button, mouse over the blank column.
The following Recovery Options can be configured.

- Not overwrite existing folder or file If there exists a file or folder of which name already exists in the destination folder, the file or folder is not overwritten but renamed.
-
Click [..] and specify the destination to save the items to restore.

Click [Run] to start restore processing.
When restored, the path specified with the backup source drive remains unchanged.
A specific file or folder can be restored.
Tips
Bare Metal Recovery of LVM system
Step 1: Select Recovery Point
Please use the following operating procedures to perform a bare metal recovery of an LVM. Please make sure the restore target system has the same number of hard disks as the backup source. Besides, the hard disks must have more available space than the backup source.
-
Boot up boot environment (LinuxBE).
-
Select a backup image created by selecting backup type [LVM] to restore.
-
Please select a backup image of a disk or a volume group (VG). Simultaneously created backup image of other disk, volume group (VG) are loaded.
-
Click [Next] to display the following dialog.

-
Click [Yes] to proceed to the next step.
Step 2: Restore Setting
-
Please select restore target only in physical disk.
-
When the volume group (VG) is configured with physical volume (PV) on multiple disks, please select the restore target on the entire disks.
- Enabling the recovery option is not necessary.

Step 3: Summary
-
Please review the configured restore settings.
-
The following provides the example of restore setting for volume group (VG) configured with physical volume (PV) spanning multiple disks.
Ex: Physical volumes (PV) configuring volume group (VG) is located in ("/dev/sda" and "dev/sdb").

When the restore process starts, [Dashboard] - [Task] provides the following information.
After restoring physical disk, ActiveImage Protector automatically restores volume group (VG) in a row.

Restore a backup image of LVM to bare metal disk.
Agentless backup created by using HyperBack is not supported.