Life Cycle Management of Agent
Use the Push Install feature for life-cycle management of Agents. Please make sure that the following security settings are configured for the computers.
-
Firewall Setting [File and printer sharing] is allowed.
- Configure firewall settings for Group Policy [Allow inbound file and printer sharing exception] option is enabled in [Network]
- [Network Connection] - [Windows Firewall].
The following are the detailed operating procedures.
-
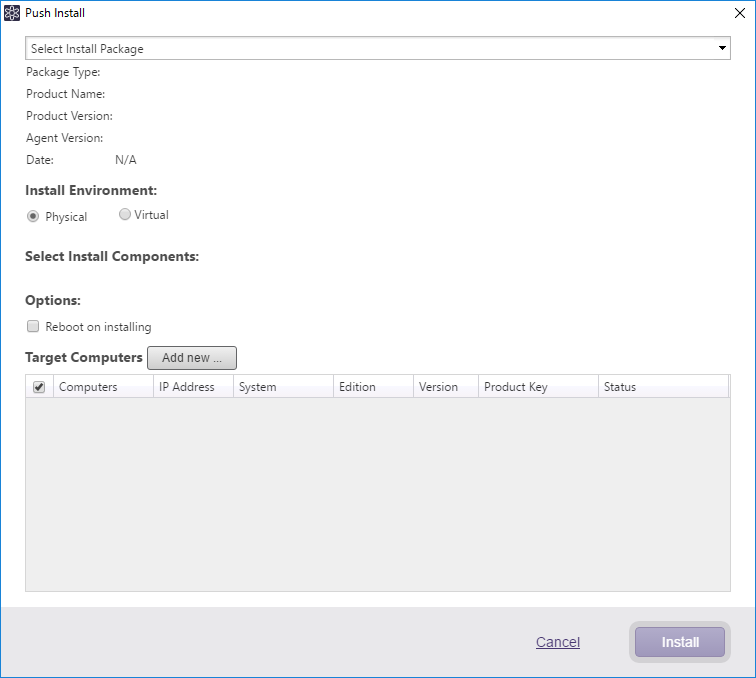
Use one of the following procedures to launch [Push install] dialog.
-
Menu Bar: [Operations] - [Client Push Install]
-
Control Button: [Push Install]
-
Right-click menu on a managed client: [Push Install]
-
-
Select the package to install. [Add new…] may be used to add a computer to the list.
Setup and patch files for agent version 5.1.11.6500 or later are supported.
Push Install does not support Linux Edition.
To include a Virtual License’s product key and install the package on a virtual machine, visit here.
-
Select the components to install.
You cannot select a component when push-installing a patch program.
-
Check the computers to install ActiveImage Protector. [Add new…] may be used to add a computer to the list.
-
Specify the product key to use for installation of the package for the respective computers. [Add new…] may be used to add a new product key.
When upgrading, the product key is already entered.
-
Click [Run] to start installation.
When installing a package using Virtual License’s product key (Windows-Server)
Specify the hypervisor which the target virtual machines are running on. Select [Virtual] in [Installation Environment], enter/specify the Virtual License’s product key and then specify the hypervisor. The computers running on the specified hypervisor are listed, now select the target virtual machines. When the installation begins, a prompt to enter credential information is displayed.
-
Note:
-
All virtual machines running on the hypervisor are listed.
-
The target virtual machines must be up and running.
-
The target virtual machines must be assigned with IP address. If [IP Address] is left blank, please enter the IP address.
-
Even if the target virtual machine is in the same domain, credential information is still required.
-
When selecting a multiple number of virtual machines, only one set credentials can be specified. If a virtual computer requiring different credentials is selected, retry the procedures.
-
When the installation process completes, the local computer name will be added for the virtual machine on the client list instead of the VM name on the hypervisor.
-
Select [Uninstall] in the pull-down menu to uninstall an agent. Select options and click [Uninstall] to start uninstallation.