Direct Operation of Agents
You can directly operate an agent to configure / edit the tasks and the settings. Follow the operating procedures below.
Create Backup Tasks
Display the managed client list in the [Client] tab, select a specific client computer from the list on which the ActiveImage Protector agent is installed, then select [Create Task] - [Backup] - [Agent-based] from the right-click menu.
- You can select computers marked with a green icon (on-line).
Source
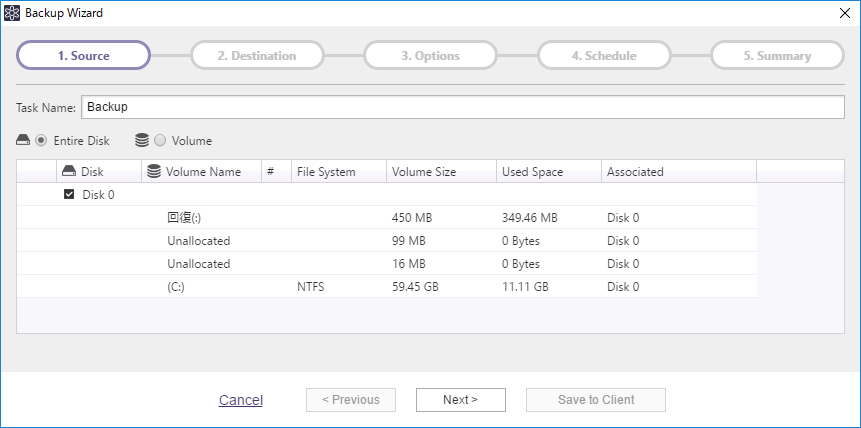
Specify the task name and the backup source.
When backing up a CSVFS volume when using Server Edition, only one CSVFS volume can be selected as the backup source.
When baking up cluster shared volume when using Cluster Edition, set up the ActiveImage console on the client PC and create a task on the target agent by using the console.
When the settings are configured, click [Next].
Destination
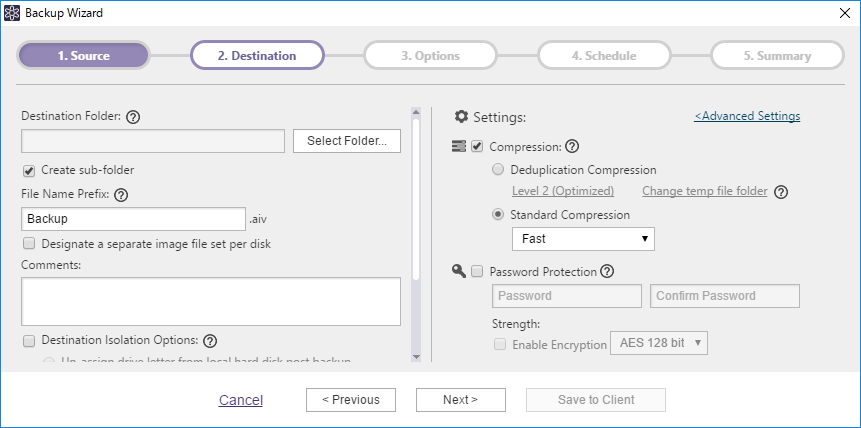
Specify the destination to save the backup images and configure the settings.
-
Destination Specify the destination to save the created backup image files.
-
Create sub-folders for the respective clients to save the backup images Enable this option to create sub-folders for the respective clients to save the backup images.
-
File Name’s Prefix
Specify the backup image file name. -
Designate a separate image file set per disk Enable this option to create backup image file per disk.
-
Comment Add a comment or description of the backup image file.
-
Destination Isolation Option
Select an option that disconnects access to backup image storage drives after backups complete. Upon completion of the backup task, the specified destination storage becomes inaccessible.
Please configure the settings for backup tasks and creation of image files.
-
Compression
Enabling the compression option reduces storage requirements by further compacting the backup file. Select the desired level of compression.-
Deduplication Compression level: Select one of the three levels of deduplication available.
-
Level 1 - Deduplication is performed at the highest level and may increase the overall backup processing time but achieves the most tightly compressed image file.
-
Level 2 - This preset level provides the best balance between process time and compression. (This is the default setting).
-
Level 3 - The image file will be generated at a lower compression rate and deduplication requires less backup processing time.
Temporary File Folder: Set the location for deduplication to process temporary files.
The maximum size of the temporary folder will be 2.5% of the used space of backup source.
It is recommended to set it on an SSD that delivers fast read and write speeds.
-
-
Standard Compression: Two levels of standard compression are available.
-
Fast - Backup processing time and storage requirements are at an optimum.
-
High - The backup task will place a higher demand on system resource usage and an increase in processing time but the result is a smaller backup image.
-
-
-
Password Protection
Password protect the backup image file by assigning a unique password. This ensures that password input is required for operation with the image file. There are three levels of encryption to choose from.-
RC5 - An early encryption standard with a variable block size, key size and number of rounds. Selecting RC5 encryption provides a faster encryption processing speed.
-
AES 128 bit / AES 256 bit - A stronger encryption method than RC5. Uses a fixed block size and a key size of 128 or 256 bits.
-
Advanced Backup Options
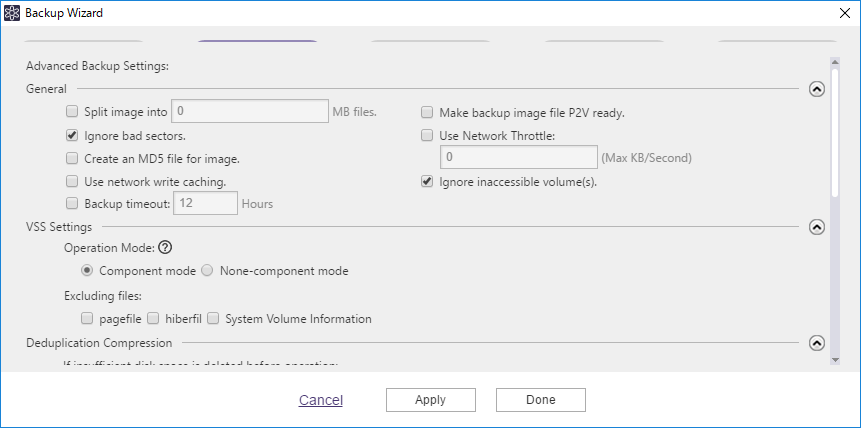
Click [Advanced Options] to access the advanced backup options settings page. Options include streamlining the backup process, generating an MD5 checksum file, and network throttling for the backup task traffic, etc.
-
General
-
Split image into xx MB files
The backup image is split into multiple files of specified size (MB). -
Ignore bad sectors
By enabling this option, the backup task will continue uninterrupted if encountering unreadable sectors. -
Create an MD5 file for image Creates an MD5 check-sum for the image file. This can be used as a security measure to check if internal tampering of the image file has occurred.
-
Use network write caching
When storing image files in network shared folder, cached data are used. -
Make backup image file P2V ready Performs the same process as required for [Virtualization] by the agent including installation of the driver required for virtualization (VMware ESXi/Microsoft Hyper-V), changing the registry settings, etc.) during the backup process. If intending to restore the backup image directly to a virtual machine instead of using [Virtualization] by the agent, please enable this option.
-
Use network throttle
If the destination drive is on a network share, use network throttle to define the maximum throughput in KB/second to reduce backup traffic over the network. -
Ignore inaccessible volume(s) Enabling this function prevents backup task interruptions when an inaccessible volume is encountered. Ex. When selecting the system volume and cluster shared volumes on Windows 2008 R2 for a backup source and the cluster shared volumes are moved to a different node, the execution of the backup task completes without an error. Desktop Edition does not provide this option.
-
-
VSS Settings
-
Operation Mode
Select an option for VSS component mode for the VSS writer. When the VSS component mode is enabled, the data integrity check is performed before starting the backup process (only if supported.)-
Component Mode - VSS component mode is enabled for every VSS writer.
-
Non-component Mode - VSS component mode is disabled for every VSS writer.
-
-
Excluding Files
Specify items to exclude from the backup. If selecting the System Volume Information, the [Recovery Point] is excluded.
-
-
Deduplication Compression
-
Auto-switch from the default to an alternate folder The temporary folder used by deduplication will automatically switch over if insufficient disk space is detected.
-
Continue operation with [Standard] Compression Will complete the backup task using the default Standard Compression instead of Deduplication Compression.
-
Temporary File Folder Specify the location for deduplication to process temporary files. The maximum size of the temporary folder will be 1% of the used space of backup source or less. The higher the deduplication level, the larger the temporary file size will be.
-
-
Script
-
Script to execute before the snapshot is taken Specify a script to run before the snapshot is taken.
-
Script to execute after the snapshot is taken Specify a script to run after the snapshot is taken.
-
Script to execute after image creation Specify a script to run after the backup image has been created.
-
Force script execution Checking this box ensures that all specified scripts will be executed even if an error occurs during the task execution process.
-
Backup Type You can select the backup type to run the script.
-
After configuring the above settings, click [Next].
Options
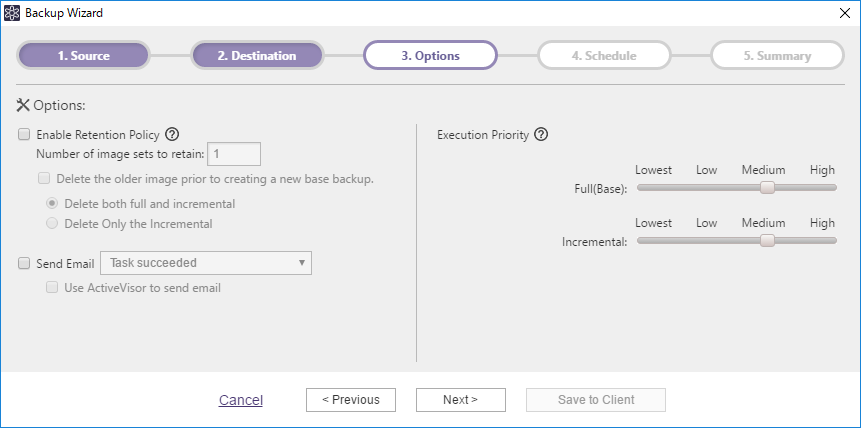
Configuring the options settings.
-
Enable Retention Policy Check this box to enable a retention policy as to how many sets of full and / or incremental backup files to retain before deletion. Enabling [Delete older image before new base backup] option deletes the most obsolete generation before creating a new image set.
-
Delete both full and incremental - Selecting this option to delete both full and incremental files based on the retention policy settings.
-
Delete the only incremental - Selecting this option retains full backup and deletes only the incremental files based on the retention policy.
-
-
Send email Check this box to send email informing you of a task completed with a specified status. Predefine the email notification settings by selecting the [Preferences] - [Notification] from the menu bar on the client computer. Enabling the [Send E-Mail from ActiveVisor] option sends email notifications from ActiveVisor.
-
Execution Priority Select a level of task execution priority.
After configuring the above settings, click [Next].
Schedule
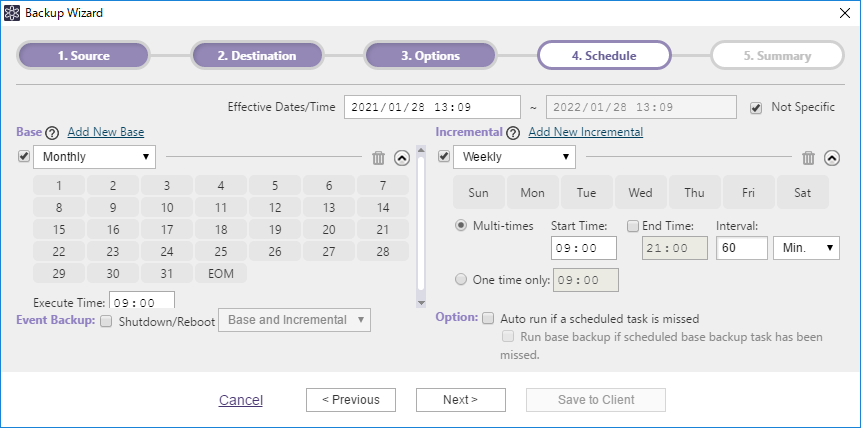
Configure the settings for a backup schedule by enabling one or more schedule types.
-
Base Select a schedule type from the drop-down box. The schedule options are [Weekly], [Monthly], [Specified Date], [Designate Specific Days]. Unclick the checkbox to disable the schedule instead of deleting. Click [Add New Base] to create an additional schedule. Delete any unnecessary schedule types by emptying the recycle bin.
-
Incremental Select a schedule type from the drop-down box. The schedule options are [Weekly], [Monthly] and [Designate Specific Days]. Uncheck the box to disable the schedule instead of deleting. The following options may be selected for incremental backup tasks:
-
Multi-times - Please specify the time slot of the day and interval to run recurring backup tasks. Without specifying [End Time], the recurring task execution continues until the specified time of the following day.
-
One Time Only - Specify the execution time.
Click [Add New Incremental] to create an additional schedule. Delete any unnecessary schedule types by emptying the recycle bin.
-
-
Event Backup
Enable [Shutdown / Reboot] option for event-triggered backup, so the backup task is started upon system shutdown or restart. -
Option
With the [Auto run missed schedule task] option enabled, skipped task at system shutdown, if any, is automatically executed when the system is rebooted.
Summary
Please review the configured settings.
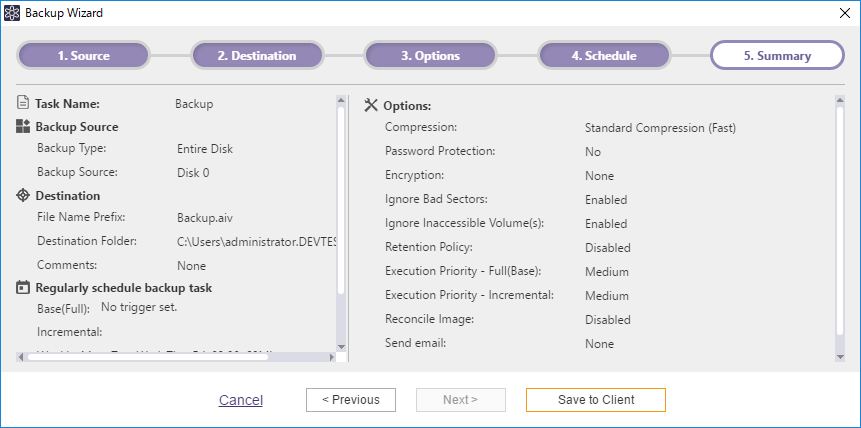
If you do not need to change the configured settings, click [Save to Client] and the task is created.
Edit Backup Tasks
Select a managed computer, click or double-click [+] to expand the detailed information of the client. Selecting a task from the [Task] tab enables editing the settings for [Source], [Destination], [Option], [Advanced Settings], [Schedule] respectively.
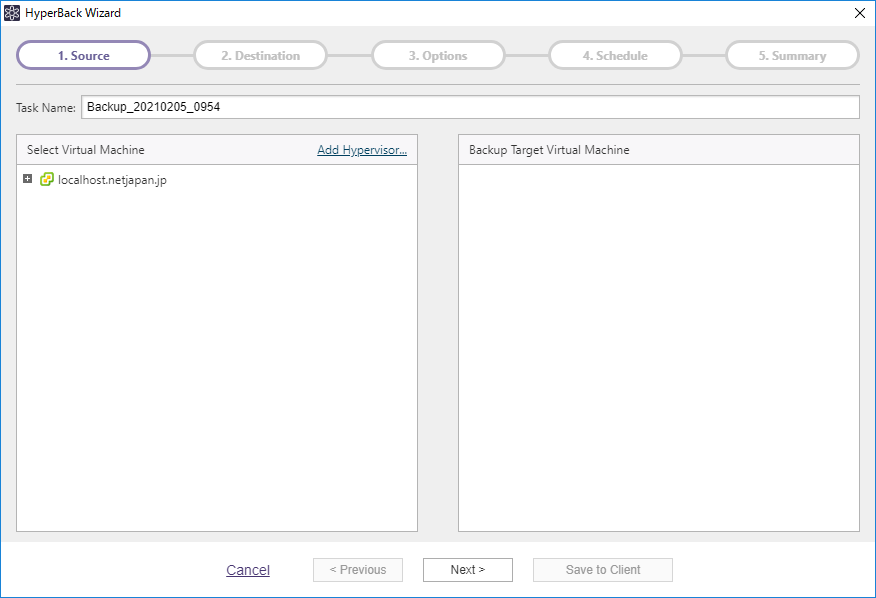
Create HyperBack task
Display the managed client list in the [Client] tab, select a specific client computer from the list on which the ActiveImage Protector agent is installed, then select [Create Task] - [Backup] - [HyperBack] from the right-click menu.
- You can select computers marked with a green icon (on-line).
Source
-
Task Name Specify the task name to be deployed to the agents.
-
Select a virtual machine
Select a virtual machine to back up. Click [Add Hypervisor] to launch the dialog and enter credentials to access the hypervisor which the backup source virtual machines are located. When the hypervisors are already registered, the host names are listed. Clicking [+] button or double-clicking the host name displays a list of the virtual machines running on that host. The information of the hypervisor can be registered for use in ActiveVisor by selecting [Site Configuration] - [Hypervisor].
Upon successful connection to the host, the virtual machines on the connected hypervisor are listed. Please select the virtual machine for the backup source. All disks, when all the checkboxes are clicked, are selected as the backup source regardless of whether the number of the disks are increased or decreased afterward. If unchecking a checkbox for a disk, the remaining checked disks are selected as the backup source. The virtual machines on multiple hypervisors can be selected.
Hyper-V 2012/2012 R2 check-pointing does not work with the VSS Writer on the respective virtual machines. If using a domain controller, SQL Server, Exchange, Oracle or non-VSS-savvy database on the virtual machine, please install ActiveImage Protector and regularly take agent-based backups.
After completing the setting configuration, click [Next >].
Destination
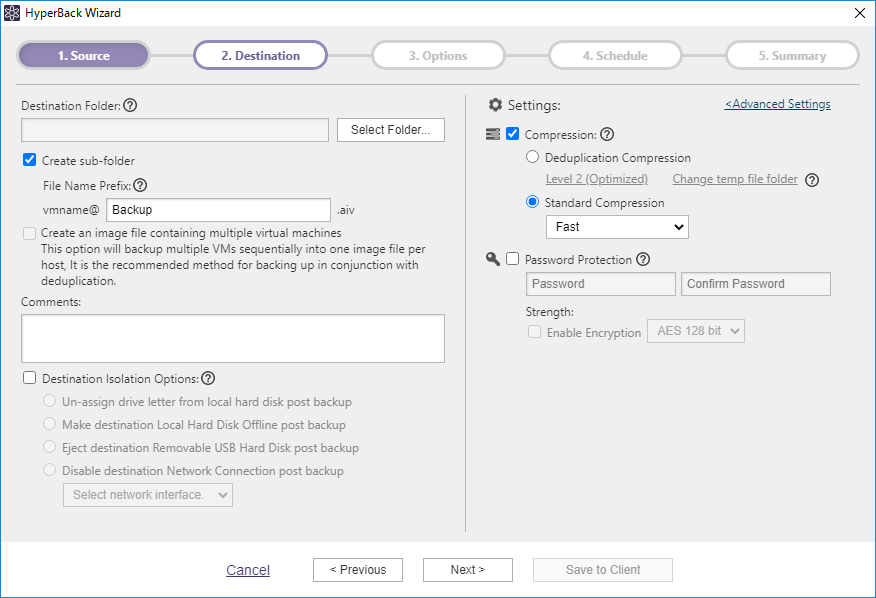
Configure the destination and other settings.
-
Destination
Click [Select Folder] and browse the location to save the created backup images. Enabling the [Create Sub-folder] option creates a sub-folder in ‘ ‘_ _ ' format to save the created backup images. -
File Name’s Prefix
Specify the backup image file name. -
Create multiple virtual machines image file Enable this option to back up multiple virtual machines on a single hypervisor in one backup image file. Enabling both this option and Deduplication Compression, the overall backup processing time may be increased but minimizes the backup image file size.
-
Comments Define comments for backup image files.
-
Destination Isolation Option Select an option to disconnect access to backup image storage drives after backups complete. Upon completion of the backup task, the specified destination storage becomes inaccessible. * Multiple options for Destination Isolation feature cannot be selected.
Configuring the settings for backup tasks and creation of image files.
-
Compression
Enabling the compression option reduces storage requirements by further compacting the backup image file. Select the desired level of compression.-
Deduplication Compression level: Select one of the three levels of deduplication available.
-
Level 1 - Deduplication is performed at the highest level and may increase the overall backup processing time but achieves the most tightly compressed image file.
-
Level 2 - This preset level provides the best balance between process time and compression performance. (Default setting).
-
Level 3 - The image file will be generated at a lower compression rate and deduplication requires less backup processing time.
Temporary File Folder: Set the location for deduplication to process temporary files.
The maximum size of the temporary folder will be 2.5% of the used space of backup source.
It is recommended to set it on an SSD that delivers fast read and write speeds.
-
-
Standard Compression: Two levels of standard compression are available.
-
Fast - Backup processing time and storage requirements are at an optimum.
-
High - The backup task will place a higher demand on system resource usage and an increase in processing time but the result is a smaller backup image.
-
-
-
Password Protection
Password protect the backup image file by assigning a unique password. This ensures that password input is required for operation with the image file. There are three levels of encryption to choose from.-
RC5 - An early encryption standard with a variable block size, key size and number of rounds. Selecting RC5 encryption provides a faster encryption processing speed.
-
AES 128 bit / AES 256 bit - A stronger encryption method than RC5. Uses a fixed block size and a key size of 128 or 256 bits.
-
Advanced Backup Options
Click [Advanced Options] to access the advanced backup options settings page. Options include streamlining the backup process, generating an MD5 checksum file, and network throttling for the backup task traffic, etc.
-
General
-
Split image into xx MB files
The backup image is split into multiple files of specified size (MB). -
Ignore bad sectors
By enabling this option, the backup task will continue uninterrupted if encountering unreadable sectors. -
Use network write caching
When storing image files in network shared folder, cached data are used. -
Use network throttle
If the destination drive is on a network share, use network throttle to define the maximum throughput in KB/second to reduce backup traffic over the network. -
Create an MD5 file for image Creates an MD5 check-sum for the image file. This can be used as a security measure to check if internal tampering of the image file has occurred.
-
Backup Time-out Time-out occurs to cancel the backup task if the backup process does not complete within the specified time.
-
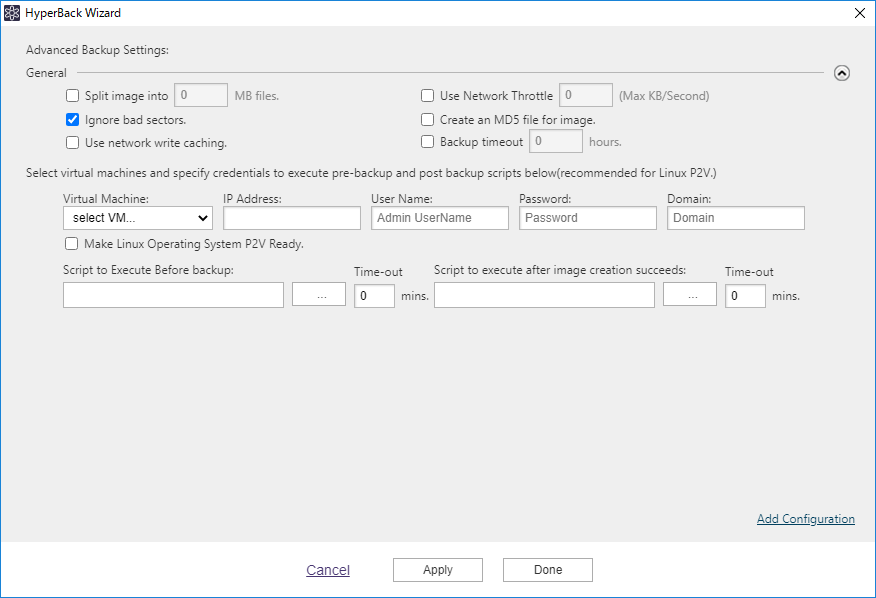
Scripts can be set to run before and / or after snapshots are taken for a virtual machine.
-
Virtual Machine Select a virtual machine to run the script.
-
IP Address Enter the IP address assigned to the virtual machine.
-
User Name / Password / Domain Enter the account information to log in the virtual machine.
-
Make Linux backup image files P2V ready Performs the same process as required for Virtualization during backup of the virtual machines of the following Linux distributions:
-
CentOS 5.x or later
-
RHEL 5.x or later
-
Oracle Linux 5.x or later
-
SLES 11 SP3 or later
-
OpenSuse 12.1 or later
-
Before Virtualization, please enable SSH on the source Linux OS and configure the firewall to open port 22. The Virtualization process includes HyperRestore process for restoring the virtual machine from ESXi to Hyper-V and HyperStandby process for booting up the virtual machine.
-
Script to execute before the snapshot is taken Specify a script to run before the snapshot is taken. Enabling time-out option cancels the script execution if the process does not complete within the specified time.
-
Script to execute after the snapshot is taken Specify a script to run after the snapshot is taken. Enabling time-out option cancels the script execution if the process does not complete within the specified time.
Depending on the number of backup source virtual machines, click [Add settings].
After configuring the settings, click [Next].
Option
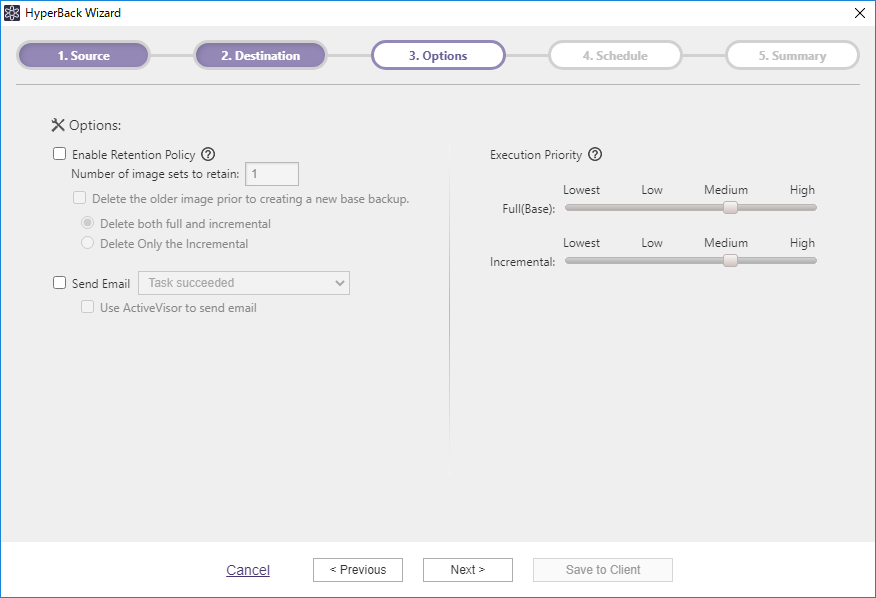
Please configure the option settings for scheduled backup tasks.
-
Enable Retention Policy Check this box to enable a retention policy as to how many sets of full and / or incremental backup files to retain before deletion. Enabling [Delete older image before new base backup] option deletes the most obsolete generation before creating a new image set.
-
Delete both full and incremental - Selecting this option to delete both full and incremental files based on the retention policy settings.
-
Delete only the incremental - Selecting this option retains full backup and deletes only the incremental files based on the retention policy.
-
-
Send email Check this box to send email informing you of a task completed with a specified status. Predefine the email notification settings by selecting [Preferences] - [Notification] from the menu bar on the client computer. Enabling [Send E-Mail from ActiveVisor] option sends email notifications from ActiveVisor.
-
Execution Priority Select a level of task execution priority.
After configuring the above settings, click [Next].
Schedule
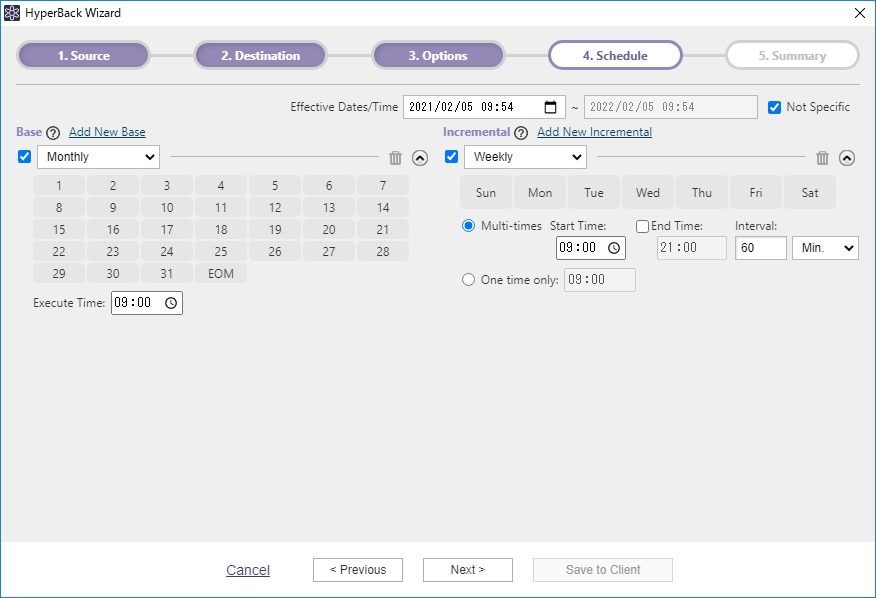
Configure the settings for a backup schedule by enabling one or more schedule types.
-
Base Select a schedule type from the drop-down box. The schedule options are [Weekly], [Monthly], [Specified Date], [Designate Specific Days]. Uncheck the checkbox to disable the schedule instead of deleting. Click [Add New Base] to create an additional schedule. Delete any unnecessary schedule types by emptying the recycle bin.
-
Incremental Select a schedule type from the drop-down box. The schedule options are [Weekly], [Monthly] and [Designate Specific Days]. Uncheck the box to disable the schedule instead of deleting. The following options may be selected for incremental backup tasks:
-
Multi-times - Please specify the time slot of the day and interval to run recurring backup tasks. Without specifying [End Time], the recurring task execution continues until the specified time of the following day.
-
One Time Only - Specify the execution time.
Click [Add New Incremental] to create an additional schedule. Delete any unnecessary schedule types by emptying the recycle bin.
-
After configuring the above settings, click [Next].
Summary
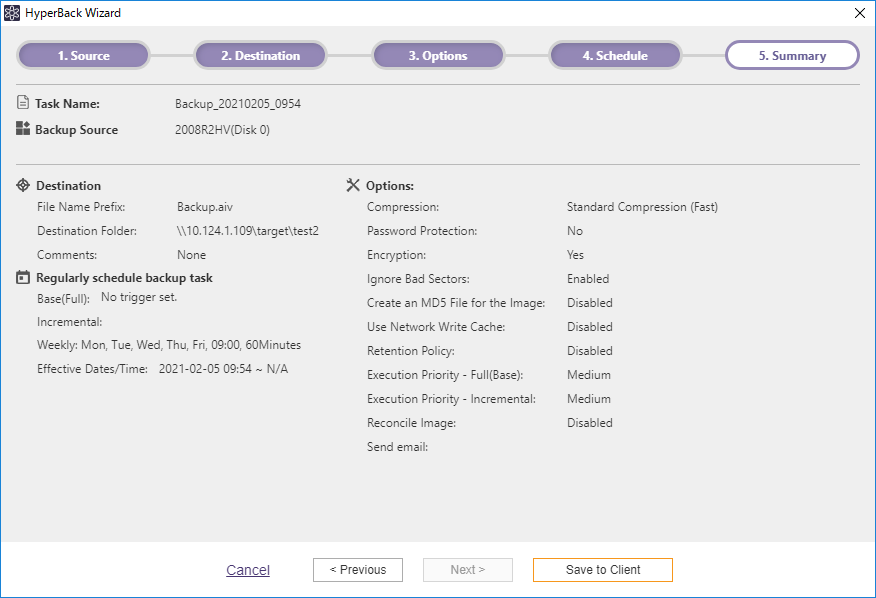
If you do not need to change the configured settings, click [Save] to save the configured settings in the template.
Click [Save and Deploy] to save and deploy the template to the clients.
Edit HyperBack Tasks
Select a specific managed computer from the list and click or double-click [+] to expand the detailed information of the client. From the right-click menu on the task selected in [Task] tab, you can edit the schedule settings.
Create vStandby Tasks
Display the client list in the [Client] tab, select a managed client computer. From the right-click menu, select [Create Task] - [vStandby].
- Select computers marked with a green icon (on-line).
Backup Source
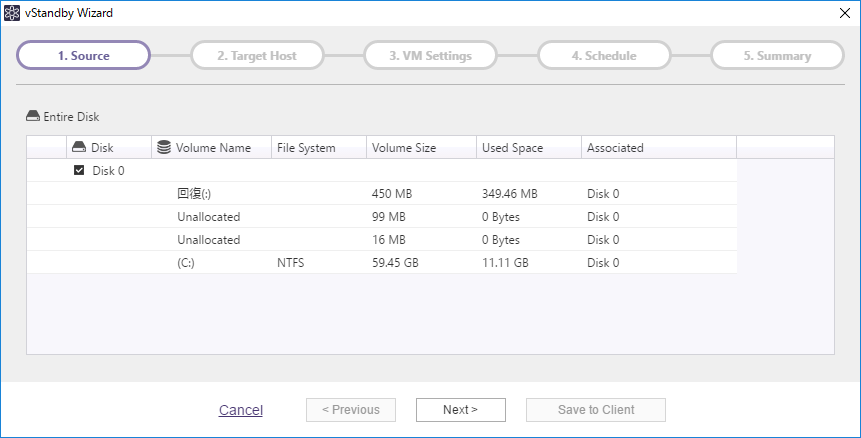
Select the backup source.
The USB HDD cannot be configured as a backup source if the USB HDD is connected to the target computer.
After configuring the settings, click [Next].
Target Host
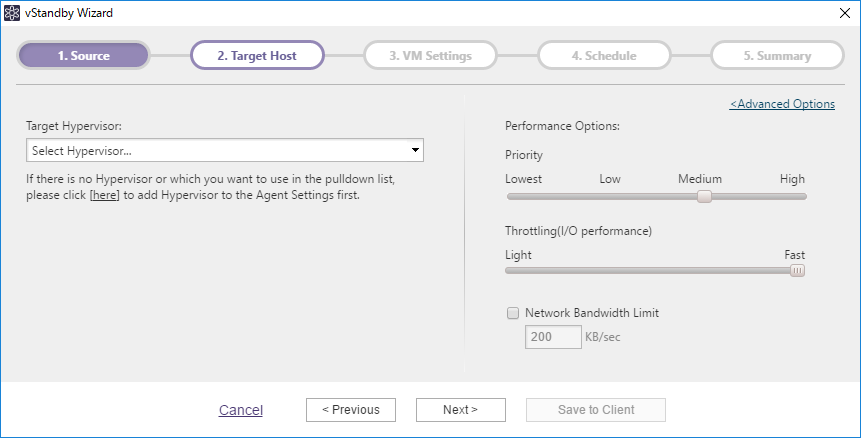
Please specify the target hypervisor to create a virtual standby replica and configure the option settings.
-
Target Hypervisor
Please specify the target hypervisor to create the VSR. If the target is not registered in Site Configuration, please click Here to register the target. -
Performance Option
-
Priority Select a level of task Execution Priority.
-
I/O Performance
Throttle the I/O speed if needed. -
Network Bandwidth Limit
Check the box to define the maximum throughput in KB/second allowed when accessing the target host as vStandby is creating the standby virtual machine or taking incremental P2V boot point snapshots.
-
Advanced Settings
-
Script to execute before the snapshot is taken Specify a script to run before the snapshot is taken.
-
Script to execute after the snapshot is taken Specify a script to run after the snapshot is taken.
-
Script to execute after image creation Specify a script to run after the backup image has been successfully created.
-
Backup Type Specify the backup type to run a script.
After configuring the settings, click [Next].
VM Setting(Hyper-V)
Configuring the settings to create the VSR.
-
VSR naming convention Specify the naming convention to create the VSR.
-
VM Setting
-
CPU
Specify the number of virtual CPUs assigned for the virtual standby replica. -
RAM
Specify the amount of memory allocated to the virtual standby replica.
-
-
VHD(X)
-
VHD(X)Name
Specify the file name of the virtual hard disk for VSR. -
Disk Type
Select Dynamic or Fixed for the disk type to create.-
Dynamic:Depending on the amount of data that the virtual machine guest OS writes on the file, the file size dynamically expands.
-
Fixed :The same capacity as the virtual disk size is reserved on the physical disk at the beginning.
-
-
Select Volume
Select the volume on the Hyper-V host to create the virtual hard disk. A shared folder is created in ‘vStandby_' format in which the virtual hard disk is created. 'Full Control' is granted to Everyone for the created shared folder.
-
-
Network Settings
-
Virtual Switch Assign the preferred virtual switch to use for the network adapter.
-
IP Config Manually configure the static IP settings for the source machine or use DHCP.
-
After configuring the settings, click [Next].
VM Setting(vCenter/ESXi)
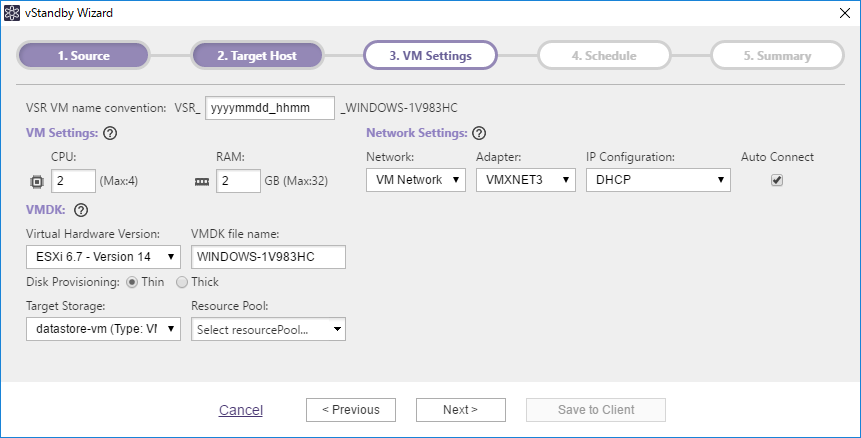
Please configure the settings to create the VSR.
-
VSR naming convention Specify the naming convention to create the VSR.
-
VM Setting
-
CPU
Specify the number of virtual CPUs assigned for the virtual standby replica. -
RAM
Specify the amount of memory allocated to the virtual standby replica.
-
-
VMDK
-
Virtual Hardware Version
The version of the virtual hardware is automatically configured. -
VMDK file name
Specify the file name of the virtual hard disk to use for the VSR. -
Disk Provisioning Select Thick or Thin provisioning for the virtual disk type.
-
Thin: The VMDK file size will expand accordingly depending on the amount of data that the VM guest OS writes to the file.
-
Thick (Zeroed): The VM will retain the same disk capacity as the source physical disk.
-
-
Destination Storage
Specify the datastore destination on which to create virtual hard disk. -
Resource pool Specify the resource pool to create the VSR.
-
-
Network Settings
-
Network Select the virtual switch to use for the network adapter.
-
Adapter By default, VMXNET 3 is selected.
-
IP Config Manually configure the static IP settings for the source machine or use DHCP.
-
Auto Connect Automatic network connection is established, when the OS boots up.
-
When the settings are configured, click [Next].
VM Setting(ESXi free license version)
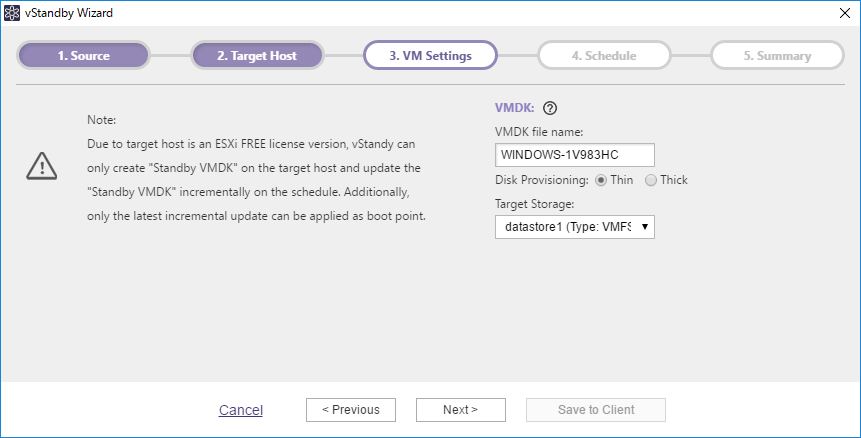
If the ESXi free license version is selected as the target host, a VMDK file is created. VMDK files are created in the specified datastore and are updated every time an incremental boot point task is executed.
-
VMDK file name
Specify the virtual hard disk file name. -
Disk Provisioning
Select Thick or Thin provisioning for the virtual disk type.-
Thin: The VMDK file size will expand accordingly depending on the amount of data that the VM guest OS writes to the file.
-
Thick (Zeroed): The VM will retain the same disk capacity as the source physical disk.
-
-
Destination Storage Specify the datastore destination on which to create virtual hard disk.
When the settings are configured, click [Next].
Schedule
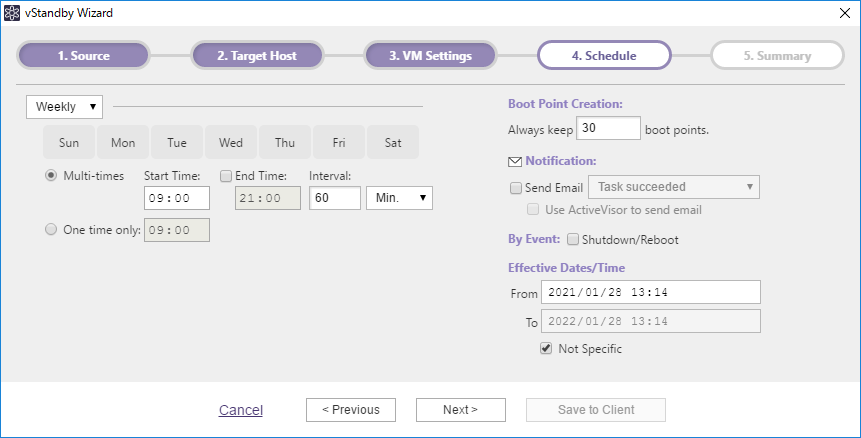
-
Schedule settings for creating boot points
Weekly and Monthly options are provided to create incremental boot points of the standby virtual machine.-
Multi-times Specify the time slot of the day and interval to run recurring backup tasks. Without specifying [End Time] the backup tasks are executed until the specified time of the following day.
-
One Time Only Specify the execution time.
-
-
Create Boot Points
Specify the maximum number of VSR boot points to create (up to 30). When the created number of boots points reaches the threshold, the oldest and the second oldest boot points are merged. -
Event
Check [Shutdown/Restart] for the [Event] to run the scheduled task upon system shutdown or restart. -
Notification Select this option to send email notifications of completed tasks of a specified status. Predefine the email notification settings by selecting [Preferences] -> [Notification] on the client computer. Enabling the [Send email using ActiveVisor] option sends email from ActiveVisor.
When the settings are configured, click [Next].
Summary
Please review the configured settings.
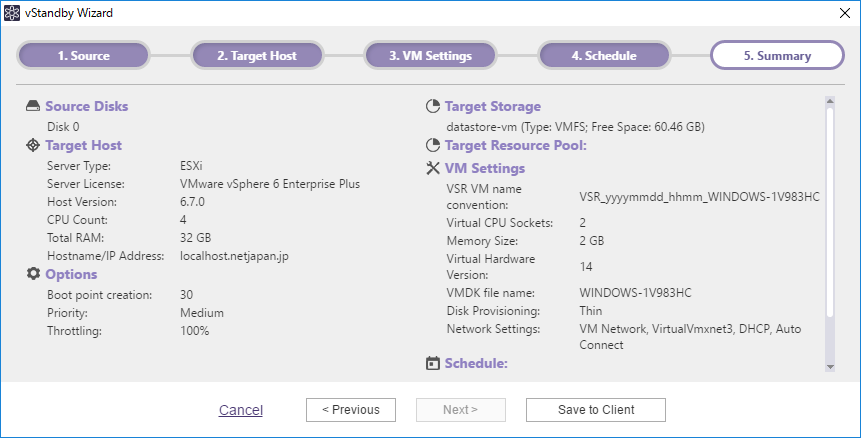
If you do not need to change the configured settings, click [Save in client], and the task is created on the client.
Edit vStandby Task
Select a specific managed computer from the list and click or double-click [+] to expand the detailed information of the client. Select a task from the [Task] tab and edit [Option], [Schedule] settings.
Edit Agent Settings
Select a specific managed computer from the list on which the ActiveImage Protector agent is installed
and click or double-click [+] to expand the detailed information of
the client. Click the ![]() icon in the upper right-hand in [Status] tab to edit the settings.
icon in the upper right-hand in [Status] tab to edit the settings.
- Select computers marked with a green icon (on-line).
General
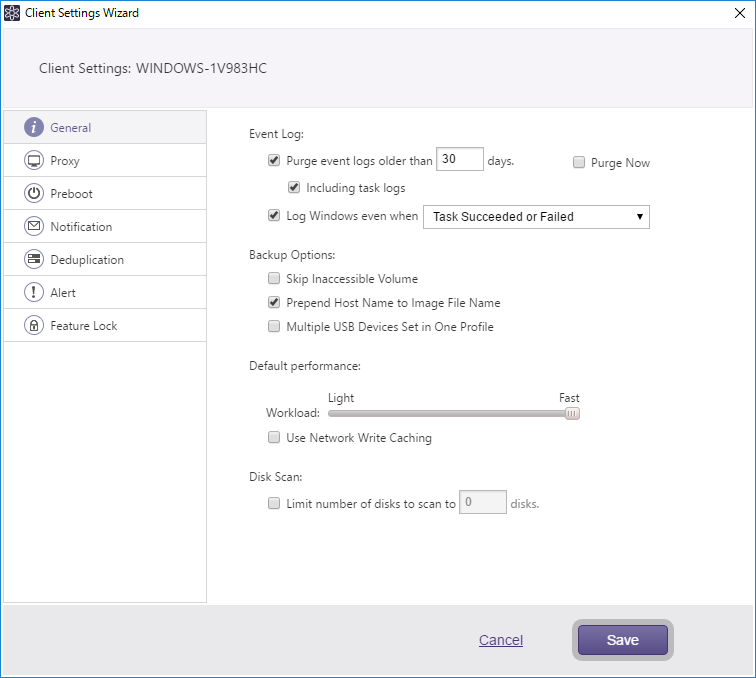
Configure the settings for the number of days to keep event logs, backup options, etc.
-
Event Log
-
Purge event logs after xx days
Specify the number of days to keep event logs. Log information stored longer than a specified number of days is purged. The [Purge task logs as well] option may be selected to purge the task logs as well. Click on [Purge now] to purge all event history and task logs. -
Log Windows event when
Enable this option to log the tasks completed in the selected status to the Windows event log.
-
-
Backup Option
-
Skip inaccessible volume Select this option to prevent backup task interruptions when an inaccessible volume is encountered. Only Server Edition provides this option.
-
Prepend host name to image file name Select this option to incorporate the host computer name in the backup image file name.
-
Allow multiple USB device destinations in one profile Select this option to allow a USB disk detected on the drive assigned with the same drive letter as the originally specified backup destination.
-
-
Default Performance Configure the settings for default performance (I/O) and the use of cached data for task execution.
-
Detect Disks
With this option enabled, predefine the maximum number of disks connected to the system. When this option is disabled, an unlimited number of disks may be connected to the system.
Proxy
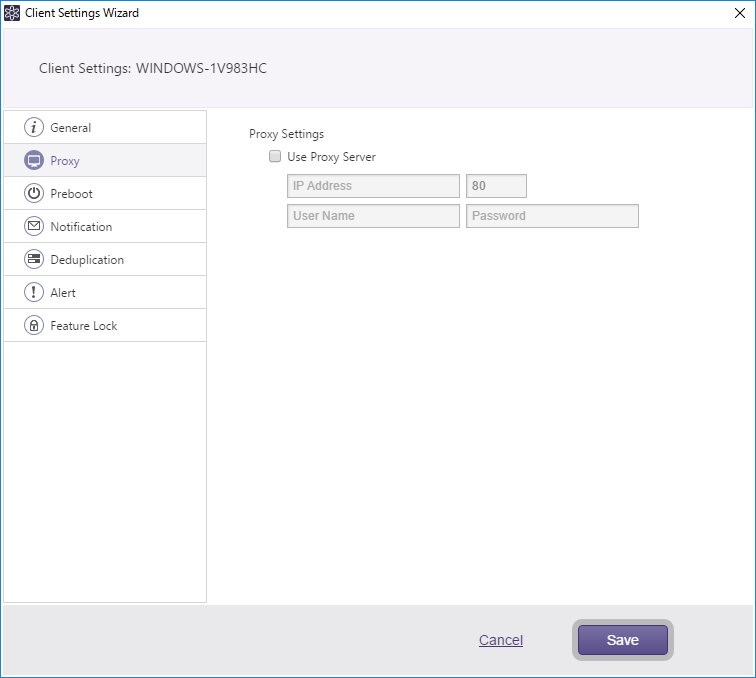
If using a proxy server for internet access, specify the server IP address, user name and password.
Activation and update check are performed using the specified proxy server.
Notification
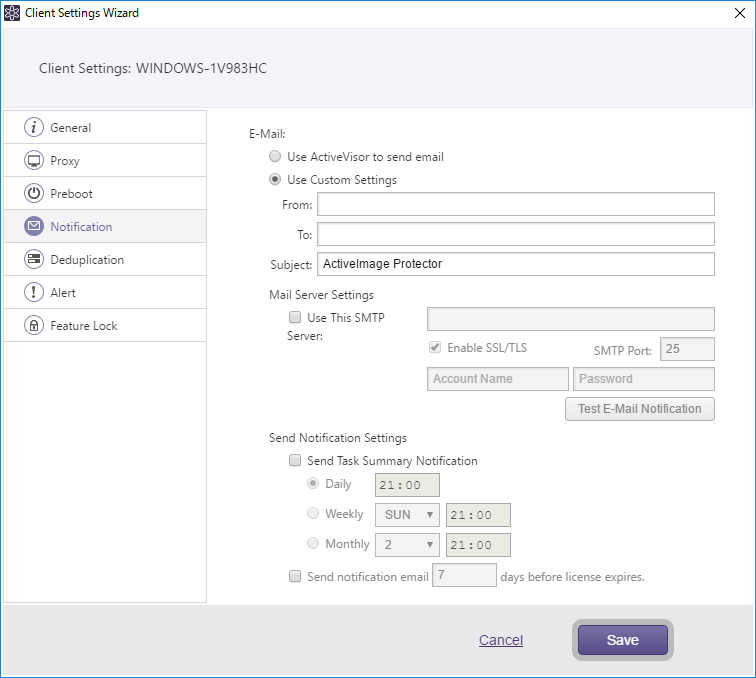
Configure the settings for E-Mail Notification.
-
E-Mail
Enter the sender’s email address into the [From] section, the recipient’s email address into the [To] section, and create a [Subject]. Multiple email addresses may be specified by separating with a comma. -
Mail Server Settings
[Use ActiveVisor to send email] or [Use custom setting] option may be selected. Select [Use custom setting] and [Use this SMTP server] options to use SMTP server for email notification. If the [Use this SMTP server] option is disabled, email notification is communicated without using an SMTP server. -
Send Notification Settings Send task summary Notification - Send task summary email according to the schedule you specify (daily, weekly, monthly). Send notification email - Send license status notifications according to the predefined threshold for the remaining days of a valid license.
Deduplication
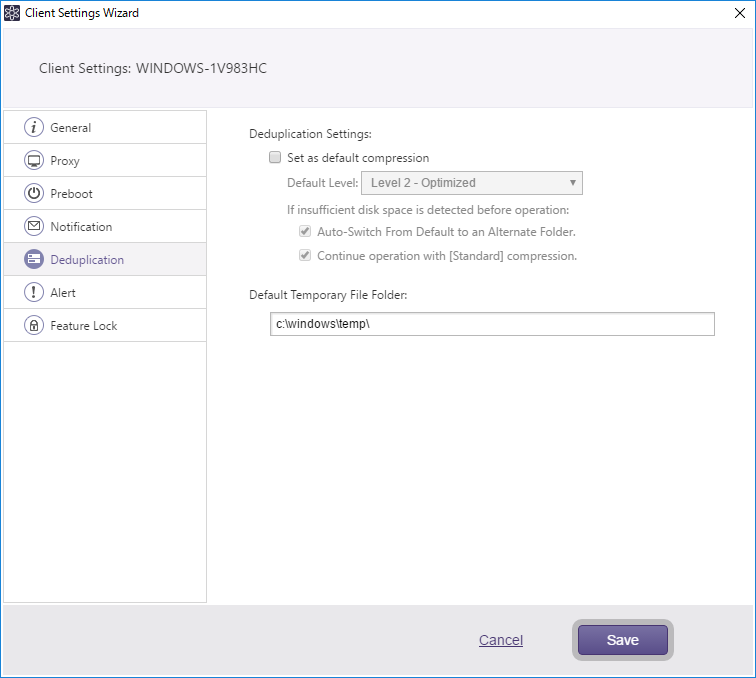
Configure the settings for Deduplication Compression.
-
Deduplication Settings Enable [Deduplication Settings] to use the Deduplication Compression option by default. Select one of the three deduplication levels and options.
-
Auto-switch from default to alternate folder The temporary folder used by deduplication will automatically switch-over if insufficient disk space is detected. Volumes with required available space are searched in ascending order of the assigned drive letters.
-
Continue operation with [Standard] compression Select this option to complete the backup task using the default Standard Compression.
-
-
Default Temporary File Folder Specify the location for deduplication to process temporary files.
Alert
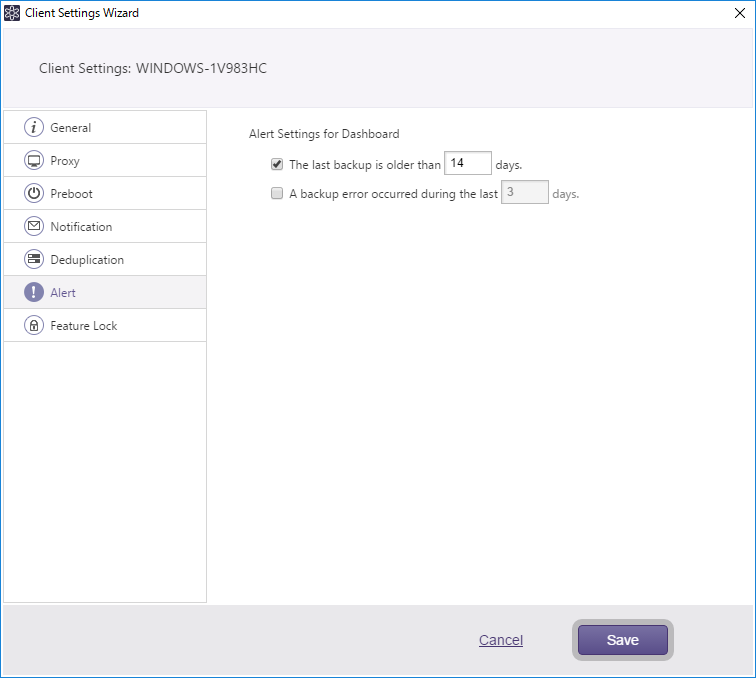
Configure Alert settings for the [Dashboard] - [System Health Status] for managed clients.
-
Last backup is older than xx days If the backup task has not been executed for more than the specified number of days since the last backup, the alert indication is displayed in the [System Health Status].
-
Backup error occurred within xx days If an error occurred with a backup task within the specified days, the alerting indication is also displayed in [Dashboard] - [System Health Status].
Lock Feature
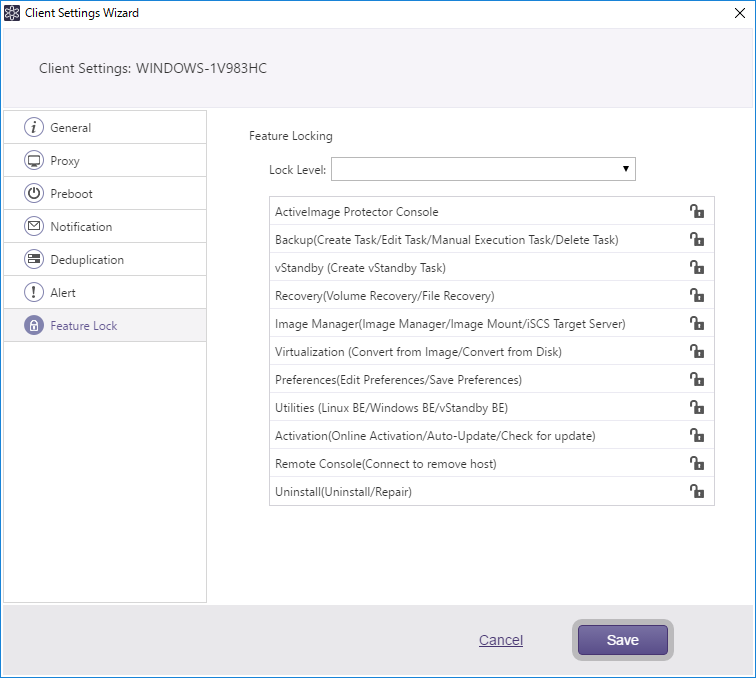
Lock specific features or operations using the ActiveImage console.
Edit HyperAgent Settings
Display the HyperAgent list in the [Agentless] tab by selecting a managed computer and clicking or double-click the [+] to expand the detailed information of the client. Click ![]() icon in the upper right-hand in [Status] tab to edit the settings.
icon in the upper right-hand in [Status] tab to edit the settings.
- You can select computers marked with a green icon (on-line).
Options
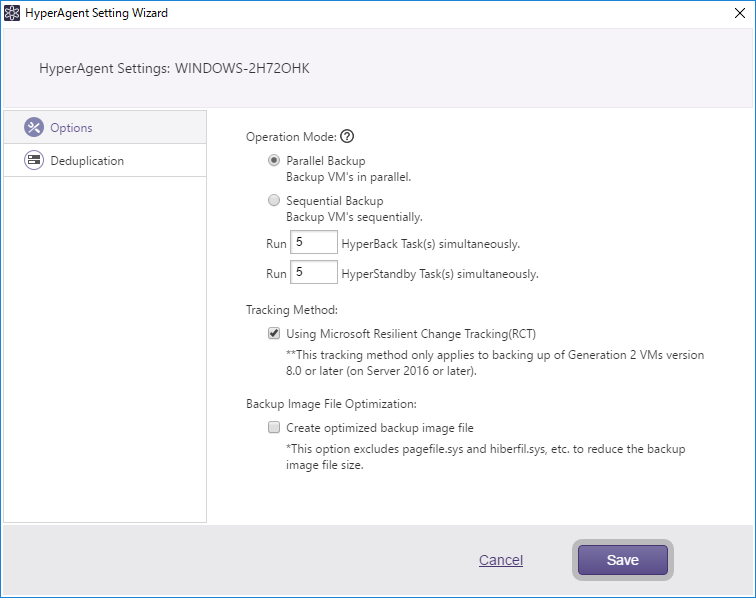
Configure the settings for HyperAgent that include the Agentless Backup feature.
-
Operation Mode Select one of the two operation mode options, i.e., [Parallel Backup] or [Sequential Backup]. When [Parallel Backup] is enabled, you can specify the concurrently executable number of HyperBack and HyperStandby tasks respectively. In the event that Post-backup Processing is enabled for HyperBack, Post-backup Processing behaves as follows:
-
BootCheck:The task is executed one after another.
-
Post-backup Processing except for BootCheck:Post-backup Processings are concurrently executed up to the same number as specified for HyperBack task.
-
-
Tracking Method Select one of the two tracking options when backing up Microsoft Hyper-V virtual machines. RCT can be applied only to backup of Generation 2 VMs versin 8.0 or later on Hyper-V (Windows Server 2016 or later).
-
Not to use RCT:Check points remains upon completion of the processing.
-
Using Microsoft Resilient Change Tracking (RCT):Check point does not remain after completing the processing.
-
-
Backup Image File Optimization You can select [Create optimized backup image file] option for backing up Microsoft Hyper-V virtual machines.
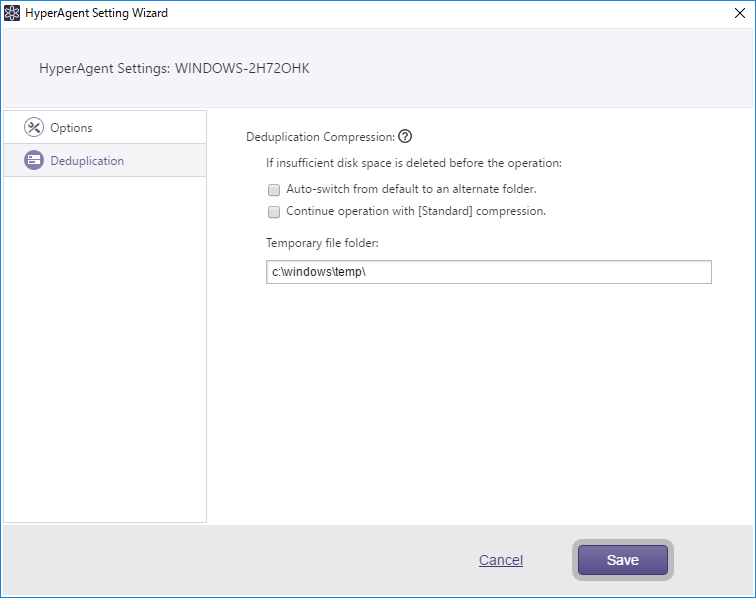
Deduplication
Configure the settings for Deduplication Compression.
-
Deduplication Settings
Enable [Deduplication Settings] to use the Deduplication Compression option by default. Select one of the three deduplication levels and the following options.-
Auto-switch from default to alternate folder The temporary folder used by deduplication will automatically switch-over if insufficient disk space is detected. Volumes with required available space are searched in ascending order of the assigned drive letters.
-
Continue operation with [Standard] compression Select this option to complete the backup task using the default Standard Compression.
-
-
Default Temporary File Folder
Specify the location for deduplication to process temporary files.