Create recovery media
The following are the operating procedures how to create a recovery media.
Create
Please select [Create Recovery Media] in the top window.

Media Type
Please select USB Device, ISO Image or Optical Disk.

Configure the settings for Boot Environment

-
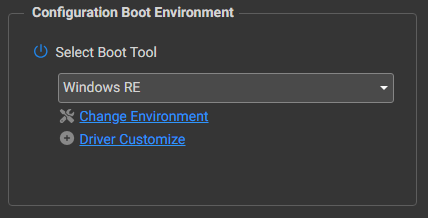
Select Boot Tool
Please select Windows RE or the tool to use from the installed Windows ADK. When using Windows ADK, please make sure the following components are installed.
-
Deployment Tools
-
Windows Preinstallation Environment (Windows PE)
If you selected the version that is not installed, a dialog is displayed prompting you to download and install Windows ADK. Please access Microsoft Web site to download and install Windows ADK of the selected version.
-
-
Boot Environment Settings Please select the preferred language, keyboard layout to configure the boot environment settings. Enable VNC Server to remotely operate the boot environment via VNC viewer.

-
Add Device Drivers
When using a device which the driver standard to Windows RE/PE does not support, please select the driver to add in the boot environment. Please click [Add Driver] to add drivers for the devices other than those detected by the computer on which the boot environment is created. The device driver must support the specified Windows PE version.
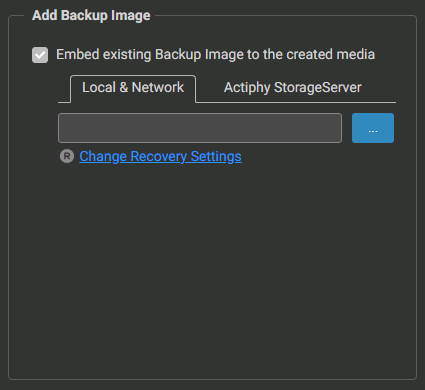
Add Backup Image
You can select an existing backup image saved in local or network shared folder, or StorageServer and add to the created media. When selecting a backup image located in Actiphy StorageServer, please click [Connect] to access Actiphy StorageServer over network and select a backup image.

Please edit the recovery settings if necessary.

-
Auto start recovery in xx seconds After booting from the created USB media, restore process will automatically start after the specified wait time.
-
Extend volumes Please select the following option.
-
Only extend data volumes Extend only data volume in the rear of the system volume.
-
Only extend system volumes Extend only system volume.
-
Expand all volumes proportionally The entire volumes are proportionally extended. This is not applied to the volume in front of the system volume.
-
Click [Next] and a dialog is displayed to ask if you want to save the configured settings in a template. If you want to save the settings, please specify the name of the template.
The path to the embedded backup image file and driver information are not saved in the template.
Create USB Media
Please select a media to create boot environment media. Uncheck the checkbox to exclude.

IT Pro supports a maximum number of 30 boot environment media to create at a time. If you want to create more than 30 boot environment media, please set the media again to create upon completion of the previous process.
Click [Execute] and the following dialog will be displayed. Click [OK] button to agree the warning message and the process will start. Click [X] in the upper right to cancel the process.

Overwriting on the created boot environment media purges the data on the media.
Create ISO file
Please make sure the system has available space larger than the image file size to embed in the ISO file.
Please specify the file name of ISO file and the destination to save the ISO file.

Please configure the following options settings.
-
Media Size
Please specify the media size to write ISO file.When selecting [Not specify], a single ISO file is created. This file cannot be split later.
If the ISO file is expected to be written on optical disk, you have to specify the media type. When the entire data does not fit into the specified size, the data have to be split into multiple files. -
Label
You can specify any volume label to be assigned to the disk. When divided into multiple media, numbers are assigned to the specified label.
Create Optical Disk
Please make sure the system has available space larger than the image file size to embed in the optical disk.

Please set the writable blank media in the optical media drive.
DVD-R, DVD-R DL, DVD-RW, BD-R, BD-R DL, BD-RE media are supported.
You can configure the following option settings.
-
Select optical drive automatically
The optical drive, when connected, is automatically selected to use. -
Label
You can specify any volume label to be attached to the disk. When divided into multiple media, numbers are assigned to the specified label. -
Verify Disk Write
The written data are verified upon completion of writing data. The process takes longer time. -
Auto Start Next Disk
When a new blank media is set, the process automatically starts to create bootable media.
When the entire data do not fit into the optical media, the data have to be split into multiple media. In that case, you need to have media of the same specifications and capacity.
Boot
Please set the created media in your computer. Please boot up the system by using IT Pro media.
Click [R] button to start recovery process.

Please contact the computer maker and ask for the operating procedures how to boot up the system from the media.
Unless you restore the backup image file split and saved in multiple ISO/optical disks, please do not eject the media while boot environment is running.