Migration of Virtual Machines / Migration Procedures
Migration of VM on Hyper-V
-
Select Hyper-V on a local host and enable [Enable Migration feature (vMotion) of Hyper-V] option and configure the boot settings.
When you shut down the virtual machine booted after enabling this option, the changes made while the virtual machine is running are not saved.
Migration to Hyper-V host using different CPU architecture is not supported.
-
Start up the virtual machine.
-
When the virtual machine boots up, access Hyper-V Manager and select [Move] in the right-click menu or the operation window.
-
Select the migration type in Migration Wizard, configure the required settings and start migration process.
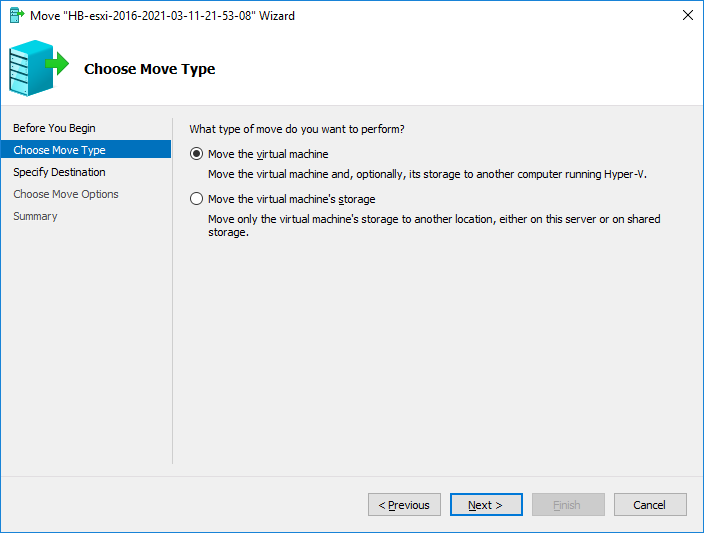
When migrating to the local storage, please select [Move storage area of virtual machine]. When migrating to Hyper-V on a different host, please select [Move the virtual machine].
Before starting migration of a virtual machine, please make sure the Live Migration feature is enabled between the two Hyper-V hosts.
The Live Migration feature can be enabled by selecting [Hyper-V Setting] - [Live Migration] - [Enable incoming and outgoing live migrations].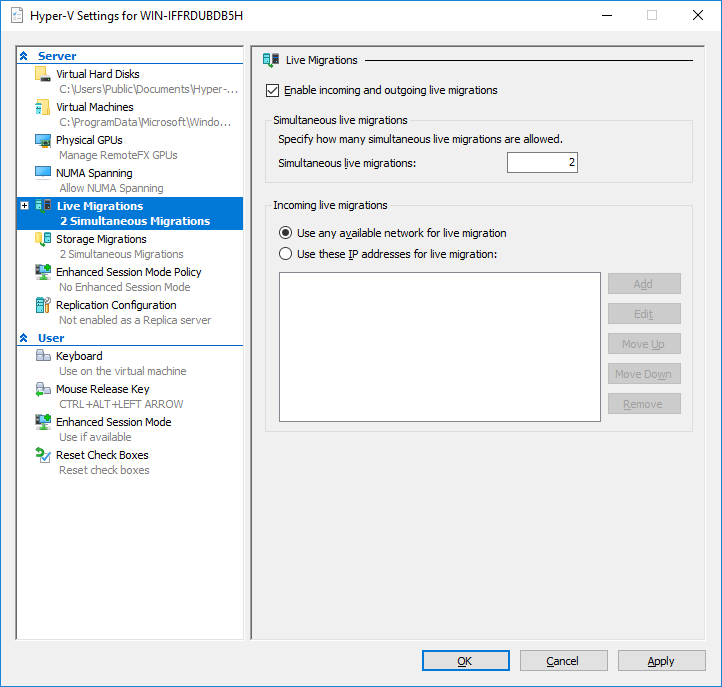
The operation on the virtual machine becomes heavy while migration is in progress.
Boot settings for the ActiveImage Protector Service is set to manual start on a booted machine. When continuing to use ActiveImage Protector on the migrated virtual machine, please set [ActiveImage Protector Service] and [ActiveImage Protector Notification Service] to [Auto] start.
While the migration process is in progress, please do not select [Shut-down] on HyperBoot. By selecting [Shut-down], the migrated virtual machine will be deleted upon completion of the migration process.
Migration under vCenter
-
Select ESXi under vCenter and select [Enable Migration feature (vMotion) of vCenter] in boot settings.
When shutting down the virtual machine booted after enabling this option, the changes made while the virtual machine is running are not saved.
-
Start up the virtual machine.
-
When the virtual machine boots up on ESXi host, go to Web console on vCenter and select [Migration] in Action menu.
Please make sure migration from ESXi host to another (vMotion) is enabled. vMotion can be enabled in [VMKernel Setting] - [Available Services] - [vMotion[.

-
Please select the migration type in [Migration Setting] dialog and configure the settings.
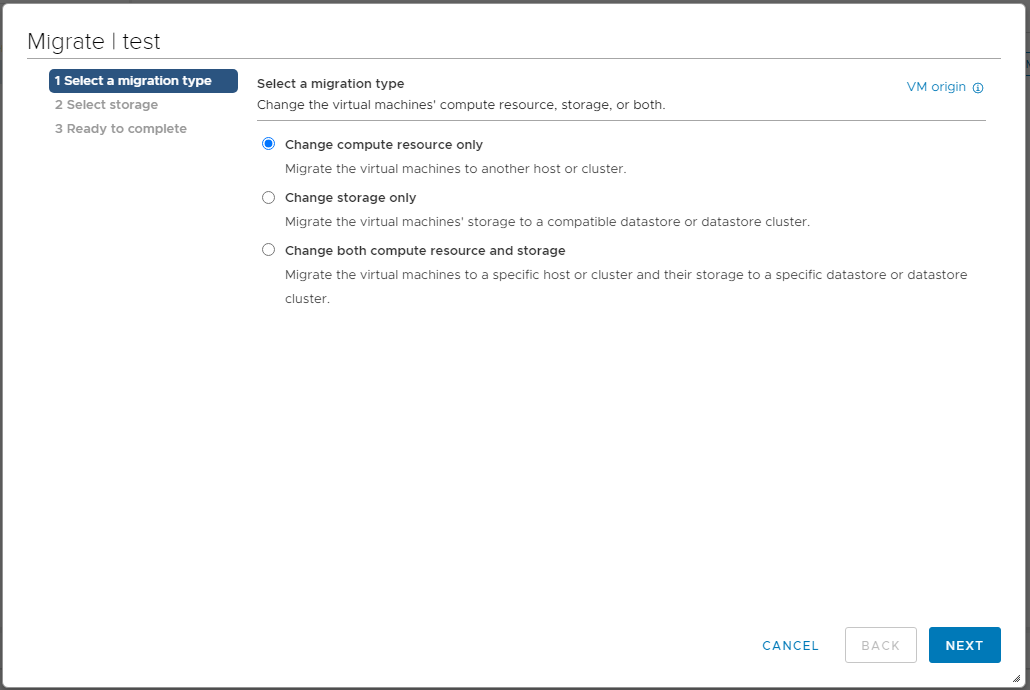
When migrating a virtual machine to datastore on ESXi host which is used for booting, please select [Change storage only].
When migrating a virtual machine to a different ESXi host managed under vCenter, please select [Change both computing resource and storage] in Migration Setting dialog and configure the required settings.If selecting a live ESXi host as the migration destination, please select a datastore except for [HyperBoot_Data (n)].
* This datastore, temporary datastore created by HyperBoot, will be deleted when the virtual machine is shut down.When selecting an option other than [Shin Provisioning] in [Select Storage] dialog, a new VMDK will be created for the disk size.
The behavior of the virtual machine becomes heavy in migration processing.
ActiveImage Protector Service is set to [Manual] start on the booted virtual machine. If continuing to use ActiveImage Protector on the migrated virtual machine, please set to [Manual] start [ActiveImage Protector Service] and [ActiveImage Protector Notification Service].
Please do not select [Power off] in HyperBoot during migration processing. If [Power off] is selected, the migrated virtual machine will be deleted upon completion of migration processing.