Virtual Conversion
Specify the destination host. Available destination and the settings should differ depending on the Convert Type selected in above step 1.
Conversion to virtual machine
for VMware Products
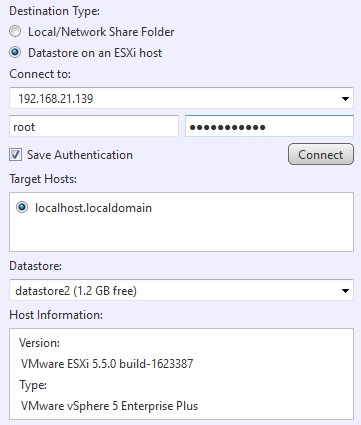
Select a datastore on the vCenter Server of the VMware vSphere or ESXi hypervisor as the conversion target. Version 5.0 or later are supported as the target. Specify the target host and click [Connect]. When the connection is successfully established, the following information is displayed in the window.
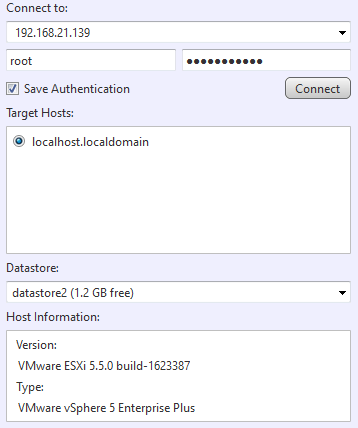
When selecting the datastore as the target, configure the settings for the virtual machine.
-
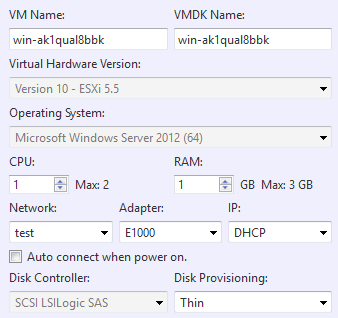
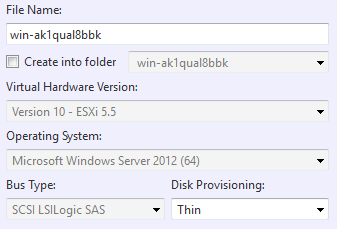
VM Name
The default name can be changed.Double-byte characters cannot be used to specify the name.
-
VMDK Name
The default name can be changed.Double-byte characters cannot be used to specify the name.
-
Virtual Machine Version
To be determined depending on the version of the target host. -
OS
To be determined depending on the operating system information of the source backup.The SCSI controller type of the virtual machine is determined depending on OS.
-
CPU
Assign the number of CPUs on the destination host. -
RAM
Specify the amount of RAM on the destination host. -
Network Select a network option available on the destination host.
Network name with double-byte characters is not indicated.
-
Adapter Only VMXNET3 can be specified.
-
IP
Only DHCP can be selected. -
Auto connect when power on.
With this option enabled, the virtual machine, when booting up after conversion process is network connected. -
Disk Provisioning
Thin or Thick provisioning (Lazy Zeroed) can be selected.
Post Task Execution Processing ([Reboot] or [Shutdown]) can be selected.

For Microsoft Hyper-V
A share folder is created on Microsoft Hyper-V host as the conversion target. Version 2008 R2 or later is supported as the target.
Ensure Microsoft .NET Framework 4 or later is configured on the conversion source host.
When using Hyper-V on a remote computer, please ensure that Administrative share is enabled on the managed remote computer.
After specifying the connection target, click [Connect]. When the connection is successfully established, the following information is displayed.
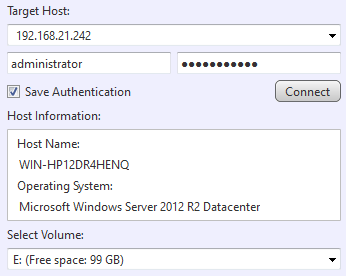
Select the volume and folder and configure the settings for the virtual machine.
-
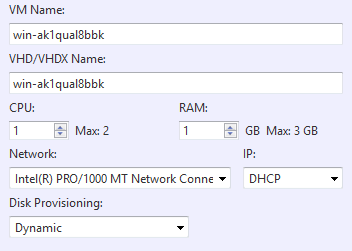
VM Name
The default name can be changed.Double-byte characters cannot be used to specify the name.
-
VHD/VHDX Name
The default name can be changed.Double-byte characters cannot be used to specify the name.
-
CPU
Specify the number of CPUs assigned on the destination host. -
RAM
Specify the amount of RAM on the destination host. -
Network
Select a network option available on the destination host. -
IP
Only DHCP can be selected. -
Disk Provisioning
Select Dynamic or Static.
Post Task Execution Processing ([Reboot] or [Shutdown]) can be selected.
for KVM
Select KVM host for conversion target.
When establishing the connection to KVM host, you need to enter root account information. You also need to allow SSH access as root on the Linux host.
Please make sure targetcl or targetcli-fb is configured on Linux host. Also, please configure your firewall to allow the connection to iSCSI-target service.
Specify the target host and click [Connect]. When the connection is successfully established, the following information is displayed in the window.
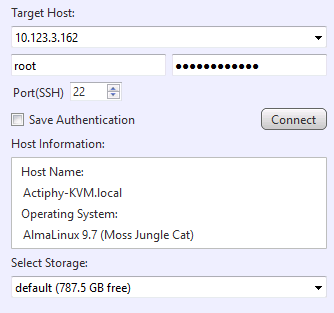
When selecting the datastore as the target, configure the settings for the virtual machine.
-
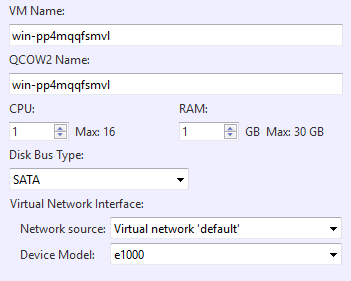
VM Name
Specify the name of standby virtual machine to create. -
QCOW2 Name
Specify the hard disk name of standby virtual machine to create. -
CPU
Assign the number of CPUs for the standby VM. The number of CPUs assigned to the conversion target host is the maximum limit. -
RAM
Specify the amount of memory allocated to the standby VM. -
Disk Bus Type Specify the virtual disk bus type.
-
Network Source Select the network source to use. When selecting bridge device, please specify the device name to use.
-
Device Mocel Select the device model to use.
As an option for Post-Task Execution Processing, you can select [System Restart] or [System Shut-down].
for Proxmox
Select Proxmox host for conversion target.
After selecting the connection target, click [Connect]. When the connection is successfully established, the following information is displayed.
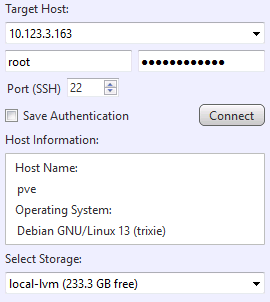
When selecting the datastore as the target, configure the settings for the virtual machine.
-
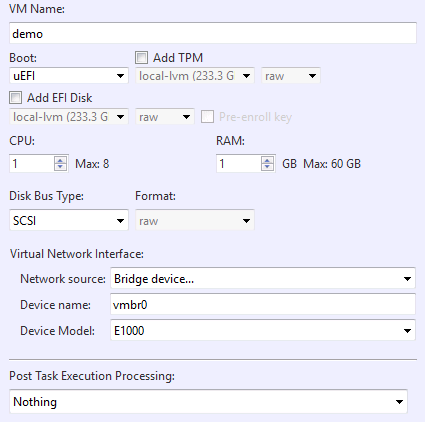
VM Name
Specify the name of standby virtual machine to create. -
Storage
Specify the destination storage on Proxmox host to create virtual hard disk. -
Disk Bus Type/Format Specify the virtual disk bus type and format.
-
CPU
Assign the number of virtual CPUs for the standby VM. -
RAM
Specify the amount of memory allocated to the standby VM.You can add TPM or EFI disks as needed.
When creating a virtual standby replica with SecureBoot enabled, you are recommended to add an EFI disk with [Standard Distribution Key] enabled. If not enabling, SecureBoot is disabled on the created virtual standby replica.
-
Network Source Select the network source to use.
-
Device Model Select the device model to use.
An option ([Reboot/Shutdown]) is provided to select for the Post Task Execution Processing.
Conversion to virtual disk
for VMware Products
Define by clicking the radio button to create the virtual machine file to a [Local/Network Share Folder] or a datastore on a vCenter Server on a VMware vSphere or ESXi hypervisor.
If a datastore is selected as the target, specify the target host to connect to and click on [Connect]. Upon establishing a successful connection to the host, the following information will be displayed in the window.
If a datastore on ESXi hypervisor is selected as the conversion target, Versions 5.0 to 6.0 are supported.
After specifying the target, configure the settings for the virtual disk.
-
File Name
The default name can be changed.Double-byte characters cannot be used to specify the name.
-
Create into folder
The file is created in a folder in the datastore. The option is provided to create a new folder.Double-byte characters cannot be used to specify the name.
-
Virtual Machine Version
To be determined depending on the version of the destination host. -
OS
To be determined depending on the operating system information of the source backup. -
Disk Provisioning
Thin or Thick Provisioning (Lazy Zeroed) can be selected.
To create the virtual disk on local or network share folder, specify the target and configure the settings for the virtual disk.

-
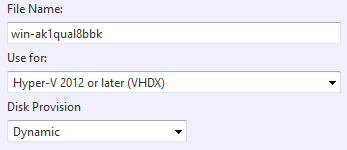
File Name
The default name can be changed.Double-byte characters cannot be used to specify the name.
-
Use for Select the virtual environment to use the created virtual disk.
-
Disk Provisioning Thin or Thick Provisioning can be selected.
If you select ESXi for [Use for], Thick Provisioning is selected.
Post Task Execution Processing ([Reboot] or [Shutdown]) can be selected.
For Microsoft Hyper-V host
Specify local or network shared folder to create a virtual disk.
After specifying the target, please configure the settings for the virtual disk.
-
File Name
The default name can be changed.Double-byte characters cannot be used to specify the name.
-
Use for
Select the virtual environment to use the created virtual disk. -
Disk Provision
Select Dynamic or Static.
Post Task Execution Processing ([Reboot] or [Shutdown]) can be selected.
for KVM
Select KVM host for conversion target.
When establishing the connection to KVM host, you need to enter root account information. You also need to allow SSH access as root on the Linux host.
Please make sure targetcl or targetcli-fb is configured on Linux host. Also, please configure your firewall to allow the connection to iSCSI-target service.
Specify the target host and click [Connect]. When the connection is successfully established, the following information is displayed in the window.
When selecting the datastore as the target, configure the settings for the virtual machine.
-
VM Name
Specify the name of standby virtual machine to create. -
QCOW2 Name
Specify the hard disk name of standby virtual machine to create. -
CPU
Assign the number of CPUs for the standby VM. The number of CPUs assigned to the conversion target host is the maximum limit. -
RAM
Specify the amount of memory allocated to the standby VM. -
Disk Bus Type Specify the virtual disk bus type.
-
Network Source Select the network source to use. When selecting bridge device, please specify the device name to use.
-
Device Mocel Select the device model to use.
As an option for Post-Task Execution Processing, you can select [System Restart] or [System Shut-down].